Supply Demand là gì — อุปสงค์อุปทานฉบับสมบูรณ์
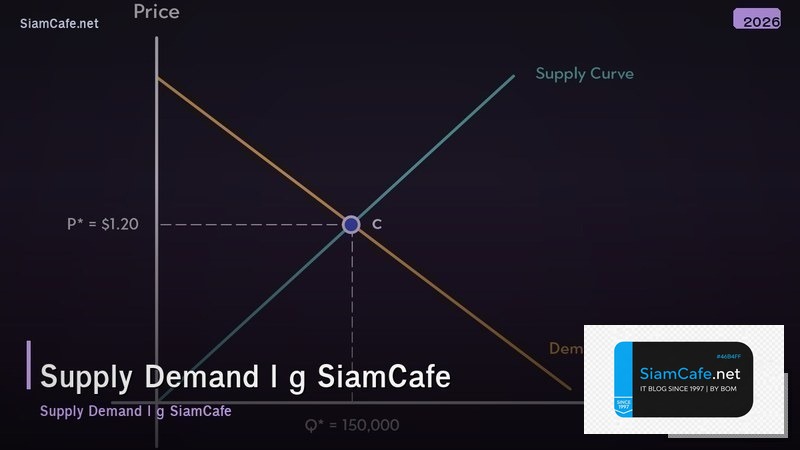
Supply Demand
Supply Demand อุปสงค์ อุปทาน Zone Price Action Rally Base Drop Equilibrium Trading Strategy Forex หุ้น Crypto
| Concept | Supply (อุปทาน) | Demand (อุปสงค์) |
|---|---|---|
| ความหมาย | ผู้ขายต้องการขาย | ผู้ซื้อต้องการซื้อ |
| Price Action | Rally-Base-Drop | Drop-Base-Rally |
| Zone เหมือน | Resistance (แนวต้าน) | Support (แนวรับ) |
| ราคาเมื่อถึง Zone | มักจะลง | มักจะขึ้น |
| Entry | Sell ที่ Zone | Buy ที่ Zone |
| Stop Loss | เหนือ Zone | ใต้ Zone |
| Candlestick | Bearish Engulfing | Bullish Engulfing |
Zone Identification
# === Supply Demand Zone Identification ===

from dataclasses import dataclass

@dataclass
class SDZone:
 zone_type: str
 formation: str
 high: float
 low: float
 strength: str
 fresh: bool
 timeframe: str

zones = [
 SDZone("Demand", "Drop-Base-Rally", 1.0850, 1.0820, "Strong", True, "H4"),
 SDZone("Demand", "Rally-Base-Rally", 1.0750, 1.0730, "Medium", False, "H4"),
 SDZone("Supply", "Rally-Base-Drop", 1.0980, 1.1010, "Strong", True, "H4"),
 SDZone("Supply", "Drop-Base-Drop", 1.1050, 1.1080, "Weak", False, "H4"),
 SDZone("Demand", "Drop-Base-Rally", 1.0700, 1.0680, "Strong", True, "Daily"),
 SDZone("Supply", "Rally-Base-Drop", 1.1100, 1.1130, "Strong", True, "Daily"),
]

print("=== Supply Demand Zones (EURUSD) ===")
for z in zones:
 fresh = "FRESH" if z.fresh else "TESTED"
 print(f" [{z.zone_type}] {z.low:.4f} - {z.high:.4f} | {z.timeframe}")
 print(f" Formation: {z.formation}")
 print(f" Strength: {z.strength} | Status: {fresh}")

# Zone Quality Scoring
def score_zone(zone):
 score = 0
 # Fresh zone = +3
 if zone.fresh:
 score += 3
 # Strong move = +2
 if zone.strength == "Strong":
 score += 2
 elif zone.strength == "Medium":
 score += 1
 # Higher timeframe = +2
 if zone.timeframe in ["Daily", "Weekly"]:
 score += 2
 elif zone.timeframe == "H4":
 score += 1
 # RBD/DBR = +1 (better formation)
 if zone.formation in ["Rally-Base-Drop", "Drop-Base-Rally"]:
 score += 1
 return score

print(f"\nZone Quality Scores:")
for z in zones:
 s = score_zone(z)
 grade = "A" if s >= 7 else "B" if s >= 5 else "C"
 print(f" [{z.zone_type} {z.low:.4f}] Score: {s}/8 Grade: {grade}")
Trading Strategy
# === Supply Demand Trading Strategy ===

@dataclass
class TradeSetup:
 pair: str
 direction: str
 zone_type: str
 entry: float
 stop_loss: float
 target: float
 risk_reward: float
 confirmation: str

setups = [
 TradeSetup("EURUSD", "Buy", "Demand", 1.0825, 1.0795, 1.0920, 3.17,
 "Bullish Engulfing at Demand Zone"),
 TradeSetup("EURUSD", "Sell", "Supply", 1.0985, 1.1015, 1.0855, 4.33,
 "Bearish Pin Bar at Supply Zone"),
 TradeSetup("GBPUSD", "Buy", "Demand", 1.2650, 1.2620, 1.2780, 4.33,
 "Morning Star at Fresh Demand"),
 TradeSetup("USDJPY", "Sell", "Supply", 150.80, 151.10, 149.90, 3.0,
 "Shooting Star at Daily Supply"),
]

print("=== Trade Setups ===")
for t in setups:
 risk = abs(t.entry - t.stop_loss)
 reward = abs(t.target - t.entry)
 print(f" [{t.pair}] {t.direction} at {t.zone_type} Zone")
 print(f" Entry: {t.entry} | SL: {t.stop_loss} | TP: {t.target}")
 print(f" Risk: {risk:.4f} | Reward: {reward:.4f} | R:R: 1:{t.risk_reward:.1f}")
 print(f" Confirm: {t.confirmation}")

# Trading Rules
rules = {
 "Rule 1": "เทรดเฉพาะ Fresh Zone ที่ยังไม่เคยถูก Test",
 "Rule 2": "ใช้ Higher TF (/H4) หา Zone, Lower TF (H1/) หา Entry",
 "Rule 3": "รอ Confirmation Candlestick ก่อน Entry ไม่ใช้ Limit Order",
 "Rule 4": "Stop Loss ใต้/เหนือ Zone ห้ามย้าย SL ออก",
 "Rule 5": "Risk Reward อย่างน้อย 1:2 ไม่เทรดถ้า R:R ต่ำกว่า",
 "Rule 6": "ถ้า Zone ถูก Break ด้วย Strong Candle ยกเลิกทันที",
 "Rule 7": "Risk ไม่เกิน 1% ต่อ Trade",
 "Rule 8": "ไม่เทรดก่อน/หลัง News สำคัญ 30 นาที",
}

print(f"\n\nTrading Rules:")
for k, v in rules.items():
 print(f" [{k}]: {v}")
Multi-timeframe Analysis
# === Multi-timeframe SD Analysis ===

@dataclass
class MTFAnalysis:
 timeframe: str
 trend: str
 nearest_zone: str
 zone_level: str
 bias: str

analysis = [
 MTFAnalysis("Monthly", "Uptrend", "Demand 1.0500", "Major", "Bullish"),
 MTFAnalysis("Weekly", "Ranging", "Supply 1.1100 / Demand 1.0700", "Major", "Neutral"),
 MTFAnalysis("Daily", "Downtrend short-term", "Supply 1.0980 / Demand 1.0700", "Intermediate", "Bearish"),
 MTFAnalysis("H4", "Downtrend", "Supply 1.0980 / Demand 1.0820", "Minor", "Bearish"),
 MTFAnalysis("H1", "Ranging", "Near Demand 1.0820", "Entry", "Watch for Buy"),
]

print("=== Multi-timeframe Analysis (EURUSD) ===")
for a in analysis:
 print(f" [{a.timeframe}] Trend: {a.trend} | Bias: {a.bias}")
 print(f" Zones: {a.nearest_zone} ({a.zone_level})")

# Decision Matrix
decisions = {
 "HTF Bullish + LTF at Demand": "BUY — Strong setup, trend aligned",
 "HTF Bullish + LTF at Supply": "WAIT — Counter-trend, skip",
 "HTF Bearish + LTF at Supply": "SELL — Strong setup, trend aligned",
 "HTF Bearish + LTF at Demand": "WAIT — Counter-trend, skip",
 "HTF Ranging + LTF at Demand": "BUY — With tight SL, reduced size",
 "HTF Ranging + LTF at Supply": "SELL — With tight SL, reduced size",
}

print(f"\n\nDecision Matrix:")
for k, v in decisions.items():
 print(f" [{k}]")
 print(f" Action: {v}")
เคล็ดลับ
- Fresh: เทรดเฉพาะ Fresh Zone ที่ยังไม่เคยถูก Test
- MTF: ใช้ Higher Timeframe หา Zone Lower Timeframe หา Entry
- Confirm: รอ Candlestick Confirmation ก่อน Entry เสมอ
- R:R: Risk Reward อย่างน้อย 1:2 ไม่เทรดถ้าต่ำกว่า
- Break: ถ้า Zone ถูก Break ด้วย Strong Candle ยกเลิกทันที
การนำความรู้ไปประยุกต์ใช้งานจริง
แหล่งเรียนรู้ที่แนะนำ ได้แก่ Official Documentation ที่อัพเดทล่าสุดเสมอ Online Course จาก Coursera Udemy edX ช่อง YouTube คุณภาพทั้งไทยและอังกฤษ และ Community อย่าง Discord Reddit Stack Overflow ที่ช่วยแลกเปลี่ยนประสบการณ์กับนักพัฒนาทั่วโลก
เนื้อหาเกี่ยวข้อง — SOPS Encryption Batch Processing Pipeline
Supply Demand คืออะไร
อุปทาน ผู้ขาย อุปสงค์ ผู้ซื้อ Supply มาก ราคาลง Demand มาก ราคาขึ้น Equilibrium สมดุล ทุกตลาด หุ้น Forex Crypto อสังหา
Supply Demand Zone คืออะไร
Supply Zone ผู้ขายมาก ราคาลง Resistance โซน Demand Zone ผู้ซื้อมาก ราคาขึ้น Support โซน Price Action ราคาเคลื่อนแรง Zone แข็งแกร่ง
แนะนำเพิ่มเติม — XM Signal
เนื้อหาเกี่ยวข้อง — บทความที่เกี่ยวข้อง: Midjourney Prompt Site Reliability SRE — คู่มือฉบับสมบูรณ์ 2026
หา Supply Demand Zone อย่างไร
Rally-Base-Drop Supply Drop-Base-Rally Demand Strong Move Base แคบ Fresh Zone ไม่เคย Test Higher Timeframe Volume Confirmation
เนื้อหาเกี่ยวข้อง — อ่านต่อ: Arimbi MQL5 — คู่มือเทรด Forex ฉบับสมบูรณ์ 2026 — คู่มือฉบับสมบูรณ์ 2026
เทรดด้วย Supply Demand อย่างไร
Buy Demand Zone SL ใต้ Zone TP Supply ถัดไป Sell Supply Zone SL เหนือ Higher TF Zone Lower TF Entry Confirmation R:R 1:2 Break ยกเลิก
แนะนำเพิ่มเติม — อีบุ๊กการลงทุน SiamCafeBook
สรุป
Supply Demand อุปสงค์ อุปทาน Zone Rally Base Drop Fresh MTF Multi-timeframe Confirmation Price Action Trading Strategy Risk Reward
เนื้อหาเกี่ยวข้อง — ดูเพิ่มเติมเรื่อง MQL5 Adalah — คู่มือเทรด Forex ฉบับสมบูรณ์ 2026
ทดลองเทรดฟรี XM — โบรกที่ อ.บอม ใช้เทรดจริง (พาร์ทเนอร์ XM)