GraphQL คืออะไร? สอน GraphQL ตั้งแต่เริ่มต้น เปรียบเทียบกับ REST API สำหรับ Developer 2026

ในโลกของ API Development ปี 2026 GraphQL กลายเป็นเทคโนโลยีที่ได้รับความนิยมเพิ่มขึ้นอย่างต่อเนื่อง ตั้งแต่ Facebook เปิดตัวเป็น Open Source ในปี 2015 จนถึงวันนี้ บริษัทยักษ์ใหญ่อย่าง GitHub, Shopify, Twitter, Netflix และ Airbnb ต่างนำ GraphQL มาใช้ในระบบ Production ของตัวเอง บทความนี้จะสอน GraphQL ตั้งแต่เริ่มต้นจนถึงระดับ Advanced เปรียบเทียบกับ REST API อย่างละเอียด พร้อมตัวอย่างโค้ดที่ใช้งานได้จริงทั้ง Server และ Client side
GraphQL คืออะไร?

GraphQL (Graph Query Language) คือภาษาสำหรับ Query ข้อมูลจาก API ที่พัฒนาโดย Facebook ในปี 2012 และเปิดเป็น Open Source ในปี 2015 แนวคิดหลักของ GraphQL คือให้ Client เป็นคนกำหนดว่าต้องการข้อมูลอะไรบ้าง แทนที่จะให้ Server เป็นคนกำหนดรูปแบบข้อมูลที่จะส่งกลับมาเหมือน REST API แบบเดิม
อ่านเพิ่ม: gRPC และ Protocol Buffers คืออะไร? สอนสร้าง High-Performance · อ่านเพิ่ม: Supabase คืออะไร? ทางเลือก Firebase แบบ Open Source สำหรับ F · อ่านเพิ่ม: Java และ Spring Boot คืออะไร? สอนสร้าง Backend API ด้วย Spri
GraphQL ไม่ใช่ Database และไม่ใช่ Framework แต่เป็น Specification ที่กำหนดวิธีการสื่อสารระหว่าง Client กับ Server โดยมีคุณสมบัติสำคัญดังนี้:
- Single Endpoint — ใช้ URL เดียว (เช่น
/graphql) สำหรับทุก Operation ต่างจาก REST ที่มีหลาย Endpoint - Declarative Data Fetching — Client ระบุว่าต้องการ Field อะไรบ้าง Server ส่งกลับเฉพาะสิ่งที่ขอ
- Strongly Typed Schema — มี Type System ที่ชัดเจน ทำให้ตรวจสอบ Query ได้ก่อน Execute
- Introspection — Client สามารถ Query Schema ของ API ได้ ทำให้เครื่องมืออย่าง GraphQL Playground สร้าง Documentation อัตโนมัติ
- Hierarchical — โครงสร้าง Query เป็นแบบ Tree ตรงกับโครงสร้างข้อมูลที่ต้องการ
GraphQL vs REST API — เปรียบเทียบอย่างละเอียด
เพื่อให้เข้าใจว่า GraphQL แก้ปัญหาอะไรของ REST ลองดูตัวอย่างสถานการณ์จริง สมมติเราต้องการแสดงข้อมูลโปรไฟล์ผู้ใช้ที่มี ชื่อ, อีเมล, โพสต์ล่าสุด 5 รายการ และจำนวน Followers
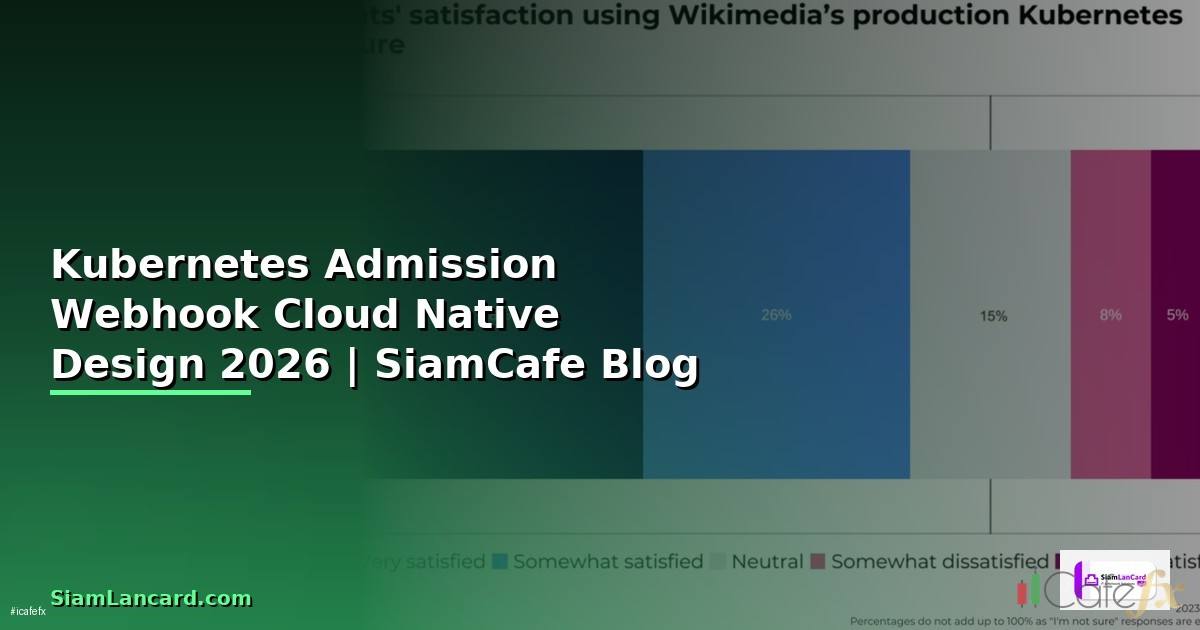
เนื้อหาเกี่ยวข้อง — Kubernetes Admission Webhook Cloud Native Design
แบบ REST API (หลาย Request)
# Request 1: ข้อมูลผู้ใช้
GET /api/users/123
# Response: ได้ข้อมูลทั้งหมดของ User (ทั้งที่ต้องการแค่ name, email)
# Over-fetching: ได้ address, phone, settings มาด้วยทั้งที่ไม่ต้องการ

# Request 2: โพสต์ของผู้ใช้
GET /api/users/123/posts?limit=5
# Response: ได้โพสต์พร้อม field ที่ไม่ต้องการ

# Request 3: จำนวน Followers
GET /api/users/123/followers/count
# Response: ได้จำนวน followers

# ปัญหา: 3 Requests, Over-fetching, Under-fetching
แบบ GraphQL (Request เดียว)
# Request เดียว — ได้ข้อมูลเฉพาะที่ต้องการ
query {
  user(id: "123") {
    name
    email
    posts(limit: 5) {
      title
      createdAt
    }
    followersCount
  }
}

# Response: ได้เฉพาะ field ที่ขอเท่านั้น ไม่เกินไม่ขาด| คุณสมบัติ | REST API | GraphQL |
|---|---|---|
| Endpoint | หลาย URL (เช่น /users, /posts) | URL เดียว (/graphql) |
| Data Fetching | Server กำหนดรูปแบบข้อมูล | Client กำหนด field ที่ต้องการ |
| Over-fetching | พบบ่อย (ได้ข้อมูลเกินจำเป็น) | ไม่มี (ได้เฉพาะที่ขอ) |
| Under-fetching | ต้องเรียกหลาย Endpoint | ขอทุกอย่างใน Query เดียว |
| Versioning | ต้องทำ v1, v2, v3 | ไม่จำเป็น (เพิ่ม field ใหม่ได้เลย) |
| Type System | ไม่มีในตัว (ต้องใช้ OpenAPI/Swagger) | มี Type System ในตัว |
| Caching | ง่าย (HTTP Caching) | ซับซ้อนกว่า (ต้องใช้ Library) |
| File Upload | ง่าย (multipart/form-data) | ต้องใช้ spec เพิ่ม |
| Learning Curve | ต่ำ | สูงกว่า |
| เหมาะกับ | CRUD ง่ายๆ, Public API | Complex data, Mobile, BFF |
Schema Definition — หัวใจของ GraphQL
Schema คือ Contract ระหว่าง Client กับ Server ที่กำหนดว่า API มีข้อมูลอะไรบ้าง Query อะไรได้ และ Mutate อะไรได้ Schema เขียนด้วย SDL (Schema Definition Language)
Scalar Types (ชนิดข้อมูลพื้นฐาน)
# Built-in Scalar Types
Int       # จำนวนเต็ม 32-bit
Float     # ทศนิยม
String    # ข้อความ UTF-8
Boolean   # true/false
ID        # Unique Identifier (เก็บเป็น String)

# Custom Scalar (สร้างเอง)
scalar DateTime
scalar Email
scalar URL
scalar JSON
Object Types
# กำหนด Type ของข้อมูล
type User {
  id: ID!                    # ! = non-nullable (ต้องมีค่า)
  name: String!
  email: String!
  age: Int
  bio: String
  avatar: URL
  posts: [Post!]!            # Array ของ Post (ทั้ง Array และ Item ต้องไม่เป็น null)
  followers: [User!]!
  followersCount: Int!
  createdAt: DateTime!
}

type Post {
  id: ID!
  title: String!
  content: String!
  published: Boolean!
  author: User!              # Relationship กลับไปหา User
  tags: [Tag!]!
  comments: [Comment!]!
  likes: Int!
  createdAt: DateTime!
  updatedAt: DateTime!
}

type Comment {
  id: ID!
  text: String!
  author: User!
  post: Post!
  createdAt: DateTime!
}

type Tag {
  id: ID!
  name: String!
  posts: [Post!]!
}
Enum Types
enum Role {
  ADMIN
  EDITOR
  USER
  GUEST
}

enum PostStatus {
  DRAFT
  PUBLISHED
  ARCHIVED
}

type User {
  id: ID!
  name: String!
  role: Role!
}
Input Types (สำหรับ Arguments)
input CreateUserInput {
  name: String!
  email: String!
  age: Int
  role: Role = USER          # Default value
}

input UpdateUserInput {
  name: String
  email: String
  age: Int
  bio: String
}

input PostFilterInput {
  status: PostStatus
  tag: String
  authorId: ID
  searchTerm: String
}
Interface และ Union Types
# Interface — ใช้เมื่อหลาย Type มี field ร่วมกัน
interface Node {
  id: ID!
  createdAt: DateTime!
}

type User implements Node {
  id: ID!
  createdAt: DateTime!
  name: String!
  email: String!
}

type Post implements Node {
  id: ID!
  createdAt: DateTime!
  title: String!
  content: String!
}

# Union — ใช้เมื่อ field อาจเป็นได้หลาย Type
union SearchResult = User | Post | Comment

type Query {
  search(term: String!): [SearchResult!]!
}
Queries, Mutations และ Subscriptions
GraphQL มี Operation 3 ประเภทหลัก:
แนะนำเพิ่มเติม — แหล่งความรู้ Forex iCafeForex
1. Query — อ่านข้อมูล
# Schema definition
type Query {
  user(id: ID!): User
  users(limit: Int, offset: Int): [User!]!
  post(id: ID!): Post
  posts(filter: PostFilterInput): [Post!]!
  me: User                   # ผู้ใช้ปัจจุบัน (จาก token)
}

# Client query
query GetUserProfile {
  user(id: "123") {
    name
    email
    posts(limit: 5) {
      title
      createdAt
      comments {
        text
        author {
          name
        }
      }
    }
  }
}

# Query with multiple root fields
query Dashboard {
  me {
    name
    role
  }
  recentPosts: posts(filter: { status: PUBLISHED }) {
    title
    likes
  }
  totalUsers: users {
    id
  }
}
2. Mutation — เปลี่ยนแปลงข้อมูล
# Schema definition
type Mutation {
  createUser(input: CreateUserInput!): User!
  updateUser(id: ID!, input: UpdateUserInput!): User!
  deleteUser(id: ID!): Boolean!
  createPost(title: String!, content: String!, tags: [String!]): Post!
  likePost(id: ID!): Post!
  addComment(postId: ID!, text: String!): Comment!
}

# Client mutation
mutation CreateNewUser {
  createUser(input: {
    name: "สมชาย"
    email: "somchai@example.com"
    age: 28
    role: USER
  }) {
    id
    name
    email
    createdAt
  }
}

mutation UpdateMyProfile {
  updateUser(id: "123", input: {
    name: "สมชาย ใจดี"
    bio: "Full-stack Developer"
  }) {
    id
    name
    bio
  }
}
3. Subscription — รับข้อมูลแบบ Real-time
# Schema definition
type Subscription {
  postCreated: Post!
  commentAdded(postId: ID!): Comment!
  userOnlineStatus(userId: ID!): OnlineStatus!
}

type OnlineStatus {
  userId: ID!
  isOnline: Boolean!
  lastSeen: DateTime
}

# Client subscription (ใช้ WebSocket)
subscription OnNewComment {
  commentAdded(postId: "456") {
    text
    author {
      name
      avatar
    }
    createdAt
  }
}
Resolvers — ตัวดึงข้อมูลจริง
Resolver คือฟังก์ชันที่รับผิดชอบในการดึงข้อมูลสำหรับแต่ละ Field ใน Schema เมื่อ Client ส่ง Query มา GraphQL Server จะเรียก Resolver ที่เกี่ยวข้องเพื่อสร้าง Response
// Resolver function signature
// parent: ผลลัพธ์จาก Resolver ระดับบน
// args: arguments ที่ส่งมาจาก Query
// context: shared data (เช่น database connection, user info)
// info: metadata ของ Query

const resolvers = {
  Query: {
    user: async (parent, { id }, context) => {
      return await context.db.users.findById(id);
    },
    users: async (parent, { limit = 10, offset = 0 }, context) => {
      return await context.db.users.findAll({ limit, offset });
    },
    me: async (parent, args, context) => {
      if (!context.user) throw new AuthenticationError('Not logged in');
      return await context.db.users.findById(context.user.id);
    },
    posts: async (parent, { filter }, context) => {
      const where = {};
      if (filter?.status) where.status = filter.status;
      if (filter?.tag) where.tags = { $contains: filter.tag };
      if (filter?.searchTerm) where.title = { $like: `%${filter.searchTerm}%` };
      return await context.db.posts.findAll({ where });
    },
  },

  Mutation: {
    createUser: async (parent, { input }, context) => {
      return await context.db.users.create(input);
    },
    updateUser: async (parent, { id, input }, context) => {
      await context.db.users.update(id, input);
      return await context.db.users.findById(id);
    },
    likePost: async (parent, { id }, context) => {
      return await context.db.posts.incrementLikes(id);
    },
  },

  // Field-level resolvers (Nested)
  User: {
    posts: async (user, args, context) => {
      return await context.db.posts.findByAuthor(user.id);
    },
    followersCount: async (user, args, context) => {
      return await context.db.followers.count({ followingId: user.id });
    },
  },

  Post: {
    author: async (post, args, context) => {
      return await context.db.users.findById(post.authorId);
    },
    comments: async (post, args, context) => {
      return await context.db.comments.findByPost(post.id);
    },
  },
};
Apollo Server — สร้าง GraphQL Server ด้วย Node.js
Apollo Server เป็น Library ที่ได้รับความนิยมสูงสุดสำหรับสร้าง GraphQL Server บน Node.js มาดูวิธีเริ่มต้นจากศูนย์
เนื้อหาเกี่ยวข้อง — แนะนำให้อ่าน Nextra MDX CI CD Automation Pipeline
ติดตั้งและตั้งค่าเบื้องต้น
# สร้างโปรเจกต์
mkdir graphql-server && cd graphql-server
npm init -y
npm install @apollo/server graphql

# สำหรับ Database
npm install @prisma/client prisma
npx prisma init
ตัวอย่าง Server แบบสมบูรณ์
// server.js
import { ApolloServer } from '@apollo/server';
import { startStandaloneServer } from '@apollo/server/standalone';

// Type Definitions (Schema)
const typeDefs = `#graphql
  type User {
    id: ID!
    name: String!
    email: String!
    posts: [Post!]!
  }

  type Post {
    id: ID!
    title: String!
    content: String!
    published: Boolean!
    author: User!
  }

  type Query {
    users: [User!]!
    user(id: ID!): User
    posts(published: Boolean): [Post!]!
    post(id: ID!): Post
  }

  type Mutation {
    createUser(name: String!, email: String!): User!
    createPost(title: String!, content: String!, authorId: ID!): Post!
    publishPost(id: ID!): Post!
  }
`;

// ข้อมูลจำลอง (ในระบบจริงใช้ Database)
let users = [
  { id: "1", name: "สมชาย", email: "somchai@test.com" },
  { id: "2", name: "สมหญิง", email: "somying@test.com" },
];

let posts = [
  { id: "1", title: "เริ่มต้น GraphQL", content: "บทความแรก...", published: true, authorId: "1" },
  { id: "2", title: "Draft Post", content: "ร่าง...", published: false, authorId: "2" },
];

// Resolvers
const resolvers = {
  Query: {
    users: () => users,
    user: (_, { id }) => users.find(u => u.id === id),
    posts: (_, { published }) => {
      if (published !== undefined) return posts.filter(p => p.published === published);
      return posts;
    },
    post: (_, { id }) => posts.find(p => p.id === id),
  },
  Mutation: {
    createUser: (_, { name, email }) => {
      const user = { id: String(users.length + 1), name, email };
      users.push(user);
      return user;
    },
    createPost: (_, { title, content, authorId }) => {
      const post = { id: String(posts.length + 1), title, content, published: false, authorId };
      posts.push(post);
      return post;
    },
    publishPost: (_, { id }) => {
      const post = posts.find(p => p.id === id);
      if (!post) throw new Error('Post not found');
      post.published = true;
      return post;
    },
  },
  User: {
    posts: (user) => posts.filter(p => p.authorId === user.id),
  },
  Post: {
    author: (post) => users.find(u => u.id === post.authorId),
  },
};

// สร้าง Server
const server = new ApolloServer({ typeDefs, resolvers });

const { url } = await startStandaloneServer(server, {
  listen: { port: 4000 },
  context: async ({ req }) => {
    // เพิ่ม authentication, database connection ฯลฯ ที่นี่
    const token = req.headers.authorization || '';
    return { token };
  },
});

console.log(`GraphQL Server ready at ${url}`);http://localhost:4000 สามารถทดสอบ Query ได้ทันทีผ่าน Browser ไม่ต้องติดตั้งเครื่องมือเพิ่ม
Apollo Client — ใช้ GraphQL ฝั่ง React
Apollo Client เป็น Library สำหรับจัดการ GraphQL ฝั่ง Client ที่ได้รับความนิยมสูงสุด มี Built-in Cache, Loading/Error States และรองรับ TypeScript อย่างดี
ติดตั้งและตั้งค่า
# ติดตั้ง
npm install @apollo/client graphql

// app.jsx — ตั้งค่า Apollo Provider
import { ApolloClient, InMemoryCache, ApolloProvider } from '@apollo/client';

const client = new ApolloClient({
  uri: 'http://localhost:4000/graphql',
  cache: new InMemoryCache(),
  headers: {
    authorization: `Bearer ${localStorage.getItem('token')}`,
  },
});

function App() {
  return (
    <ApolloProvider client={client}>
      <UserList />
    </ApolloProvider>
  );
}
useQuery — ดึงข้อมูล
import { useQuery, gql } from '@apollo/client';

const GET_USERS = gql`
  query GetUsers {
    users {
      id
      name
      email
      posts {
        id
        title
      }
    }
  }
`;

function UserList() {
  const { loading, error, data, refetch } = useQuery(GET_USERS);

  if (loading) return <p>Loading...</p>;
  if (error) return <p>Error: {error.message}</p>;

  return (
    <div>
      <button onClick={() => refetch()}>Refresh</button>
      {data.users.map(user => (
        <div key={user.id}>
          <h3>{user.name}</h3>
          <p>{user.email}</p>
          <p>Posts: {user.posts.length}</p>
        </div>
      ))}
    </div>
  );
}
useMutation — เปลี่ยนแปลงข้อมูล
import { useMutation, gql } from '@apollo/client';

const CREATE_USER = gql`
  mutation CreateUser($name: String!, $email: String!) {
    createUser(name: $name, email: $email) {
      id
      name
      email
    }
  }
`;

function CreateUserForm() {
  const [createUser, { loading, error }] = useMutation(CREATE_USER, {
    refetchQueries: ['GetUsers'],  // Refetch หลังสร้างสำเร็จ
    onCompleted: (data) => {
      console.log('Created:', data.createUser);
    },
  });

  const handleSubmit = (e) => {
    e.preventDefault();
    createUser({
      variables: {
        name: e.target.name.value,
        email: e.target.email.value,
      },
    });
  };

  return (
    <form onSubmit={handleSubmit}>
      <input name="name" placeholder="Name" required />
      <input name="email" placeholder="Email" required />
      <button type="submit" disabled={loading}>
        {loading ? 'Creating...' : 'Create User'}
      </button>
      {error && <p>Error: {error.message}</p>}
    </form>
  );
}
Fragments — ใช้ Field ซ้ำ

Fragment ช่วยให้เราสร้างชุด Field ที่ใช้ซ้ำบ่อยๆ ลดการเขียนโค้ดซ้ำ และทำให้ Query อ่านง่ายขึ้น เหมาะสำหรับโปรเจกต์ขนาดใหญ่ที่มีหลาย Component ใช้ข้อมูลคล้ายกัน
# กำหนด Fragment
fragment UserBasicInfo on User {
  id
  name
  email
  avatar
}

fragment PostSummary on Post {
  id
  title
  createdAt
  likes
  author {
    ...UserBasicInfo
  }
}

# ใช้ Fragment ใน Query
query GetDashboard {
  me {
    ...UserBasicInfo
    role
    posts {
      ...PostSummary
    }
  }
  recentPosts {
    ...PostSummary
    comments {
      text
      author {
        ...UserBasicInfo
      }
    }
  }
}

# Inline Fragment (สำหรับ Union/Interface)
query Search {
  search(term: "GraphQL") {
    ... on User {
      name
      email
    }
    ... on Post {
      title
      content
    }
    ... on Comment {
      text
    }
  }
}
Variables และ Directives
Variables — ส่ง Parameter แบบ Dynamic
# ใช้ Variable แทนค่าตรง (Hardcode)
query GetUser($userId: ID!, $includeEmail: Boolean = true) {
  user(id: $userId) {
    name
    email @include(if: $includeEmail)
    posts {
      title
    }
  }
}

# Variables (ส่งเป็น JSON แยก)
# {
#   "userId": "123",
#   "includeEmail": true
# }
Directives — ควบคุม Query แบบมีเงื่อนไข
# Built-in Directives
@include(if: Boolean)   # รวม field ถ้า true
@skip(if: Boolean)      # ข้าม field ถ้า true
@deprecated(reason: String)  # ทำเครื่องหมาย field ที่เลิกใช้

# ตัวอย่างใน Schema
type User {
  id: ID!
  name: String!
  email: String!
  username: String @deprecated(reason: "Use 'name' instead")
}

# ตัวอย่างใน Query
query GetUser($userId: ID!, $withPosts: Boolean!) {
  user(id: $userId) {
    name
    email
    posts @include(if: $withPosts) {
      title
    }
  }
}

# Custom Directive (Server-side)
directive @auth(requires: Role!) on FIELD_DEFINITION

type Query {
  publicPosts: [Post!]!
  adminDashboard: Dashboard! @auth(requires: ADMIN)
  userSettings: Settings! @auth(requires: USER)
}
Pagination — จัดการข้อมูลจำนวนมาก
เมื่อมีข้อมูลจำนวนมาก การดึงทั้งหมดในครั้งเดียวไม่เหมาะสม GraphQL มี Pattern การทำ Pagination 2 แบบหลัก คือ Offset-based และ Cursor-based
แนะนำเพิ่มเติม — XM Signal
Offset-based Pagination (ง่าย แต่มีข้อจำกัด)
type Query {
  posts(limit: Int = 10, offset: Int = 0): PostConnection!
}

type PostConnection {
  items: [Post!]!
  totalCount: Int!
  hasMore: Boolean!
}

# Query
query {
  posts(limit: 10, offset: 20) {
    items {
      title
      createdAt
    }
    totalCount
    hasMore
  }
}

# ข้อเสีย: ถ้ามีการเพิ่ม/ลบข้อมูลระหว่าง pagination
# อาจเจอข้อมูลซ้ำหรือหายไป
Cursor-based Pagination (แนะนำ — Relay Style)
# Relay-style Connection specification
type Query {
  posts(first: Int, after: String, last: Int, before: String): PostConnection!
}

type PostConnection {
  edges: [PostEdge!]!
  pageInfo: PageInfo!
  totalCount: Int!
}

type PostEdge {
  cursor: String!       # Unique identifier สำหรับ position
  node: Post!           # ข้อมูลจริง
}

type PageInfo {
  hasNextPage: Boolean!
  hasPreviousPage: Boolean!
  startCursor: String
  endCursor: String
}

# Query — ขอ 10 รายการแรก
query {
  posts(first: 10) {
    edges {
      cursor
      node {
        title
        createdAt
      }
    }
    pageInfo {
      hasNextPage
      endCursor
    }
  }
}

# Query — ขอ 10 รายการถัดไป (ใช้ endCursor จากก่อนหน้า)
query {
  posts(first: 10, after: "cursor_abc123") {
    edges {
      cursor
      node {
        title
      }
    }
    pageInfo {
      hasNextPage
      endCursor
    }
  }
}Error Handling ใน GraphQL
GraphQL จัดการ Error ต่างจาก REST API ตรงที่ GraphQL จะคืน HTTP 200 เสมอ (ยกเว้น Server Error จริงๆ) และรายงาน Error ผ่าน errors Array ใน Response
เนื้อหาเกี่ยวข้อง — GCP Vertex AI Docker Container Deploy
// Response ที่มี Error
{
  "data": {
    "user": null
  },
  "errors": [
    {
      "message": "User not found",
      "locations": [{ "line": 2, "column": 3 }],
      "path": ["user"],
      "extensions": {
        "code": "NOT_FOUND",
        "statusCode": 404
      }
    }
  ]
}

// Server-side Error Handling
import { GraphQLError } from 'graphql';

const resolvers = {
  Query: {
    user: async (_, { id }, context) => {
      // Authentication check
      if (!context.user) {
        throw new GraphQLError('You must be logged in', {
          extensions: { code: 'UNAUTHENTICATED' },
        });
      }

      const user = await context.db.users.findById(id);
      if (!user) {
        throw new GraphQLError('User not found', {
          extensions: { code: 'NOT_FOUND', argumentName: 'id' },
        });
      }

      // Authorization check
      if (user.id !== context.user.id && context.user.role !== 'ADMIN') {
        throw new GraphQLError('Not authorized to view this user', {
          extensions: { code: 'FORBIDDEN' },
        });
      }

      return user;
    },
  },
};

// Error formatting (กรอง sensitive info ก่อนส่ง client)
const server = new ApolloServer({
  typeDefs,
  resolvers,
  formatError: (formattedError, error) => {
    // ซ่อน internal error details ใน production
    if (process.env.NODE_ENV === 'production') {
      if (formattedError.extensions?.code === 'INTERNAL_SERVER_ERROR') {
        return { message: 'Something went wrong' };
      }
    }
    return formattedError;
  },
});
Authentication และ Authorization
การทำ Auth ใน GraphQL มักใช้ Context เพื่อส่งข้อมูล User ไปยังทุก Resolver
// ตั้งค่า Context สำหรับ Authentication
import jwt from 'jsonwebtoken';

const server = new ApolloServer({ typeDefs, resolvers });

const { url } = await startStandaloneServer(server, {
  context: async ({ req }) => {
    const token = req.headers.authorization?.replace('Bearer ', '');
    let user = null;

    if (token) {
      try {
        user = jwt.verify(token, process.env.JWT_SECRET);
      } catch (e) {
        // Token ไม่ถูกต้อง — ปล่อย user เป็น null
      }
    }

    return {
      user,
      db: database,
    };
  },
});

// Authorization ระดับ Resolver
const resolvers = {
  Query: {
    adminDashboard: (_, __, context) => {
      if (!context.user) throw new GraphQLError('Not authenticated', {
        extensions: { code: 'UNAUTHENTICATED' },
      });
      if (context.user.role !== 'ADMIN') throw new GraphQLError('Admin only', {
        extensions: { code: 'FORBIDDEN' },
      });
      return getDashboardData();
    },
  },
};

// Login / Register Mutations
type Mutation {
  login(email: String!, password: String!): AuthPayload!
  register(input: CreateUserInput!): AuthPayload!
}

type AuthPayload {
  token: String!
  user: User!
}
N+1 Problem และ DataLoader
N+1 Problem เป็นปัญหาที่พบบ่อยที่สุดใน GraphQL เกิดขึ้นเมื่อ Query ข้อมูลที่มี Relationship ทำให้เกิด Database Query จำนวนมากเกินจำเป็น
# ตัวอย่าง Query ที่ทำให้เกิด N+1
query {
  posts {           # 1 query สำหรับ posts
    title
    author {         # N queries สำหรับ author (1 ต่อ post)
      name
    }
  }
}

# ถ้ามี 100 posts = 1 + 100 = 101 queries!

// แก้ไขด้วย DataLoader (Batching + Caching)
import DataLoader from 'dataloader';

// สร้าง DataLoader ใน Context (ต้องสร้างใหม่ทุก request)
const { url } = await startStandaloneServer(server, {
  context: async ({ req }) => {
    return {
      loaders: {
        userLoader: new DataLoader(async (userIds) => {
          // Batch: ดึง users ทั้งหมดในครั้งเดียว
          const users = await db.users.findAll({
            where: { id: { $in: userIds } }
          });
          // ส่งคืนตาม order ของ keys
          const userMap = {};
          users.forEach(u => userMap[u.id] = u);
          return userIds.map(id => userMap[id] || null);
        }),

        postsByAuthorLoader: new DataLoader(async (authorIds) => {
          const posts = await db.posts.findAll({
            where: { authorId: { $in: authorIds } }
          });
          const grouped = {};
          authorIds.forEach(id => grouped[id] = []);
          posts.forEach(p => grouped[p.authorId]?.push(p));
          return authorIds.map(id => grouped[id]);
        }),
      },
    };
  },
});

// ใช้ DataLoader ใน Resolver
const resolvers = {
  Post: {
    author: (post, _, context) => {
      // จะ batch ทุก authorId แล้ว query ครั้งเดียว
      return context.loaders.userLoader.load(post.authorId);
    },
  },
  User: {
    posts: (user, _, context) => {
      return context.loaders.postsByAuthorLoader.load(user.id);
    },
  },
};

// ผลลัพธ์: จาก 101 queries เหลือแค่ 2 queries!Caching Strategies
การทำ Caching ใน GraphQL ซับซ้อนกว่า REST เพราะใช้ POST Request ทำให้ HTTP Cache ใช้ไม่ได้ตรงๆ ต้องอาศัยกลยุทธ์เฉพาะ
Client-side Cache (Apollo Client)
// Apollo Client ใช้ Normalized Cache
// ทุก object ที่มี __typename + id จะถูก cache อัตโนมัติ
const client = new ApolloClient({
  uri: '/graphql',
  cache: new InMemoryCache({
    typePolicies: {
      Query: {
        fields: {
          posts: {
            // Merge function สำหรับ pagination
            keyArgs: ['filter'],
            merge(existing = [], incoming) {
              return [...existing, ...incoming];
            },
          },
        },
      },
      User: {
        // กำหนด key field สำหรับ cache normalization
        keyFields: ['id'],
      },
    },
  }),
});

// Cache policies ใน useQuery
const { data } = useQuery(GET_POSTS, {
  fetchPolicy: 'cache-first',      // ใช้ cache ก่อน (default)
  // fetchPolicy: 'network-only',  // ดึงจาก server เสมอ
  // fetchPolicy: 'cache-only',    // ใช้ cache เท่านั้น
  // fetchPolicy: 'no-cache',      // ไม่ cache เลย
  // fetchPolicy: 'cache-and-network', // ใช้ cache + update จาก server
  pollInterval: 30000,  // Refetch ทุก 30 วินาที (optional)
});
Server-side Cache
// ใช้ Cache Hints ใน Schema
const typeDefs = `#graphql
  type Post @cacheControl(maxAge: 60) {
    id: ID!
    title: String!
    content: String!
    viewCount: Int! @cacheControl(maxAge: 10)
    author: User!
  }

  type User @cacheControl(maxAge: 300) {
    id: ID!
    name: String!
  }
`;

// ใช้ Redis สำหรับ Server Cache
import { KeyvAdapter } from '@apollo/utils.keyvadapter';
import Keyv from 'keyv';
import KeyvRedis from '@keyv/redis';

const server = new ApolloServer({
  typeDefs,
  resolvers,
  cache: new KeyvAdapter(
    new Keyv({ store: new KeyvRedis('redis://localhost:6379') })
  ),
});
Schema Stitching และ Federation
เมื่อระบบขยายใหญ่ขึ้น การมี GraphQL Schema เดียวที่รวมทุกอย่างจะจัดการยาก Schema Stitching และ Federation ช่วยแบ่ง Schema ออกเป็นส่วนๆ
เนื้อหาเกี่ยวข้อง — แนะนำให้อ่าน MongoDB Change Streams Domain Driven Design DDD
Apollo Federation (แนะนำสำหรับ Microservices)
# Service: Users
type User @key(fields: "id") {
  id: ID!
  name: String!
  email: String!
}

# Service: Posts
type Post {
  id: ID!
  title: String!
  author: User!    # Reference ข้าม Service
}

# Extend User ใน Posts Service
extend type User @key(fields: "id") {
  id: ID! @external
  posts: [Post!]!            # เพิ่ม field ให้ User
}

# Apollo Gateway (รวมทุก Subgraph)
import { ApolloGateway } from '@apollo/gateway';

const gateway = new ApolloGateway({
  supergraphSdl: '...',  // หรือ
  subgraphs: [
    { name: 'users', url: 'http://users:4001/graphql' },
    { name: 'posts', url: 'http://posts:4002/graphql' },
    { name: 'comments', url: 'http://comments:4003/graphql' },
  ],
});
เครื่องมือสำหรับ GraphQL
| เครื่องมือ | ประเภท | คุณสมบัติ |
|---|---|---|
| Apollo Sandbox | IDE | มาพร้อม Apollo Server, ทดสอบ Query ผ่าน Browser ได้ทันที |
| GraphQL Playground | IDE | IDE แบบ Web สำหรับทดสอบ Query มี Docs Explorer |
| Altair GraphQL Client | IDE | Desktop/Browser Extension รองรับ Subscription, File Upload |
| GraphQL Codegen | Code Generator | สร้าง TypeScript Types และ Hooks จาก Schema อัตโนมัติ |
| GraphQL Voyager | Visualization | แสดง Schema เป็น Interactive Graph Diagram |
| Apollo Studio | Monitoring | ติดตาม Performance, Schema Changes, Error Tracking |
| Prisma | ORM | สร้าง Database Schema + Resolvers อัตโนมัติ |
| Hasura | Engine | สร้าง GraphQL API จาก Database โดยไม่ต้องเขียน Code |
| PostGraphile | Engine | สร้าง GraphQL API จาก PostgreSQL อัตโนมัติ |
เมื่อไหร่ควรใช้ GraphQL vs REST?
ใช้ GraphQL เมื่อ:
- Client หลายตัว (Mobile, Web, TV) ต้องการข้อมูลต่างกัน
- ข้อมูลมี Relationship ซับซ้อน (Graph-like data)
- ต้องการลด Network Requests (รวมหลาย Resource ใน Query เดียว)
- ต้องการ API ที่ Evolve ได้โดยไม่ต้อง Version
- ทีมใหญ่ที่ Frontend-Backend ต้องการ Contract ที่ชัดเจน
- ใช้ BFF (Backend For Frontend) Pattern
ใช้ REST เมื่อ:
- CRUD ง่ายๆ ที่ไม่มี Relationship ซับซ้อน
- ต้องการ HTTP Caching (CDN, Browser Cache)
- File Upload/Download เป็นหลัก
- Public API ที่ต้องการความเรียบง่าย
- ทีมไม่คุ้นเคย GraphQL และโปรเจกต์เร่งด่วน
- Webhook หรือ Server-to-Server Communication
Performance Considerations
Query Complexity Limiting
// ป้องกัน Query ที่ซับซ้อนเกินไป
import depthLimit from 'graphql-depth-limit';
import { createComplexityLimitRule } from 'graphql-validation-complexity';

const server = new ApolloServer({
  typeDefs,
  resolvers,
  validationRules: [
    depthLimit(7),  // จำกัดความลึกของ Query
    createComplexityLimitRule(1000),  // จำกัด complexity score
  ],
});

// ตัวอย่าง Query ที่ถูก Block
query TooDeep {
  user {
    posts {
      comments {
        author {
          posts {
            comments {   // depth 6 — อาจถูก limit
              author {   // depth 7 — ถูก block!
                name
              }
            }
          }
        }
      }
    }
  }
}
Persisted Queries
// Client ส่ง hash แทน query string เต็ม
// ลดขนาด request + ป้องกัน arbitrary queries

// ขั้นตอน: 1) Build time — extract queries เป็น hash
//          2) Runtime — client ส่ง hash, server lookup query จาก hash

// Apollo Automatic Persisted Queries (APQ)
import { ApolloClient, InMemoryCache } from '@apollo/client';
import { createPersistedQueryLink } from '@apollo/client/link/persisted-queries';
import { createHttpLink } from '@apollo/client/link/http';
import { sha256 } from 'crypto-hash';

const link = createPersistedQueryLink({ sha256 }).concat(
  createHttpLink({ uri: '/graphql' })
);

const client = new ApolloClient({ link, cache: new InMemoryCache() });
Best Practices สำหรับ GraphQL ในระบบ Production
- ใช้ DataLoader เสมอ — แก้ N+1 Problem ตั้งแต่เริ่มต้น อย่ารอจนมีปัญหา Performance
- ใช้ Persisted Queries — ลดขนาด Request และป้องกัน Query Injection
- จำกัด Query Depth และ Complexity — ป้องกันผู้ใช้ส่ง Query ที่ทำให้ Server ล่ม
- ใช้ TypeScript + Codegen — สร้าง Types อัตโนมัติจาก Schema ลด Bug จาก Type mismatch
- Schema Design First — ออกแบบ Schema ก่อนเขียน Code ให้ Frontend-Backend ตกลง Contract กัน
- Error Handling ที่ดี — ใช้ Error Code ที่ชัดเจน (UNAUTHENTICATED, NOT_FOUND, FORBIDDEN) ไม่ใช่แค่ Message
- Monitoring — ติดตาม Query Performance, Error Rate, Slow Resolvers ด้วย Apollo Studio หรือเครื่องมืออื่น
- Pagination ตั้งแต่เริ่มต้น — อย่าส่ง List ทั้งหมดโดยไม่มี Limit
- Deprecate อย่า Delete — ใช้ @deprecated directive แทนการลบ Field ออกทันที
- Cache อย่างเหมาะสม — ใช้ Apollo Client Cache + Server-side Cache (Redis) ร่วมกัน
สรุป
GraphQL เป็นเทคโนโลยีที่ทรงพลังสำหรับการสร้าง API ที่ยืดหยุ่นและมีประสิทธิภาพ ด้วย Type System ที่แข็งแกร่ง การดึงข้อมูลที่แม่นยำ และเครื่องมือที่ครบครัน ทำให้เป็นตัวเลือกที่ยอดเยี่ยมสำหรับแอปพลิเคชันที่มีข้อมูลซับซ้อนหรือต้องรองรับ Client หลายตัว
อย่างไรก็ตาม GraphQL ไม่ได้เหมาะกับทุกสถานการณ์ สำหรับ API ที่เรียบง่าย REST ยังคงเป็นตัวเลือกที่ดี สิ่งสำคัญคือเข้าใจข้อดีข้อเสียของทั้งสอง แล้วเลือกใช้ให้เหมาะกับความต้องการของโปรเจกต์ เริ่มต้นลองสร้าง Apollo Server ง่ายๆ ลองเขียน Schema และ Query แล้วคุณจะเห็นว่า GraphQL เปลี่ยนวิธีคิดเกี่ยวกับ API อย่างไร