Webhook Design Pattern Docker Container Deploy
โดย อ. บอมกิตติทัศน์เจริญพนาสิทธิ์ | อัปเดต 24 ก. พ. 2026 | อ่าน 15 นาที
Webhook คืออะไร — Push vs Pull Model

Webhook คือกลไกที่ให้ระบบหนึ่ง (Producer) ส่ง HTTP POST Request ไปยัง URL ที่กำหนดไว้ล่วงหน้า (Consumer) เมื่อเกิด Event บางอย่างเป็นรูปแบบ Push Notification แบบ Server-to-Server ที่ไม่ต้อง Polling ทำให้ได้รับข้อมูลแบบ Near Real-time และประหยัดทรัพยากร
ความแตกต่างระหว่าง Pull Model (API Polling) กับ Push Model (Webhook) คือใน Pull Model ฝั่ง Client ต้องส่ง Request ไปถาม Server ซ้ำๆเป็นระยะว่ามีข้อมูลใหม่หรือยังถ้าถามบ่อยเกินไปเปลือง Bandwidth ถ้าถามห่างเกินไปได้ข้อมูลช้าส่วนใน Push Model (Webhook) Server จะส่งข้อมูลมาหาเราทันทีเมื่อเกิด Event ไม่ต้องถามซ้ำลดทั้ง Latency และ Bandwidth อย่างมาก
ตัวอย่าง Webhook ที่ใช้กันแพร่หลายได้แก่ GitHub Webhook แจ้งเมื่อมี Push/PR, Stripe Webhook แจ้งเมื่อมี Payment, LINE Messaging API แจ้งเมื่อมีข้อความใหม่, Slack Webhook ส่งข้อความเข้า Channel และ Discord Webhook สำหรับ Bot Notification
Webhook ทำงานอย่างไร — Flow ทั้งระบบ
- Registration — Consumer ลงทะเบียน URL ปลายทาง (Endpoint) กับ Producer พร้อม Secret Key สำหรับ Verify Signature
- Event เกิดขึ้น — เช่น User ชำระเงินสำเร็จบน Stripe
- Producer สร้าง Payload — รวบรวมข้อมูล Event เป็น JSON พร้อมสร้าง Signature ด้วย HMAC-SHA256
- HTTP POST — Producer ส่ง POST Request พร้อม Payload และ Signature Header ไปยัง Consumer URL
- Consumer รับและ Verify — ตรวจ Signature ว่าถูกต้องตอบ 200 OK ทันที
- Async Processing — Consumer ส่ง Payload เข้า Queue แล้ว Worker Process ทีหลัง
- Retry (ถ้าล้มเหลว) — ถ้า Consumer ไม่ตอบ 2xx Producer จะ Retry ตาม Schedule (เช่น 1, 5, 30, 60 นาที)
Pattern 1: Direct Processing (ไม่แนะนำสำหรับ Production)
Webhook Receiver รับ Request แล้ว Process ทันทีก่อนตอบ 200 ปัญหาคือถ้า Processing ช้า (เช่นต้อง Query Database, เรียก API อื่น) อาจ Timeout ทำให้ Producer คิดว่า Delivery ล้มเหลวแล้ว Retry ทำให้เกิด Duplicate Processing
Pattern 2: Queue-based Processing (แนะนำ)
Webhook Receiver รับ Request → Validate Signature → ส่ง Payload เข้า Message Queue → ตอบ 200 OK ทันทีส่วน Worker Process อ่านจาก Queue แล้ว Process แยกต่างหากข้อดีคือ Receiver ตอบเร็วมากไม่มี Timeout, Decouple Receiving กับ Processing, Scale Worker แยกจาก Receiver ได้และไม่หาย Payload แม้ Worker ล่ม
เนื้อหาเกี่ยวข้อง — ดูเพิ่มเติมเรื่อง AWS Step Functions Stream Processing
Pattern 3: Fan-out Processing
Webhook เดียวอาจต้อง Trigger หลาย Action เช่นเมื่อ Payment สำเร็จต้องอัปเดต Order, ส่ง Email, อัปเดต Inventory พร้อมกันใช้ Fan-out Pattern กระจาย Event ไปหลาย Queue/Topic แต่ละ Consumer จัดการ Action ของตัวเอง
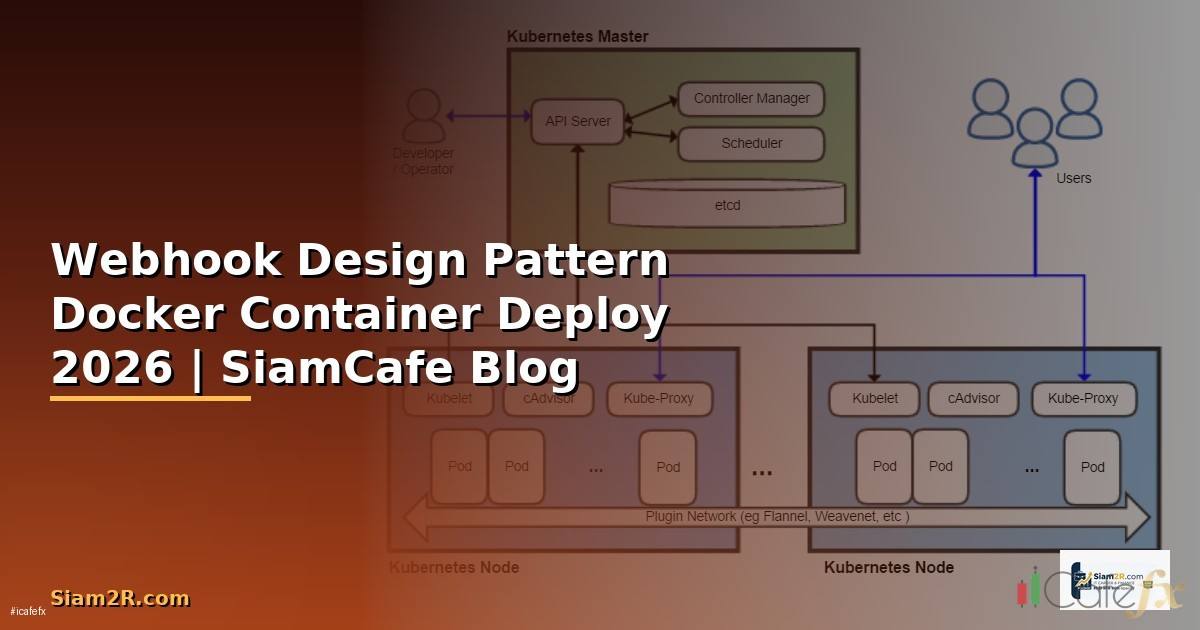
Webhook Receiver Architecture — Queue-based Processing
สถาปัตยกรรมที่แนะนำสำหรับ Production ประกอบด้วย 4 Component หลัก
- Webhook Receiver (API Server) — รับ HTTP POST, Validate Signature, Push เข้า Queue ใช้ Lightweight Framework เช่น Express.js, FastAPI, Go Fiber ไม่ต้อง Logic หนักตอบเร็วที่สุด
- Message Queue — Buffer ระหว่าง Receiver กับ Worker ใช้ Redis (BullMQ), RabbitMQ หรือ Apache Kafka ขึ้นกับ Scale ที่ต้องการ
- Worker Process — อ่าน Message จาก Queue แล้ว Process Business Logic เช่นอัปเดต Database, เรียก API อื่น, ส่ง Notification Scale แนวนอนได้ง่ายเพิ่ม Worker ตามภาระงาน
- Database — เก็บ Log ของ Webhook ทุกตัวที่เข้ามาสำหรับ Debugging, Audit Trail และ Replay ถ้าจำเป็น
Webhook Security — Signature, HMAC, Rate Limit
ความปลอดภัยเป็นสิ่งสำคัญมากสำหรับ Webhook เพราะ Endpoint เป็น Public URL ที่ใครก็ส่ง Request มาได้ต้องมีกลไกยืนยันว่า Request มาจากแหล่งที่ถูกต้องจริง
แนะนำเพิ่มเติม — หนังสือเทรดที่ SiamCafeBook
HMAC Signature Verification
วิธีที่นิยมที่สุดคือ Producer สร้าง HMAC-SHA256 จาก Payload + Secret Key แล้วแนบเป็น Header มาใน Request ฝั่ง Consumer คำนวณ HMAC จาก Payload ที่ได้รับ + Secret Key เดียวกันแล้วเปรียบเทียบว่าตรงกันหรือไม่
// Node.js — Verify Webhook Signature
const crypto = require('crypto');

function verifySignature(payload, signature, secret) {
 const expected = crypto
 .createHmac('sha256', secret)
 .update(payload, 'utf8')
 .digest('hex');

 // ใช้ timingSafeEqual ป้องกัน Timing Attack
 return crypto.timingSafeEqual(
 Buffer.from(signature),
 Buffer.from(`sha256=`)
 );
}
มาตรการ Security เพิ่มเติม
- HTTPS Only — ห้ามรับ Webhook ผ่าน HTTP เด็ดขาดข้อมูลจะถูกดักจับได้
- Rate Limiting — จำกัดจำนวน Request ต่อวินาทีป้องกัน DDoS
- IP Whitelist — อนุญาตเฉพาะ IP ของ Provider เช่น GitHub, Stripe ที่ประกาศ IP Range ไว้
- Payload Validation — Validate JSON Schema ก่อน Process ป้องกัน Injection
- Timestamp Check — ตรวจว่า Webhook ไม่เก่าเกินไป (เช่นไม่เกิน 5 นาที) ป้องกัน Replay Attack
Retry Strategy และ Idempotency
Webhook Delivery อาจล้มเหลวได้หลายสาเหตุเช่น Network Error, Server Down, Timeout ดังนั้น Producer จะมีระบบ Retry ฝั่ง Consumer ต้องออกแบบให้รองรับ Duplicate Delivery ได้
Retry Strategy ทั่วไป ใช้ Exponential Backoff เช่น Retry ครั้งที่ 1 หลัง 1 นาที, ครั้งที่ 2 หลัง 5 นาที, ครั้งที่ 3 หลัง 30 นาที, ครั้งที่ 4 หลัง 2 ชั่วโมง, ครั้งที่ 5 หลัง 24 ชั่วโมงหลังจากนั้น Mark เป็น Failed
เนื้อหาเกี่ยวข้อง — แนะนำให้อ่าน OWASP ZAP Certification Path
Idempotency คือการทำให้ Process Webhook ซ้ำกี่ครั้งก็ได้ผลลัพธ์เหมือนกันวิธีทำคือใช้ Event ID ที่ Provider แนบมาในทุก Webhook เป็น Deduplication Key เก็บ Event ID ที่ Process แล้วไว้ใน Database หรือ Redis ถ้าเจอ Event ID ซ้ำก็ Skip ไม่ Process อีก
// Idempotency Check
async function processWebhook(eventId, payload) {
 // ตรวจว่าเคย Process แล้วหรือยัง
 const exists = await redis.get(`webhook:`);
 if (exists) {
 console.log(`Event  already processed, skipping`);
 return;
 }

 // Process Business Logic
 await handlePaymentSuccess(payload);

 // Mark ว่า Process แล้ว (TTL 7 วัน)
 await redis.set(`webhook:`, '1', 'EX', 604800);
}
เขียน Webhook Receiver ด้วย Node.js
// webhook-receiver.js
const express = require('express');
const crypto = require('crypto');
const { Queue } = require('bullmq');
const Redis = require('ioredis');

const app = express();
const redis = new Redis(process.env.REDIS_URL || 'redis://localhost:6379');
const webhookQueue = new Queue('webhooks', { connection: redis });

// ใช้ raw body สำหรับ Signature Verification
app.use('/webhook', express.raw({ type: 'application/json' }));

app.post('/webhook/:source', async (req, res) => {
 try {
 const source = req.params.source;
 const signature = req.headers['x-webhook-signature'];
 const payload = req.body;

 // 1. Verify Signature
 const secret = process.env[`WEBHOOK_SECRET_`];
 if (!verifySignature(payload, signature, secret)) {
 return res.status(401).json({ error: 'Invalid signature' });
 }

 // 2. Parse Payload
 const data = JSON.parse(payload);

 // 3. Idempotency Check
 const eventId = data.id || req.headers['x-event-id'];
 const exists = await redis.get(`wh:`);
 if (exists) {
 return res.status(200).json({ status: 'already_processed' });
 }

 // 4. Push to Queue (ไม่ Process ที่นี่!)
 await webhookQueue.add(source, {
 eventId,
 source,
 payload: data,
 receivedAt: new Date().toISOString()
 }, {
 attempts: 3,
 backoff: { type: 'exponential', delay: 5000 }
 });

 // 5. Mark received
 await redis.set(`wh:`, 'queued', 'EX', 604800);

 // 6. ตอบ 200 ทันที!
 res.status(200).json({ status: 'accepted' });

 } catch (err) {
 console.error('Webhook error:', err);
 res.status(500).json({ error: 'Internal error' });
 }
});

function verifySignature(payload, signature, secret) {
 if (!signature || !secret) return false;
 const expected = 'sha256=' + crypto
 .createHmac('sha256', secret)
 .update(payload)
 .digest('hex');
 try {
 return crypto.timingSafeEqual(
 Buffer.from(signature),
 Buffer.from(expected)
 );
 } catch { return false; }
}

app.listen(3000, () => console.log('Webhook receiver on :3000'));
เขียน Webhook Sender ด้วย Python
# webhook_sender.py
import hmac
import hashlib
import json
import time
import requests
from datetime import datetime

class WebhookSender:
 def __init__(self, target_url: str, secret: str):
 self.target_url = target_url
 self.secret = secret
 self.max_retries = 5
 self.retry_delays = [60, 300, 1800, 7200, 86400]

 def sign(self, payload: bytes) -> str:
 return 'sha256=' + hmac.new(
 self.secret.encode(),
 payload,
 hashlib.sha256
 ).hexdigest()

 def send(self, event_type: str, data: dict) -> bool:
 payload = json.dumps({
 'id': f'evt_{int(time.time()*1000)}',
 'type': event_type,
 'data': data,
 'created_at': datetime.utcnow().isoformat()
 }).encode()

 signature = self.sign(payload)
 headers = {
 'Content-Type': 'application/json',
 'X-Webhook-Signature': signature,
 'X-Event-ID': json.loads(payload)['id']
 }

 for attempt in range(self.max_retries):
 try:
 resp = requests.post(
 self.target_url,
 data=payload,
 headers=headers,
 timeout=30
 )
 if resp.status_code == 200:
 return True
 print(f'Attempt {attempt+1} failed: {resp.status_code}')
 except requests.RequestException as e:
 print(f'Attempt {attempt+1} error: {e}')

 if attempt < self.max_retries - 1:
 time.sleep(self.retry_delays[attempt])

 return False

# ใช้งาน
sender = WebhookSender(
 target_url='https://example.com/webhook/payment',
 secret='your-secret-key'
)
sender.send('payment.success', {
 'order_id': 'ORD-001',
 'amount': 1500,
 'currency': 'THB'
})
Dockerize Webhook Application

# Dockerfile
FROM node:20-alpine AS base
WORKDIR /app
COPY package*.json ./
RUN npm ci --production
COPY . .

# Health Check
HEALTHCHECK --interval=30s --timeout=5s --retries=3 \
 CMD wget -qO- http://localhost:3000/health || exit 1

# ใช้ non-root user
RUN addgroup -g 1001 appgroup && \
 adduser -u 1001 -G appgroup -s /bin/sh -D appuser
USER appuser

EXPOSE 3000
CMD ["node", "webhook-receiver.js"]
หลักการสำคัญของ Dockerfile สำหรับ Production ได้แก่ใช้ Alpine Image ลดขนาด, npm ci แทน npm install เพื่อ Reproducibility, มี Health Check สำหรับ Orchestrator, รัน Process เป็น Non-root User เพิ่มความปลอดภัยและใช้ Multi-stage Build ถ้ามีขั้นตอน Build
Docker Compose — จัดการ Multi-container
# docker-compose.yml
version: '3.8'

services:
 webhook-receiver:
 build: .
 ports:
 - "3000:3000"
 environment:
 - REDIS_URL=redis://redis:6379
 - WEBHOOK_SECRET_STRIPE=whsec_xxx
 - WEBHOOK_SECRET_GITHUB=ghsec_xxx
 depends_on:
 redis:
 condition: service_healthy
 deploy:
 replicas: 2
 resources:
 limits:
 cpus: '0.5'
 memory: 256M
 restart: unless-stopped

 webhook-worker:
 build: .
 command: ["node", "worker.js"]
 environment:
 - REDIS_URL=redis://redis:6379
 - DATABASE_URL=postgres://user:pass@postgres:5432/webhooks
 depends_on:
 redis:
 condition: service_healthy
 postgres:
 condition: service_healthy
 deploy:
 replicas: 3
 restart: unless-stopped

 redis:
 image: redis:7-alpine
 volumes:
 - redis_data:/data
 healthcheck:
 test: ["CMD", "redis-cli", "ping"]
 interval: 10s
 timeout: 5s
 retries: 5
 restart: unless-stopped

 postgres:
 image: postgres:16-alpine
 environment:
 - POSTGRES_DB=webhooks
 - POSTGRES_USER=user
 - POSTGRES_PASSWORD=pass
 volumes:
 - pg_data:/var/lib/postgresql/data
 healthcheck:
 test: ["CMD-SHELL", "pg_isready -U user -d webhooks"]
 interval: 10s
 timeout: 5s
 retries: 5
 restart: unless-stopped

volumes:
 redis_data:
 pg_data:
Docker Compose นี้สร้าง 4 Service ได้แก่ Webhook Receiver 2 Replica รับ HTTP Request, Worker 3 Replica Process จาก Queue, Redis เป็น Message Queue และ PostgreSQL เก็บ Log และข้อมูลธุรกิจทุก Service มี Health Check และ Restart Policy
Docker Swarm
# Init Swarm
docker swarm init

# Deploy Stack
docker stack deploy -c docker-compose.yml webhook-stack

# Scale Worker
docker service scale webhook-stack_webhook-worker=5

# ดู Status
docker service ls
docker service logs webhook-stack_webhook-receiver
Kubernetes Deployment
apiVersion: apps/v1
kind: Deployment
metadata:
 name: webhook-receiver
spec:
 replicas: 3
 selector:
 matchLabels:
 app: webhook-receiver
 template:
 metadata:
 labels:
 app: webhook-receiver
 spec:
 containers:
 - name: receiver
 image: registry.example.com/webhook-receiver:v1.2.0
 ports:
 - containerPort: 3000
 env:
 - name: REDIS_URL
 valueFrom:
 secretKeyRef:
 name: webhook-secrets
 key: redis-url
 resources:
 requests:
 cpu: 100m
 memory: 128Mi
 limits:
 cpu: 500m
 memory: 256Mi
 livenessProbe:
 httpGet:
 path: /health
 port: 3000
 initialDelaySeconds: 10
 periodSeconds: 30
 readinessProbe:
 httpGet:
 path: /health
 port: 3000
 initialDelaySeconds: 5
 periodSeconds: 10
CI/CD Pipeline สำหรับ Webhook Service
# .github/workflows/deploy.yml
name: Deploy Webhook Service
on:
 push:
 branches: [main]

jobs:
 test:
 runs-on: ubuntu-latest
 steps:
 - uses: actions/checkout@v4
 - run: npm ci
 - run: npm test

 build-push:
 needs: test
 runs-on: ubuntu-latest
 steps:
 - uses: actions/checkout@v4
 - uses: docker/login-action@v3
 with:
 registry: ghcr.io
 username: }
 password: }
 - uses: docker/build-push-action@v5
 with:
 push: true
 tags: ghcr.io/}:}

 deploy:
 needs: build-push
 runs-on: ubuntu-latest
 steps:
 - name: Deploy to Kubernetes
 run: |
 kubectl set image deployment/webhook-receiver \
 receiver=ghcr.io/}:}
Monitoring และ Observability
Webhook Service ต้องมี Monitoring ที่ดีเพราะปัญหาอาจเกิดได้ทุกจุด Metrics ที่ต้องติดตามได้แก่
แนะนำเพิ่มเติม — แหล่งความรู้ Forex iCafeForex
- Webhook Received Count — จำนวน Webhook ที่เข้ามาต่อนาทีแยกตาม Source และ Event Type
- Processing Latency — เวลาตั้งแต่รับ Webhook จนถึง Process เสร็จ
- Queue Depth — จำนวน Message ที่รอใน Queue ถ้าเพิ่มขึ้นเรื่อยๆแสดงว่า Worker ไม่พอ
- Error Rate — เปอร์เซ็นต์ Webhook ที่ Process ล้มเหลว
- Signature Verification Failures — จำนวน Request ที่ Signature ไม่ถูกอาจเป็นสัญญาณของ Attack
- Duplicate Rate — จำนวน Webhook ที่ถูก Deduplicate ถ้าสูงอาจมีปัญหาที่ฝั่ง Provider
แนะนำใช้ Prometheus + Grafana สำหรับ Metrics และ ELK Stack (Elasticsearch + Logstash + Kibana) หรือ Loki สำหรับ Centralized Logging ตั้ง Alert เมื่อ Queue Depth เกิน Threshold หรือ Error Rate เกิน 1%
เนื้อหาเกี่ยวข้อง — อ่านต่อ: PostgreSQL Partitioning Shift Left Security
Best Practices รวม
- ตอบ 200 OK เร็วที่สุด — ไม่เกิน 3 วินาทีส่ง Payload เข้า Queue แล้วตอบทันที
- ใช้ Queue เสมอ — อย่า Process Business Logic ใน Request Handler โดยตรง
- Verify Signature ทุกครั้ง — ใช้
timingSafeEqualป้องกัน Timing Attack - Idempotent Processing — ออกแบบให้ Process ซ้ำได้โดยไม่เกิดผลข้างเคียง
- เก็บ Raw Payload — Log Webhook ทุกตัวที่เข้ามาสำหรับ Debugging และ Replay
- ใช้ Dead Letter Queue — Webhook ที่ Process ล้มเหลวหลายครั้งให้ส่งเข้า DLQ สำหรับตรวจสอบด้วยมือ
- Health Check Endpoint — มี
/healthEndpoint สำหรับ Load Balancer และ Orchestrator - Graceful Shutdown — เมื่อ Stop Container ให้รอ Process Message ที่กำลังทำอยู่ให้เสร็จก่อน
- ใช้ HTTPS เท่านั้น — ห้ามรับ Webhook ผ่าน Plain HTTP
- Version Endpoint — ใช้ Path เช่น
/webhook/v1/paymentเพื่อรองรับการเปลี่ยน Schema ในอนาคต
สรุปและแหล่งเรียนรู้เพิ่มเติม
Webhook เป็น Design Pattern พื้นฐานที่สำคัญมากในสถาปัตยกรรมแบบ Event-driven การออกแบบ Webhook Receiver ที่ดีต้องคำนึงถึง Security (Signature Verification), Reliability (Queue-based Processing, Retry), Scalability (Containerized, Horizontally Scalable) และ Observability (Metrics, Logging, Alerting) การ Dockerize และ Deploy ด้วย Docker Compose หรือ Kubernetes ทำให้ Scale ได้ง่ายและ Reproduce Environment ได้ทุกที่
แหล่งเรียนรู้เพิ่มเติมได้แก่ Standard Webhooks (standardwebhooks.com) สำหรับ Best Practice มาตรฐาน, BullMQ Documentation สำหรับ Queue Library, Docker Official Documentation และ Kubernetes Documentation ติดตามบทความใหม่ๆได้ที่ SiamCafe.net
Q: Webhook คืออะไร
กลไกที่ให้ระบบหนึ่งส่ง HTTP POST ไปยัง URL ที่กำหนดเมื่อเกิด Event เป็น Push Notification แบบ Server-to-Server ไม่ต้อง Polling ได้ข้อมูล Real-time
Q: Webhook ต่างจาก API อย่างไร
API เป็น Pull Model ต้องส่ง Request ไปถามเองส่วน Webhook เป็น Push Model Server ส่งข้อมูลมาเมื่อเกิด Event อัตโนมัติลด Latency และ Bandwidth
Q: Deploy Webhook Receiver ด้วย Docker ทำอย่างไร
สร้าง Dockerfile → Docker Compose จัดการ App + Queue + DB → docker compose up -d หรือ Push Image ขึ้น Registry แล้ว Deploy บน Kubernetes
Q: ทำอย่างไรให้ Webhook ไม่หายข้อมูล
ใช้ Message Queue เป็น Buffer ตอบ 200 OK ทันทีที่รับ Payload ได้มีระบบ Retry และ Dead Letter Queue สำหรับ Failed Messages
เนื้อหาเกี่ยวข้อง — แนะนำให้อ่าน Vagrant Multi-Machine SSL TLS Certificate
Q: Webhook Security ต้องทำอะไรบ้าง
Verify HMAC-SHA256 Signature ทุกครั้ง, HTTPS Only, Validate Payload Schema, Rate Limit, IP Whitelist และ Timestamp Check ป้องกัน Replay Attack
บทความแนะนำ:
อ่านเพิ่มเติม: บทความทั้งหมด | หน้าแรก Blog
อ่านเพิ่มเติม: สอนเทรด Forex | XM Signal | IT Hardware | อาชีพ IT | SiamCafe Book | iCafe Cloud