Kubernetes Pod Lifecycle คืออะไร? สอน Probes, Init Containers, Sidecar 2026

การเข้าใจ Pod Lifecycle อย่างลึกซึ้งเป็นทักษะสำคัญสำหรับ DevOps Engineer และ Platform Engineer ในปี 2026 Pod เป็นหน่วยที่เล็กที่สุดที่ Deploy ได้ใน Kubernetes และมี Lifecycle ที่ซับซ้อน ตั้งแต่ Scheduling, Init Containers, Probes ไปจนถึง Graceful Shutdown
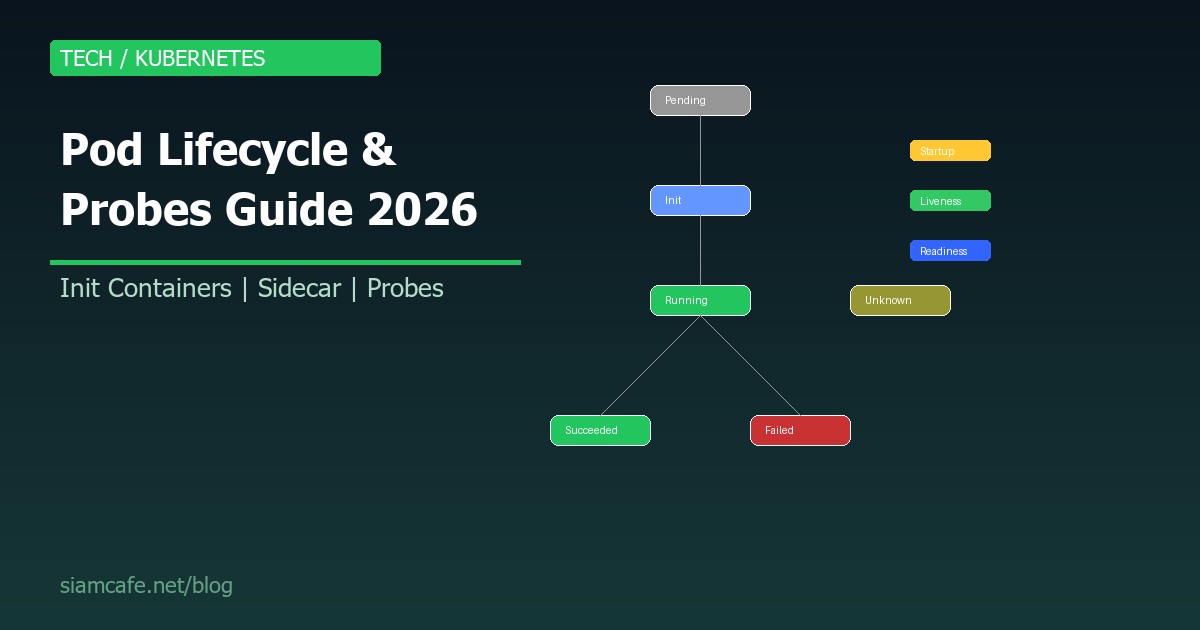
Pod Phases (สถานะของ Pod)
Pod มี 5 Phases หลัก:
เนื้อหาเกี่ยวข้อง — แนะนำให้อ่าน LocalAI Self-hosted Code Review Best Practice — คู่มือฉบับสมบูรณ์ 2026
อ่านเพิ่ม: Docker Compose 2026 สร้าง Home Lab Self-Hosted Services ที่บ · อ่านเพิ่ม: Helm Chart สร้างเอง คืออะไร? สอนสร้าง Custom Helm Chart สำหร · อ่านเพิ่ม: Kubernetes ConfigMap และ Secret คืออะไร? จัดการ Configuratio
| Phase | ความหมาย | เกิดเมื่อ |
|---|---|---|
| Pending | Pod ถูกสร้างแล้ว แต่ยังไม่ได้ Schedule หรือ Container ยังโหลดไม่เสร็จ | กำลัง Pull image, ไม่มี Node ว่าง, PV ยังไม่พร้อม |
| Running | Pod ถูก Schedule แล้ว อย่างน้อย 1 Container กำลังทำงาน | Container เริ่มทำงานสำเร็จ |
| Succeeded | ทุก Container ใน Pod ทำงานเสร็จแล้ว (exit code 0) | เฉพาะ Jobs/CronJobs |
| Failed | ทุก Container หยุดทำงาน และอย่างน้อย 1 Container exit ด้วย error | Application crash, OOMKilled |
| Unknown | ไม่สามารถดึงสถานะ Pod ได้ | Node ที่รัน Pod ไม่ตอบสนอง |
# ดู Pod phase
kubectl get pods -o wide
kubectl describe pod my-pod | grep -A5 "Status:"

# Pod ค้างใน Pending — ดูสาเหตุ
kubectl describe pod my-pod | grep -A10 "Events:"
# สาเหตุทั่วไป:
# - Insufficient CPU/Memory (Node ไม่พอ)
# - No matching node (nodeSelector/affinity ไม่ตรง)
# - ImagePullBackOff (ดึง Image ไม่ได้)
# - PVC Pending (Storage ยังไม่พร้อม)
Container States
แต่ละ Container ใน Pod มี 3 States:
แนะนำเพิ่มเติม — ดูสัญญาณเทรดที่ XM Signal
เนื้อหาเกี่ยวข้อง — Healthchecks.io Stream Processing
| State | ความหมาย | ข้อมูลเพิ่มเติม |
|---|---|---|
| Waiting | Container ยังไม่เริ่มทำงาน | กำลัง Pull image, Init container ยังไม่เสร็จ |
| Running | Container กำลังทำงาน | เวลาเริ่มทำงาน |
| Terminated | Container หยุดทำงานแล้ว | Exit code, เหตุผลที่หยุด |
# ดู Container state
kubectl get pod my-pod -o jsonpath='{.status.containerStatuses[*].state}'

# ดู Container restart count
kubectl get pod my-pod -o jsonpath='{.status.containerStatuses[*].restartCount}'

# ดู Terminated reason
kubectl get pod my-pod -o jsonpath='{.status.containerStatuses[*].lastState}'
Init Containers
Init Containers ทำงาน ก่อน Application containers โดยทำงานแบบ Sequential (ทีละตัว) ถ้า Init container ใดล้มเหลว Kubernetes จะ Restart จนกว่าจะสำเร็จ:
apiVersion: v1
kind: Pod
metadata:
  name: my-app
spec:
  initContainers:
  # Init 1: รอ Database พร้อม
  - name: wait-for-db
    image: busybox:1.36
    command: ['sh', '-c', 'until nslookup mysql-service; do echo waiting for db; sleep 2; done']

  # Init 2: รอ Redis พร้อม
  - name: wait-for-redis
    image: busybox:1.36
    command: ['sh', '-c', 'until nc -z redis-service 6379; do echo waiting for redis; sleep 2; done']

  # Init 3: Download config จาก S3
  - name: download-config
    image: amazon/aws-cli:2.15
    command: ['aws', 's3', 'cp', 's3://my-bucket/config.yaml', '/config/config.yaml']
    volumeMounts:
    - name: config-volume
      mountPath: /config

  containers:
  - name: my-app
    image: my-app:latest
    volumeMounts:
    - name: config-volume
      mountPath: /app/config
      readOnly: true

  volumes:
  - name: config-volume
    emptyDir: {}
Init Containers Use Cases
- Wait for dependencies: รอ Database, Cache, Message queue พร้อมก่อน
- Download configurations: ดึง Config จาก S3, Vault, ConfigServer
- Database migration: Run migration scripts ก่อน App เริ่ม
- Security setup: ตั้งค่า File permissions, Generate certificates
- Clone repository: Clone code จาก Git (เช่น Hugo static site)
Sidecar Containers (K8s 1.28+ Native Sidecar)
ตั้งแต่ Kubernetes 1.28 มี Native Sidecar support ผ่าน restartPolicy: Always ใน initContainers ทำให้ Sidecar เริ่มก่อน App container และหยุดหลัง:
แนะนำเพิ่มเติม — iCafeForex
เนื้อหาเกี่ยวข้อง — CDK Construct Team Productivity
apiVersion: v1
kind: Pod
metadata:
  name: my-app
spec:
  initContainers:
  # Native Sidecar (K8s 1.28+)
  - name: log-collector
    image: fluent/fluent-bit:2.2
    restartPolicy: Always   # ทำให้เป็น Sidecar
    volumeMounts:
    - name: app-logs
      mountPath: /var/log/app

  # อีก Sidecar
  - name: envoy-proxy
    image: envoyproxy/envoy:v1.29
    restartPolicy: Always
    ports:
    - containerPort: 9901

  containers:
  - name: my-app
    image: my-app:latest
    volumeMounts:
    - name: app-logs
      mountPath: /var/log/app

  volumes:
  - name: app-logs
    emptyDir: {}

# ลำดับ Startup:
# 1. Sidecar log-collector เริ่ม (และทำงานต่อเนื่อง)
# 2. Sidecar envoy-proxy เริ่ม (และทำงานต่อเนื่อง)
# 3. App container เริ่ม
#
# ลำดับ Shutdown:
# 1. App container หยุดก่อน
# 2. Sidecars หยุดหลัง (reverse order)
Probes Deep Dive
Kubernetes มี 3 Probes สำหรับตรวจสอบสุขภาพ Container:
Startup Probe — สำหรับ App ที่เริ่มช้า
# Startup Probe: ตรวจสอบว่า App เริ่มทำงานแล้วหรือยัง
# ถ้ายัง → ไม่เริ่ม Liveness/Readiness probe
# ถ้าล้มเหลวเกิน failureThreshold → Kill container

containers:
- name: my-app
  image: my-app:latest
  startupProbe:
    httpGet:
      path: /healthz
      port: 8080
    initialDelaySeconds: 10
    periodSeconds: 5
    timeoutSeconds: 3
    failureThreshold: 30    # 30 x 5s = 150s max startup time
    successThreshold: 1

# Use case:
# - Java/Spring Boot apps (30-120s startup)
# - Apps ที่ต้อง Load data เข้า Memory ก่อน
# - Legacy apps ที่เริ่มช้า
Liveness Probe — ตรวจจับ Deadlock
# Liveness Probe: ตรวจว่า App ยังทำงานอยู่ไหม
# ถ้าล้มเหลว → Kubernetes Restart container

containers:
- name: my-app
  image: my-app:latest
  livenessProbe:
    httpGet:
      path: /healthz
      port: 8080
    initialDelaySeconds: 15
    periodSeconds: 10
    timeoutSeconds: 3
    failureThreshold: 3     # ล้มเหลว 3 ครั้งติด → restart
    successThreshold: 1

# Use case:
# - Detect deadlocks (app ค้าง ไม่ตอบสนอง)
# - Detect infinite loops
# - Memory leak ที่ทำให้ app ช้ามาก
# - ไม่ควร check dependency (DB, Redis) ใน liveness
Readiness Probe — ควบคุม Traffic
# Readiness Probe: ตรวจว่า App พร้อมรับ Traffic ไหม
# ถ้าไม่พร้อม → ถอด Pod ออกจาก Service (ไม่ส่ง Traffic มา)
# ไม่ Restart container

containers:
- name: my-app
  image: my-app:latest
  readinessProbe:
    httpGet:
      path: /ready
      port: 8080
    initialDelaySeconds: 5
    periodSeconds: 5
    timeoutSeconds: 3
    failureThreshold: 3
    successThreshold: 1

# Use case:
# - App กำลัง Load cache (ยังไม่พร้อมรับ Traffic)
# - App กำลัง Warm up
# - Downstream dependency ล่ม (ถอด Traffic ชั่วคราว)
# - Rolling update (รอ Pod ใหม่พร้อมก่อนลบ Pod เก่า)
Probe Types
| Type | วิธีตรวจ | เหมาะกับ |
|---|---|---|
| httpGet | HTTP GET request ต้องได้ 200-399 | Web applications, REST APIs |
| tcpSocket | TCP connection ต้องสำเร็จ | Database, Redis, non-HTTP services |
| exec | Run command ใน container ต้อง exit 0 | Custom health checks, scripts |
| gRPC | gRPC Health Checking Protocol | gRPC services |
# TCP Socket probe
livenessProbe:
  tcpSocket:
    port: 3306
  periodSeconds: 10

# Exec probe
livenessProbe:
  exec:
    command:
    - cat
    - /tmp/healthy
  periodSeconds: 5

# gRPC probe (K8s 1.24+)
livenessProbe:
  grpc:
    port: 50051
    service: "my.health.v1.Health"
  periodSeconds: 10
Probe Parameters
| Parameter | Default | คำอธิบาย |
|---|---|---|
| initialDelaySeconds | 0 | รอกี่วินาทีหลัง Container start ก่อนเริ่ม Probe |
| periodSeconds | 10 | ตรวจทุกกี่วินาที |
| timeoutSeconds | 1 | Timeout ต่อครั้ง |
| failureThreshold | 3 | ล้มเหลวกี่ครั้งติดถึงถือว่า Fail |
| successThreshold | 1 | สำเร็จกี่ครั้งถึงถือว่า OK (Readiness ต้อง >= 1) |
Common Probe Mistakes
- Liveness probe check dependencies: อย่าเช็ค DB/Redis ใน liveness probe เพราะถ้า DB ล่ม ทุก Pod จะถูก restart วนลูป ให้เช็คใน readiness แทน
- initialDelaySeconds น้อยเกินไป: App ยังเริ่มไม่เสร็จก็ถูก kill แล้ว ใช้ startupProbe แทน
- timeoutSeconds สั้นเกินไป: ภายใต้ Load สูง response อาจช้า ตั้ง timeout ให้เหมาะสม
- Health endpoint ทำงานหนัก: /healthz ควร return เร็ว ไม่ควร query DB หรือทำ computation
- ไม่มี readiness probe: Rolling update จะส่ง Traffic ไป Pod ที่ยังไม่พร้อม
Graceful Shutdown
# Graceful Shutdown Flow:
# 1. Kubernetes ส่ง SIGTERM ไป Container
# 2. preStop hook ทำงาน (ถ้ามี)
# 3. Pod ถูกถอดออกจาก Service (ไม่รับ Traffic ใหม่)
# 4. App จัดการ request ที่ค้างอยู่ให้เสร็จ
# 5. App ปิดตัวเอง (exit 0)
# 6. ถ้าไม่ปิดภายใน terminationGracePeriodSeconds
#    → Kubernetes ส่ง SIGKILL (force kill)

apiVersion: apps/v1
kind: Deployment
spec:
  template:
    spec:
      terminationGracePeriodSeconds: 60  # default: 30
      containers:
      - name: my-app
        image: my-app:latest
        lifecycle:
          preStop:
            exec:
              command:
              - /bin/sh
              - -c
              - "sleep 5 && kill -SIGTERM 1"
              # sleep 5: รอให้ Service ถอด Pod ออกก่อน
              # จากนั้น SIGTERM ไป PID 1
# Application-side SIGTERM handling (Node.js example):
process.on('SIGTERM', () => {
console.log('SIGTERM received, shutting down gracefully...');
// 1. หยุดรับ connection ใหม่
server.close(() => {
console.log('HTTP server closed');
// 2. ปิด Database connections
db.close(() => {
console.log('DB connection closed');
// 3. ปิด Redis
redis.quit(() => {
console.log('Redis connection closed');
process.exit(0);
});
});
});
// 4. Force exit ถ้าปิดไม่เสร็จใน 25 วินาที
setTimeout(() => {
console.error('Forced shutdown');
process.exit(1);
}, 25000);
});Pod Disruption Budgets (PDB)
# PDB กำหนดจำนวน Pod ขั้นต่ำที่ต้องทำงานระหว่าง Disruption
# (เช่น Node upgrade, cluster scaling)

apiVersion: policy/v1
kind: PodDisruptionBudget
metadata:
  name: my-app-pdb
spec:
  minAvailable: 2         # ต้องมีอย่างน้อย 2 Pods running
  # หรือ
  # maxUnavailable: 1     # ลดได้ทีละ 1 Pod
  selector:
    matchLabels:
      app: my-app

# ผลลัพธ์:
# - ถ้ามี 3 Pods → drain Node ได้ทีละ 1
# - ถ้ามี 2 Pods → ห้าม drain Node (จะเหลือ Pod น้อยกว่า minAvailable)
Pod Priority and Preemption
# PriorityClass: กำหนดความสำคัญของ Pod
apiVersion: scheduling.k8s.io/v1
kind: PriorityClass
metadata:
  name: high-priority
value: 1000000
globalDefault: false
description: "For critical production workloads"

---
apiVersion: scheduling.k8s.io/v1
kind: PriorityClass
metadata:
  name: low-priority
value: 100
description: "For batch jobs and dev workloads"

---
# ใช้ PriorityClass ใน Pod
apiVersion: v1
kind: Pod
metadata:
  name: critical-app
spec:
  priorityClassName: high-priority
  containers:
  - name: app
    image: critical-app:latest

# Preemption:
# ถ้า Node เต็ม Pod priority สูง จะ Evict Pod priority ต่ำ
# เพื่อให้ Pod สำคัญได้ทำงาน
Pod Topology Spread Constraints
# กระจาย Pods ไปหลาย Zone/Node
apiVersion: apps/v1
kind: Deployment
spec:
  template:
    spec:
      topologySpreadConstraints:
      # กระจายไปหลาย Zone
      - maxSkew: 1
        topologyKey: topology.kubernetes.io/zone
        whenUnsatisfiable: DoNotSchedule
        labelSelector:
          matchLabels:
            app: my-app

      # กระจายไปหลาย Node
      - maxSkew: 1
        topologyKey: kubernetes.io/hostname
        whenUnsatisfiable: ScheduleAnyway
        labelSelector:
          matchLabels:
            app: my-app
Pod Security Context
apiVersion: v1
kind: Pod
metadata:
  name: secure-pod
spec:
  securityContext:
    runAsNonRoot: true          # ห้ามรัน root
    runAsUser: 1000             # UID 1000
    runAsGroup: 3000            # GID 3000
    fsGroup: 2000               # Volume ownership
    seccompProfile:
      type: RuntimeDefault

  containers:
  - name: app
    image: my-app:latest
    securityContext:
      allowPrivilegeEscalation: false  # ห้าม escalate
      readOnlyRootFilesystem: true     # Root FS read-only
      capabilities:
        drop:
        - ALL                           # ลบทุก Linux capability
        add:
        - NET_BIND_SERVICE              # อนุญาตเฉพาะที่จำเป็น
สรุป
การเข้าใจ Kubernetes Pod Lifecycle อย่างลึกซึ้งช่วยให้คุณ Deploy application ที่ Reliable, Resilient และ Production-ready ในปี 2026 ประเด็นสำคัญคือ:
เนื้อหาเกี่ยวข้อง — ทำความเข้าใจ Fivetran Connector Best Practices ที่ต้องรู้
- ใช้ Init Containers: สำหรับ Sequential initialization (รอ dependencies, download config)
- ใช้ Native Sidecar (K8s 1.28+): สำหรับ Log collection, Service mesh proxy
- ตั้ง Probes ให้ถูกต้อง: Startup → Liveness → Readiness แต่ละตัวมีหน้าที่ต่างกัน
- จัดการ Graceful Shutdown: Handle SIGTERM, ใช้ preStop hook, ตั้ง terminationGracePeriodSeconds
- ใช้ PDB: ป้องกัน Disruption ที่มากเกินไประหว่าง Maintenance
- Security Context: Run as non-root, Drop capabilities, Read-only filesystem