API คืออะไร? สอนออกแบบ REST API ตั้งแต่ Endpoint Authentication Versioning จนถึง GraphQL 2026
API คืออะไร? (Application Programming Interface)
API ย่อมาจาก Application Programming Interface คือชุดของกฎ โปรโตคอล และเครื่องมือที่กำหนดวิธีการสื่อสารระหว่างซอฟต์แวร์สองตัวหรือมากกว่า ลองจินตนาการว่า API เปรียบเหมือนพนักงานเสิร์ฟในร้านอาหาร คุณ (Client) สั่งอาหารผ่านพนักงานเสิร์ฟ (API) ซึ่งจะนำคำสั่งไปยังห้องครัว (Server) แล้วนำผลลัพธ์กลับมาให้คุณ คุณไม่จำเป็นต้องรู้ว่าห้องครัวทำอาหารอย่างไร คุณแค่สั่งผ่าน API และรอรับผลลัพธ์
API มีหลายประเภทตามวัตถุประสงค์การใช้งาน Web API คือ API ที่สื่อสารผ่าน HTTP/HTTPS ซึ่งเป็นประเภทที่พบบ่อยที่สุดในปัจจุบัน ไม่ว่าจะเป็นการดึงข้อมูลสภาพอากาศจาก OpenWeatherMap การชำระเงินผ่าน Stripe หรือการล็อกอินด้วย Google ล้วนใช้ Web API ทั้งสิ้น Library API คือ API ที่ใช้ภายในภาษาโปรแกรม เช่น Python Standard Library, Java SDK Operating System API คือ API ที่ระบบปฏิบัติการเปิดให้แอปพลิเคชันเรียกใช้ เช่น Windows API, POSIX API และ Hardware API คือ API สำหรับเข้าถึงอุปกรณ์ฮาร์ดแวร์ เช่น กล้อง, GPS, เซ็นเซอร์
อ่านเพิ่ม: OAuth 2.0 และ OpenID Connect เจาะลึก Authorization Server, T · อ่านเพิ่ม: OpenAPI และ Swagger คืออะไร? สอนเขียน API Documentation ที่ด · อ่านเพิ่ม: Java และ Spring Boot คืออะไร? สอนสร้าง Backend API ด้วย Spri
ทำไม API ถึงสำคัญมากในยุคปัจจุบัน? เหตุผลหลักคือ API ช่วยให้เกิด Separation of Concerns แต่ละระบบทำงานอิสระ ไม่ต้องรู้รายละเอียดภายในของกันและกัน เปิดโอกาสให้ Frontend (React, Vue, Mobile App) และ Backend (Python, Node.js, Go) พัฒนาแยกกันได้อย่างอิสระ ทำให้ทีมสามารถทำงานขนานกันได้ นอกจากนี้ API ยังเป็นรากฐานของสถาปัตยกรรม Microservices ที่แบ่งระบบใหญ่ออกเป็นบริการเล็กๆ แต่ละบริการสื่อสารกันผ่าน API ทำให้ง่ายต่อการ Scale และบำรุงรักษา
REST คืออะไร? (Representational State Transfer)
REST ย่อมาจาก Representational State Transfer เป็นสถาปัตยกรรมรูปแบบหนึ่ง (Architectural Style) ที่ Roy Fielding เสนอไว้ในวิทยานิพนธ์ปริญญาเอกของเขาในปี 2000 REST ไม่ใช่โปรโตคอล ไม่ใช่มาตรฐาน แต่เป็นชุดของข้อจำกัด (Constraints) ที่กำหนดว่า API ที่ออกแบบมาดีควรมีลักษณะอย่างไร API ที่ปฏิบัติตาม REST Constraints เรียกว่า RESTful API
REST มี 6 Constraints ที่สำคัญ ได้แก่
- Client-Server — แยก Client และ Server ออกจากกันชัดเจน Client รับผิดชอบ UI ส่วน Server รับผิดชอบ Data Storage และ Business Logic ทำให้พัฒนาแยกกันได้
- Stateless — ทุก Request ต้องมีข้อมูลครบถ้วนในตัวเอง Server ไม่เก็บ Session State ใดๆ ระหว่าง Request ทำให้ Scale ได้ง่ายเพราะ Request ใดๆ สามารถส่งไปยัง Server ตัวไหนก็ได้
- Cacheable — Response ต้องระบุได้ว่า Cacheable หรือไม่ เพื่อให้ Client หรือ Intermediary สามารถ Cache ได้ ลด Latency และ Network Traffic
- Uniform Interface — Interface ต้องเป็นมาตรฐานเดียวกัน ใช้ Resource-based URI, HTTP Methods, และ Standard Media Types ทำให้ API เรียนรู้ง่ายและใช้งานง่าย
- Layered System — Client ไม่จำเป็นต้องรู้ว่ากำลังเชื่อมต่อกับ Server ตัวจริงหรือ Proxy, Load Balancer, CDN ทำให้เพิ่ม Security และ Scalability ได้
- Code on Demand (Optional) — Server สามารถส่ง Executable Code (เช่น JavaScript) ให้ Client รันได้ เป็น Constraint เดียวที่เป็น Optional
HTTP Methods — กริยาของ REST API
HTTP Methods (หรือ HTTP Verbs) คือคำสั่งที่บอกว่า Client ต้องการทำอะไรกับ Resource แต่ละ Method มีความหมายและพฤติกรรมที่แตกต่างกัน
| Method | คำอธิบาย | Idempotent | Safe | ตัวอย่าง |
|---|---|---|---|---|
| GET | ดึงข้อมูล Resource | ใช่ | ใช่ | GET /api/users — ดึงรายชื่อผู้ใช้ทั้งหมด |
| POST | สร้าง Resource ใหม่ | ไม่ | ไม่ | POST /api/users — สร้างผู้ใช้ใหม่ |
| PUT | อัปเดต Resource ทั้งหมด (Replace) | ใช่ | ไม่ | PUT /api/users/1 — แทนที่ข้อมูลผู้ใช้ ID 1 |
| PATCH | อัปเดต Resource บางส่วน | ไม่* | ไม่ | PATCH /api/users/1 — แก้ไขบางฟิลด์ของผู้ใช้ ID 1 |
| DELETE | ลบ Resource | ใช่ | ไม่ | DELETE /api/users/1 — ลบผู้ใช้ ID 1 |
Idempotent หมายความว่าไม่ว่าจะเรียก Request ซ้ำกี่ครั้ง ผลลัพธ์ก็เหมือนเดิม เช่น GET /users/1 เรียกกี่ครั้งก็ได้ข้อมูลเดิม DELETE /users/1 เรียกครั้งแรกจะลบ เรียกครั้งที่สองจะได้ 404 แต่ไม่มีผลข้างเคียงเพิ่ม Safe หมายความว่า Method นั้นไม่เปลี่ยนแปลงข้อมูลบน Server เลย มีแค่ GET และ HEAD เท่านั้นที่เป็น Safe
# ตัวอย่าง HTTP Methods ด้วย curl

# GET — ดึงรายชื่อผู้ใช้
curl -X GET https://api.example.com/v1/users \
  -H "Authorization: Bearer YOUR_TOKEN"

# POST — สร้างผู้ใช้ใหม่
curl -X POST https://api.example.com/v1/users \
  -H "Content-Type: application/json" \
  -H "Authorization: Bearer YOUR_TOKEN" \
  -d '{"name": "สมชาย", "email": "somchai@example.com"}'

# PUT — อัปเดตผู้ใช้ทั้งหมด
curl -X PUT https://api.example.com/v1/users/1 \
  -H "Content-Type: application/json" \
  -d '{"name": "สมชาย", "email": "somchai@new.com", "role": "admin"}'

# PATCH — อัปเดตบางฟิลด์
curl -X PATCH https://api.example.com/v1/users/1 \
  -H "Content-Type: application/json" \
  -d '{"role": "admin"}'

# DELETE — ลบผู้ใช้
curl -X DELETE https://api.example.com/v1/users/1 \
  -H "Authorization: Bearer YOUR_TOKEN"
Endpoint Design — ออกแบบ URL ให้ถูกหลัก
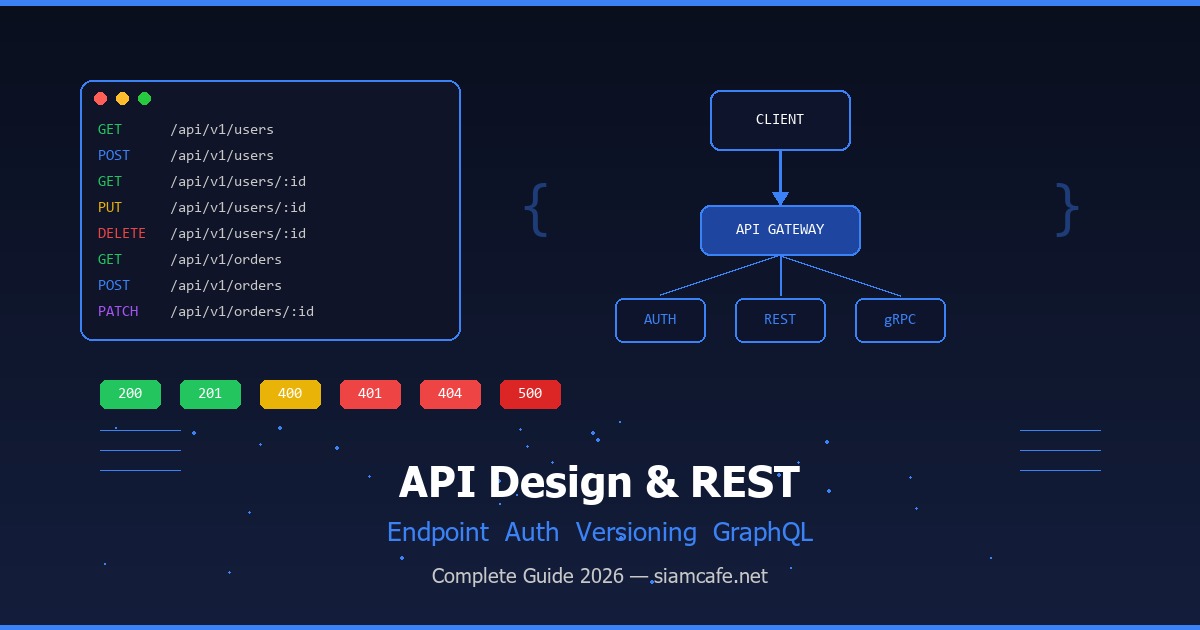
การออกแบบ Endpoint ที่ดีเป็นพื้นฐานสำคัญของ REST API ที่ใช้งานง่ายและบำรุงรักษาได้ Endpoint คือ URL ที่ Client ใช้เรียก API โดยควรปฏิบัติตามหลักการเหล่านี้
Resource Naming — ตั้งชื่อ Resource อย่างถูกต้อง
- ใช้คำนาม (Noun) ไม่ใช่กริยา — เช่น
/usersไม่ใช่/getUsersเพราะ HTTP Method คือ "กริยา" แล้ว - ใช้พหูพจน์ (Plural) — เช่น
/users,/products,/ordersไม่ใช่/user - ใช้ lowercase + hyphen — เช่น
/order-itemsไม่ใช่/orderItemsหรือ/OrderItems - หลีกเลี่ยง nesting ลึกเกิน 2 ระดับ — เช่น
/users/1/ordersดี แต่/users/1/orders/5/items/3/reviewsลึกเกินไป
# ตัวอย่าง Endpoint ที่ดี vs ไม่ดี

# ดี — ใช้คำนาม + พหูพจน์
GET    /api/v1/users
GET    /api/v1/users/123
POST   /api/v1/users
PUT    /api/v1/users/123
DELETE /api/v1/users/123

# ไม่ดี — ใช้กริยาใน URL
GET    /api/v1/getUsers
POST   /api/v1/createUser
PUT    /api/v1/updateUser/123
DELETE /api/v1/deleteUser/123

# ดี — Nested Resources (ไม่ลึกเกิน 2 ระดับ)
GET    /api/v1/users/123/orders      # คำสั่งซื้อของผู้ใช้ 123
GET    /api/v1/orders/456/items      # รายการสินค้าในคำสั่งซื้อ 456

# ไม่ดี — Nested ลึกเกินไป
GET    /api/v1/users/123/orders/456/items/789/reviews
Filtering, Pagination & Sorting
เมื่อ API มีข้อมูลจำนวนมาก การส่งข้อมูลทั้งหมดในคราวเดียวไม่ใช่ทางเลือกที่ดี ต้องใช้ Filtering, Pagination และ Sorting ผ่าน Query Parameters
# Filtering — กรองข้อมูลตามเงื่อนไข
GET /api/v1/products?category=electronics&min_price=1000&max_price=5000
GET /api/v1/users?role=admin&status=active

# Pagination — แบ่งหน้า
# วิธีที่ 1: Page-based (เหมาะกับ UI แบบมีเลขหน้า)
GET /api/v1/products?page=2&per_page=20

# วิธีที่ 2: Cursor-based (เหมาะกับ Infinite Scroll, Performance ดีกว่า)
GET /api/v1/products?cursor=eyJpZCI6MTAwfQ&limit=20

# Sorting — เรียงลำดับ
GET /api/v1/products?sort=price&order=asc
GET /api/v1/products?sort=-created_at   # เครื่องหมาย - = descending

# รวมทุกอย่าง
GET /api/v1/products?category=electronics&sort=-price&page=1&per_page=10
สำหรับ Pagination Response ควรส่งข้อมูลเกี่ยวกับ Pagination กลับไปด้วย เพื่อให้ Client รู้ว่ามีข้อมูลอีกกี่หน้า
// ตัวอย่าง Pagination Response
{
  "data": [
    {"id": 1, "name": "สินค้า A", "price": 1500},
    {"id": 2, "name": "สินค้า B", "price": 2300}
  ],
  "pagination": {
    "current_page": 2,
    "per_page": 20,
    "total_items": 156,
    "total_pages": 8,
    "has_next": true,
    "has_prev": true
  },
  "links": {
    "self": "/api/v1/products?page=2&per_page=20",
    "first": "/api/v1/products?page=1&per_page=20",
    "prev": "/api/v1/products?page=1&per_page=20",
    "next": "/api/v1/products?page=3&per_page=20",
    "last": "/api/v1/products?page=8&per_page=20"
  }
}
Status Codes — รหัสสถานะ HTTP
HTTP Status Code คือตัวเลข 3 หลักที่ Server ส่งกลับมาเพื่อบอก Client ว่าผลลัพธ์ของ Request เป็นอย่างไร แบ่งเป็น 5 กลุ่มหลัก
2xx — Success (สำเร็จ)
| Code | ชื่อ | ใช้เมื่อ |
|---|---|---|
| 200 | OK | Request สำเร็จ ใช้กับ GET, PUT, PATCH, DELETE |
| 201 | Created | สร้าง Resource สำเร็จ ใช้กับ POST |
| 204 | No Content | สำเร็จแต่ไม่มี Body ตอบกลับ ใช้กับ DELETE |
3xx — Redirection (เปลี่ยนเส้นทาง)
| Code | ชื่อ | ใช้เมื่อ |
|---|---|---|
| 301 | Moved Permanently | Resource ย้ายถาวร URL ใหม่อยู่ใน Location Header |
| 304 | Not Modified | Resource ไม่เปลี่ยนแปลง Client ใช้ Cache ได้ |
4xx — Client Error (ข้อผิดพลาดจาก Client)
| Code | ชื่อ | ใช้เมื่อ |
|---|---|---|
| 400 | Bad Request | Request ผิดรูปแบบ ข้อมูลไม่ครบ หรือ Validation ไม่ผ่าน |
| 401 | Unauthorized | ไม่ได้ Authentication (ยังไม่ล็อกอิน หรือ Token หมดอายุ) |
| 403 | Forbidden | Authentication แล้วแต่ไม่มีสิทธิ์เข้าถึง Resource นี้ |
| 404 | Not Found | ไม่พบ Resource ที่ร้องขอ |
| 405 | Method Not Allowed | HTTP Method ไม่รองรับสำหรับ Endpoint นี้ |
| 409 | Conflict | ขัดแย้งกับสถานะปัจจุบัน เช่น สร้าง User ที่ Email ซ้ำ |
| 422 | Unprocessable Entity | ข้อมูลถูกรูปแบบแต่ไม่สามารถประมวลผลได้ |
| 429 | Too Many Requests | ส่ง Request มากเกินไป (Rate Limit) |
5xx — Server Error (ข้อผิดพลาดจาก Server)
| Code | ชื่อ | ใช้เมื่อ |
|---|---|---|
| 500 | Internal Server Error | Server เกิดข้อผิดพลาดที่ไม่ได้คาดคิด |
| 502 | Bad Gateway | Server ที่เป็น Gateway/Proxy ได้รับ Response ผิดปกติจาก Upstream |
| 503 | Service Unavailable | Server ไม่พร้อมให้บริการ (Maintenance, Overload) |
| 504 | Gateway Timeout | Gateway/Proxy ไม่ได้รับ Response จาก Upstream ทันเวลา |
Request/Response Format — รูปแบบข้อมูล
REST API ส่วนใหญ่ใช้ JSON (JavaScript Object Notation) เป็นรูปแบบข้อมูลเริ่มต้น เพราะอ่านง่าย เบา และรองรับทุกภาษาโปรแกรม Headers ที่สำคัญสำหรับ API ได้แก่
# Request Headers ที่สำคัญ
Content-Type: application/json       # รูปแบบข้อมูลที่ส่ง
Accept: application/json             # รูปแบบข้อมูลที่ต้องการรับ
Authorization: Bearer eyJhbGciOi...  # Authentication Token
X-Request-ID: uuid-v4               # สำหรับ Tracing
X-API-Version: 2                    # Version ของ API

# Response Headers ที่สำคัญ
Content-Type: application/json
X-RateLimit-Limit: 100              # จำนวน Request สูงสุดต่อ Window
X-RateLimit-Remaining: 95           # จำนวน Request ที่เหลือ
X-RateLimit-Reset: 1680000000       # เวลาที่ Rate Limit จะ Reset (Unix Timestamp)
Cache-Control: max-age=3600         # Cache ได้นาน 1 ชั่วโมง
รูปแบบ JSON Response ที่ดีควรมีโครงสร้างที่สม่ำเสมอ ไม่ว่าจะเป็น Success หรือ Error
// Success Response
{
  "status": "success",
  "data": {
    "id": 1,
    "name": "สมชาย ใจดี",
    "email": "somchai@example.com",
    "role": "admin",
    "created_at": "2026-04-08T10:30:00Z"
  }
}

// List Response
{
  "status": "success",
  "data": [
    {"id": 1, "name": "สมชาย"},
    {"id": 2, "name": "สมหญิง"}
  ],
  "meta": {
    "total": 50,
    "page": 1,
    "per_page": 20
  }
}

// Error Response
{
  "status": "error",
  "error": {
    "code": "VALIDATION_ERROR",
    "message": "ข้อมูลไม่ถูกต้อง",
    "details": [
      {"field": "email", "message": "รูปแบบ Email ไม่ถูกต้อง"},
      {"field": "name", "message": "ต้องมีอย่างน้อย 2 ตัวอักษร"}
    ]
  }
}
Authentication — การยืนยันตัวตน
Authentication คือกระบวนการตรวจสอบว่า Client ที่เรียก API เป็นใคร มีสิทธิ์หรือไม่ เป็นส่วนที่สำคัญมากสำหรับ API Security มีหลายวิธีให้เลือกใช้ แต่ละวิธีเหมาะกับสถานการณ์ที่แตกต่างกัน
1. API Key — วิธีที่ง่ายที่สุด
API Key คือ String ยาวๆ ที่ Server สร้างให้ Client ใช้ส่งมาใน Header หรือ Query Parameter ทุก Request ข้อดีคือใช้ง่าย เหมาะกับ Server-to-Server Communication แต่ข้อเสียคือถ้า Key หลุดไปจะใช้ได้ทันทีโดยไม่มีวันหมดอายุ
# ส่ง API Key ผ่าน Header (แนะนำ)
curl -X GET https://api.example.com/v1/data \
  -H "X-API-Key: sk_live_abc123def456"

# ส่ง API Key ผ่าน Query Parameter (ไม่แนะนำ — อาจติด Log)
curl -X GET "https://api.example.com/v1/data?api_key=sk_live_abc123def456"
2. JWT (JSON Web Token) — มาตรฐานยอดนิยม
JWT เป็น Token ที่ Self-contained คือมีข้อมูลผู้ใช้ (Claims) อยู่ในตัว Token เอง Server ไม่ต้องเก็บ Session ทำให้ Stateless และ Scale ได้ง่าย JWT ประกอบด้วย 3 ส่วนคั่นด้วยจุด: Header.Payload.Signature
# JWT Structure
# Header: อัลกอริทึมที่ใช้
{"alg": "HS256", "typ": "JWT"}

# Payload: ข้อมูลผู้ใช้ (Claims)
{
  "sub": "1234567890",
  "name": "สมชาย",
  "role": "admin",
  "iat": 1680000000,
  "exp": 1680086400
}

# Signature: ลายเซ็นดิจิทัล
HMACSHA256(base64UrlEncode(header) + "." + base64UrlEncode(payload), secret)

# ผลลัพธ์: eyJhbGciOiJIUzI1NiJ9.eyJzdWIiOiIxMjM0NTY3ODkwIn0.signature
# Python — สร้างและตรวจสอบ JWT ด้วย PyJWT
# pip install pyjwt
import jwt
from datetime import datetime, timedelta
SECRET_KEY = "your-secret-key-keep-it-safe"
# สร้าง Token
def create_token(user_id: int, role: str) -> str:
payload = {
"sub": str(user_id),
"role": role,
"iat": datetime.utcnow(),
"exp": datetime.utcnow() + timedelta(hours=24)
}
return jwt.encode(payload, SECRET_KEY, algorithm="HS256")
# ตรวจสอบ Token
def verify_token(token: str) -> dict:
try:
payload = jwt.decode(token, SECRET_KEY, algorithms=["HS256"])
return payload
except jwt.ExpiredSignatureError:
raise Exception("Token หมดอายุแล้ว")
except jwt.InvalidTokenError:
raise Exception("Token ไม่ถูกต้อง")
# ใช้งาน
token = create_token(user_id=1, role="admin")
print(token)
data = verify_token(token)
print(f"User ID: {data['sub']}, Role: {data['role']}")3. OAuth 2.0 — มาตรฐานสำหรับ Third-Party Access
OAuth 2.0 เป็นมาตรฐานสำหรับ Delegated Authorization คือการให้แอปพลิเคชันเข้าถึงข้อมูลผู้ใช้โดยผู้ใช้ไม่ต้องให้รหัสผ่าน ตัวอย่างเช่น "Login with Google" หรือ "Connect with Facebook" OAuth 2.0 มีหลาย Grant Type ที่พบบ่อยคือ Authorization Code (สำหรับ Web App), Client Credentials (สำหรับ Server-to-Server) และ PKCE (สำหรับ Mobile/SPA)
# OAuth 2.0 Authorization Code Flow
# Step 1: Client redirect ผู้ใช้ไป Authorization Server
GET https://auth.example.com/authorize?
    response_type=code&
    client_id=YOUR_CLIENT_ID&
    redirect_uri=https://yourapp.com/callback&
    scope=read+write&
    state=random_state_string

# Step 2: ผู้ใช้ล็อกอิน + อนุญาต -> Redirect กลับมาพร้อม Code
GET https://yourapp.com/callback?code=AUTH_CODE&state=random_state_string

# Step 3: แลก Code เป็น Access Token
POST https://auth.example.com/token
Content-Type: application/x-www-form-urlencoded

grant_type=authorization_code&
code=AUTH_CODE&
redirect_uri=https://yourapp.com/callback&
client_id=YOUR_CLIENT_ID&
client_secret=YOUR_SECRET

# Step 4: ใช้ Access Token เรียก API
GET https://api.example.com/v1/users/me
Authorization: Bearer ACCESS_TOKEN
4. Bearer Token — การส่ง Token ใน Header
Bearer Token คือรูปแบบการส่ง Token ใน Authorization Header โดยใช้คำว่า "Bearer" นำหน้า ทั้ง JWT, OAuth Access Token และ Token อื่นๆ ล้วนใช้ Bearer Scheme นี้ในการส่ง ข้อสำคัญคือต้องส่งผ่าน HTTPS เสมอ เพราะถ้าใช้ HTTP ธรรมดา Token จะถูกดักจับได้
# ส่ง Bearer Token
curl -X GET https://api.example.com/v1/profile \
  -H "Authorization: Bearer eyJhbGciOiJIUzI1NiIsInR5cCI6IkpXVCJ9..."
Rate Limiting & Throttling — จำกัดอัตราการเรียกใช้
Rate Limiting คือการจำกัดจำนวน Request ที่ Client สามารถส่งได้ภายในช่วงเวลาหนึ่ง เพื่อป้องกัน Server Overload, DDoS Attack และการใช้งานเกินสิทธิ์ วิธีการที่พบบ่อยมี 3 แบบ
- Fixed Window — นับ Request ในช่วงเวลาคงที่ เช่น 100 requests/นาที พอหมดนาทีก็เริ่มนับใหม่ ง่ายแต่อาจมีปัญหา Burst ตรงรอยต่อ
- Sliding Window — คล้าย Fixed Window แต่คำนวณจาก Window ที่เลื่อนไปเรื่อยๆ ป้องกัน Burst ได้ดีกว่า
- Token Bucket — มี Bucket เก็บ Token เติมเรื่อยๆ ตามเวลา แต่ละ Request ใช้ 1 Token ถ้า Token หมดก็ต้องรอ เหมาะกับการอนุญาตให้ Burst ชั่วคราวได้
# Python FastAPI — Rate Limiting ด้วย slowapi
from fastapi import FastAPI
from slowapi import Limiter
from slowapi.util import get_remote_address

app = FastAPI()
limiter = Limiter(key_func=get_remote_address)

@app.get("/api/v1/search")
@limiter.limit("30/minute")   # จำกัด 30 requests ต่อนาที
async def search(request, q: str):
    return {"query": q, "results": []}

@app.get("/api/v1/users")
@limiter.limit("100/hour")    # จำกัด 100 requests ต่อชั่วโมง
async def get_users(request):
    return {"users": []}
เมื่อ Client ถูก Rate Limit ควรตอบ 429 Too Many Requests พร้อม Headers บอกรายละเอียด
# Response เมื่อถูก Rate Limit
HTTP/1.1 429 Too Many Requests
X-RateLimit-Limit: 100
X-RateLimit-Remaining: 0
X-RateLimit-Reset: 1680001200
Retry-After: 60

{
  "status": "error",
  "error": {
    "code": "RATE_LIMIT_EXCEEDED",
    "message": "คุณส่ง Request มากเกินไป กรุณารอ 60 วินาที"
  }
}
Versioning — การจัดการเวอร์ชัน API
เมื่อ API มีการเปลี่ยนแปลง (Breaking Changes) ที่อาจกระทบ Client เดิม จำเป็นต้องมี Versioning เพื่อให้ Client เดิมยังใช้งานได้ขณะที่ Client ใหม่ใช้เวอร์ชันใหม่ มี 3 วิธีหลัก
| วิธี | ตัวอย่าง | ข้อดี | ข้อเสีย |
|---|---|---|---|
| URL Path | /api/v1/users | ชัดเจน เห็นทันที เปลี่ยนง่าย | URL เปลี่ยน ต้องอัปเดต Client |
| Header | X-API-Version: 2 | URL สะอาด ไม่ผูกกับ Version | ไม่ชัดเจน Debug ยากกว่า |
| Query Parameter | /api/users?version=2 | ง่าย ไม่ต้องแก้ URL Pattern | ดู "สกปรก" ปนกับ Parameter อื่น |
วิธีที่นิยมที่สุดและแนะนำคือ URL Path Versioning เพราะชัดเจน ง่ายต่อการทำความเข้าใจ และ Cache ได้ง่าย บริษัทใหญ่ๆ เช่น Twitter, Stripe, GitHub ล้วนใช้วิธีนี้
# URL Path Versioning (แนะนำ)
GET /api/v1/users        # Version 1
GET /api/v2/users        # Version 2

# Header Versioning
GET /api/users
X-API-Version: 1

# Query Parameter Versioning
GET /api/users?version=1
Error Handling — จัดการข้อผิดพลาดอย่างเป็นระบบ
API ที่ดีต้องจัดการข้อผิดพลาดอย่างมีมาตรฐาน ไม่ใช่แค่ส่ง 500 Internal Server Error กลับไปเฉยๆ แต่ต้องมี Error Response ที่ชัดเจน ช่วยให้ Client แก้ปัญหาได้
// Standard Error Response Format
{
  "status": "error",
  "error": {
    "code": "RESOURCE_NOT_FOUND",
    "message": "ไม่พบผู้ใช้ที่มี ID 999",
    "details": null,
    "timestamp": "2026-04-08T10:30:00Z",
    "path": "/api/v1/users/999",
    "request_id": "req_abc123def456"
  }
}

// Validation Error (หลาย Field)
{
  "status": "error",
  "error": {
    "code": "VALIDATION_ERROR",
    "message": "ข้อมูลไม่ถูกต้อง กรุณาตรวจสอบ",
    "details": [
      {
        "field": "email",
        "code": "INVALID_FORMAT",
        "message": "รูปแบบ Email ไม่ถูกต้อง"
      },
      {
        "field": "password",
        "code": "TOO_SHORT",
        "message": "รหัสผ่านต้องมีอย่างน้อย 8 ตัวอักษร"
      }
    ]
  }
}
# Python FastAPI — Error Handling
from fastapi import FastAPI, HTTPException
from fastapi.responses import JSONResponse
from pydantic import BaseModel
from datetime import datetime
app = FastAPI()
class ErrorResponse(BaseModel):
status: str = "error"
error: dict
@app.exception_handler(HTTPException)
async def http_exception_handler(request, exc):
return JSONResponse(
status_code=exc.status_code,
content={
"status": "error",
"error": {
"code": exc.detail.get("code", "UNKNOWN_ERROR"),
"message": exc.detail.get("message", str(exc.detail)),
"timestamp": datetime.utcnow().isoformat() + "Z",
"path": str(request.url.path),
}
}
)
@app.get("/api/v1/users/{user_id}")
async def get_user(user_id: int):
user = find_user_by_id(user_id)
if not user:
raise HTTPException(
status_code=404,
detail={
"code": "USER_NOT_FOUND",
"message": f"ไม่พบผู้ใช้ที่มี ID {user_id}"
}
)API Documentation — Swagger/OpenAPI & Postman
API Documentation คือเอกสารที่อธิบายวิธีใช้ API ได้แก่ Endpoint ทั้งหมด, HTTP Method, Parameters, Request Body, Response, Authentication และ Error Codes เอกสารที่ดีช่วยให้นักพัฒนาเข้าใจ API ได้เร็ว ลดเวลาในการ Integrate
OpenAPI Specification (Swagger)
OpenAPI (เดิมชื่อ Swagger) เป็นมาตรฐาน Specification สำหรับอธิบาย REST API ในรูปแบบ YAML หรือ JSON ข้อดีคือสามารถ Auto-generate จากโค้ดได้ (เช่น FastAPI สร้างให้อัตโนมัติ) และสามารถ Generate Client SDK, Mock Server, Test Suite จาก Spec ได้
# openapi.yaml ตัวอย่าง
openapi: 3.0.3
info:
  title: User Management API
  version: "1.0"
  description: API สำหรับจัดการผู้ใช้งาน
servers:
  - url: https://api.example.com/v1
paths:
  /users:
    get:
      summary: ดึงรายชื่อผู้ใช้
      parameters:
        - name: page
          in: query
          schema:
            type: integer
            default: 1
        - name: per_page
          in: query
          schema:
            type: integer
            default: 20
      responses:
        '200':
          description: สำเร็จ
          content:
            application/json:
              schema:
                type: object
                properties:
                  data:
                    type: array
                    items:
                      $ref: '#/components/schemas/User'
    post:
      summary: สร้างผู้ใช้ใหม่
      requestBody:
        required: true
        content:
          application/json:
            schema:
              $ref: '#/components/schemas/CreateUser'
      responses:
        '201':
          description: สร้างสำเร็จ
components:
  schemas:
    User:
      type: object
      properties:
        id:
          type: integer
        name:
          type: string
        email:
          type: string
Postman — เครื่องมือทดสอบ API
Postman เป็นเครื่องมือยอดนิยมสำหรับทดสอบ API สามารถส่ง HTTP Request ได้ทุกรูปแบบ มี Collection สำหรับจัดกลุ่ม Request, Environment Variables สำหรับเปลี่ยนค่าตาม Environment, Test Scripts สำหรับ Automated Testing, และ Mock Server สำหรับจำลอง API ปัจจุบัน Postman ยังรองรับ API Documentation, API Monitoring และ Team Collaboration
GraphQL vs REST — ตารางเปรียบเทียบ
GraphQL เป็น Query Language สำหรับ API ที่ Facebook สร้างขึ้นในปี 2012 (เปิดเป็น Open Source ปี 2015) แตกต่างจาก REST ตรงที่ Client กำหนดได้เองว่าต้องการข้อมูลอะไรบ้าง ไม่ต้องรับข้อมูลทั้งหมดที่ Server ส่งมา
| หัวข้อ | REST | GraphQL |
|---|---|---|
| Endpoint | หลาย Endpoint (/users, /orders) | Endpoint เดียว (/graphql) |
| Data Fetching | Server กำหนดรูปแบบ Response | Client กำหนด Query ว่าต้องการอะไร |
| Over-fetching | ปัญหาบ่อย ได้ข้อมูลเกินที่ต้องการ | ไม่มี ได้เฉพาะที่ขอ |
| Under-fetching | ต้องเรียกหลาย Endpoint | Query เดียวได้ข้อมูลจากหลาย Resource |
| Versioning | ต้องมี /v1, /v2 | ไม่ต้อง เพิ่ม Field ใหม่ได้โดยไม่กระทบ |
| Caching | ง่าย ใช้ HTTP Caching ได้ตรงๆ | ซับซ้อนกว่า ต้องใช้ Client-side Caching |
| Learning Curve | ง่าย ใช้ HTTP ที่รู้จักอยู่แล้ว | สูงกว่า ต้องเรียน Query Language ใหม่ |
| File Upload | ง่าย multipart/form-data | ต้องใช้ Library เพิ่ม |
| เหมาะกับ | CRUD ทั่วไป Microservices | Mobile App ข้อมูลซับซ้อน หลาย Relationship |
# GraphQL Query — ขอเฉพาะข้อมูลที่ต้องการ
query {
  user(id: 1) {
    name
    email
    orders(last: 5) {
      id
      total
      status
      items {
        name
        quantity
      }
    }
  }
}

# GraphQL Mutation — สร้าง/แก้ไขข้อมูล
mutation {
  createUser(input: {
    name: "สมชาย"
    email: "somchai@example.com"
  }) {
    id
    name
    email
  }
}

# REST เทียบเท่า — ต้องเรียกหลาย Endpoint
GET /api/v1/users/1
GET /api/v1/users/1/orders?limit=5
# ต้อง Loop เรียก items ของแต่ละ order อีก
# Python — GraphQL Server ด้วย Strawberry
# pip install strawberry-graphql fastapi uvicorn
import strawberry
from fastapi import FastAPI
from strawberry.fastapi import GraphQLRouter
@strawberry.type
class User:
id: int
name: str
email: str
@strawberry.type
class Query:
@strawberry.field
def user(self, id: int) -> User:
# ดึงจาก Database
return User(id=id, name="สมชาย", email="somchai@example.com")
@strawberry.field
def users(self) -> list[User]:
return [
User(id=1, name="สมชาย", email="somchai@example.com"),
User(id=2, name="สมหญิง", email="somying@example.com"),
]
schema = strawberry.Schema(query=Query)
graphql_app = GraphQLRouter(schema)
app = FastAPI()
app.include_router(graphql_app, prefix="/graphql")gRPC Overview — Remote Procedure Call สมัยใหม่
gRPC (gRPC Remote Procedure Calls) เป็น High-performance RPC Framework ที่ Google สร้างขึ้น ใช้ Protocol Buffers (protobuf) เป็น Interface Definition Language (IDL) และ Serialization Format ทำงานบน HTTP/2 รองรับ Bidirectional Streaming เร็วกว่า REST JSON หลายเท่าเพราะใช้ Binary Format
Protocol Buffers — กำหนด Service และ Message
// user.proto — กำหนดโครงสร้างข้อมูลและ Service
syntax = "proto3";

package user;

// Message — โครงสร้างข้อมูล
message User {
  int32 id = 1;
  string name = 2;
  string email = 3;
  string role = 4;
}

message GetUserRequest {
  int32 id = 1;
}

message CreateUserRequest {
  string name = 1;
  string email = 2;
}

message UserList {
  repeated User users = 1;
}

message Empty {}

// Service — กำหนด RPC Methods
service UserService {
  rpc GetUser(GetUserRequest) returns (User);
  rpc ListUsers(Empty) returns (UserList);
  rpc CreateUser(CreateUserRequest) returns (User);
  rpc StreamUsers(Empty) returns (stream User); // Server Streaming
}
gRPC Streaming — 4 รูปแบบ
- Unary — Client ส่ง 1 Request, Server ตอบ 1 Response (เหมือน REST)
- Server Streaming — Client ส่ง 1 Request, Server ตอบเป็น Stream หลาย Response
- Client Streaming — Client ส่ง Stream หลาย Request, Server ตอบ 1 Response
- Bidirectional Streaming — ทั้ง Client และ Server ส่ง Stream ได้พร้อมกัน
| หัวข้อ | REST | gRPC |
|---|---|---|
| Protocol | HTTP/1.1 หรือ HTTP/2 | HTTP/2 เท่านั้น |
| Format | JSON (Text) | Protocol Buffers (Binary) |
| Performance | ปานกลาง | สูงมาก (5-10x เร็วกว่า) |
| Streaming | ไม่รองรับ (ต้องใช้ WebSocket) | รองรับ 4 รูปแบบ |
| Browser Support | รองรับทุก Browser | ต้องใช้ gRPC-Web Proxy |
| เหมาะกับ | Public API, Web/Mobile | Microservices, Internal Communication |
API Testing — ทดสอบ API อย่างมืออาชีพ
การทดสอบ API เป็นขั้นตอนสำคัญที่ไม่ควรข้าม เพื่อให้มั่นใจว่า API ทำงานถูกต้อง รองรับ Edge Cases และไม่มี Regression เมื่อแก้ไขโค้ด
ทดสอบด้วย curl
# GET — ดึงข้อมูล
curl -s https://api.example.com/v1/users | python -m json.tool

# POST — สร้างข้อมูลใหม่
curl -X POST https://api.example.com/v1/users \
  -H "Content-Type: application/json" \
  -H "Authorization: Bearer TOKEN" \
  -d '{"name": "ทดสอบ", "email": "test@example.com"}' \
  -w "\nHTTP Status: %{http_code}\n"

# ดู Response Headers
curl -I https://api.example.com/v1/users

# Verbose mode (ดูทุกอย่าง)
curl -v https://api.example.com/v1/users
ทดสอบด้วย pytest (Python)
# test_api.py
# pip install pytest httpx

import pytest
import httpx

BASE_URL = "http://localhost:8000/api/v1"
TOKEN = "your-test-token"

headers = {
    "Authorization": f"Bearer {TOKEN}",
    "Content-Type": "application/json",
}

class TestUserAPI:
    def test_list_users(self):
        response = httpx.get(f"{BASE_URL}/users", headers=headers)
        assert response.status_code == 200
        data = response.json()
        assert data["status"] == "success"
        assert isinstance(data["data"], list)

    def test_create_user(self):
        payload = {"name": "ทดสอบ", "email": "test@example.com"}
        response = httpx.post(f"{BASE_URL}/users", json=payload, headers=headers)
        assert response.status_code == 201
        data = response.json()
        assert data["data"]["name"] == "ทดสอบ"

    def test_get_user_not_found(self):
        response = httpx.get(f"{BASE_URL}/users/99999", headers=headers)
        assert response.status_code == 404
        data = response.json()
        assert data["status"] == "error"

    def test_create_user_validation_error(self):
        payload = {"name": ""}  # ข้อมูลไม่ครบ
        response = httpx.post(f"{BASE_URL}/users", json=payload, headers=headers)
        assert response.status_code == 422

    def test_unauthorized_access(self):
        response = httpx.get(f"{BASE_URL}/users")  # ไม่มี Token
        assert response.status_code == 401

# รัน: pytest test_api.py -v
Postman Collection — Automated Testing
Postman ยังสามารถเขียน Test Script ใน JavaScript เพื่อตรวจสอบ Response อัตโนมัติ และรัน Collection ทั้งหมดด้วย Newman (CLI Runner) ใน CI/CD Pipeline
// Postman Test Script ตัวอย่าง
pm.test("Status code is 200", function () {
    pm.response.to.have.status(200);
});

pm.test("Response has correct structure", function () {
    var json = pm.response.json();
    pm.expect(json).to.have.property("status", "success");
    pm.expect(json).to.have.property("data");
});

pm.test("Response time is less than 500ms", function () {
    pm.expect(pm.response.responseTime).to.be.below(500);
});

// รันด้วย Newman CLI
// npx newman run collection.json -e environment.json --reporters cli,json
ข้อผิดพลาดที่พบบ่อยในการออกแบบ API
- ใช้กริยาใน URL — เช่น
/getUsers,/createOrderควรใช้ HTTP Method แทน - ไม่มี Versioning — เมื่อต้องเปลี่ยนแปลง API จะกระทบ Client ทั้งหมด
- ส่ง 200 OK ทุกอย่าง — แม้เกิด Error ก็ส่ง 200 พร้อม error flag ใน Body ทำให้ Client จัดการยาก
- Error Response ไม่มีรายละเอียด — ส่งแค่ "Something went wrong" ไม่ช่วยให้ Debug ได้
- ไม่มี Pagination — ส่งข้อมูลทั้งหมดในครั้งเดียว ทำให้ Response ช้าและใช้ Memory มาก
- ไม่ทำ Rate Limiting — เปิดให้เรียกได้ไม่จำกัดทำให้ Server ล่มง่ายเมื่อถูก Abuse
- ไม่ใช้ HTTPS — ส่ง Token และข้อมูลผ่าน HTTP ธรรมดาทำให้ถูกดักจับได้
- เปิดเผย Internal Error ใน Production — ส่ง Stack Trace กลับให้ Client เป็นช่องโหว่ด้าน Security
- ไม่ Validate Input — รับข้อมูลจาก Client ไปใช้ตรงๆ โดยไม่ตรวจสอบ เสี่ยง SQL Injection และ XSS
- ไม่มี API Documentation — ทำให้นักพัฒนาคนอื่นใช้ API ได้ยาก ต้องมานั่งเดาว่า Endpoint มีอะไรบ้าง
สรุป — เลือก API Style ไหนดี?
การเลือก API Style ขึ้นอยู่กับ Use Case ของคุณ REST เหมาะกับ Public API, CRUD Application และเมื่อต้องการ HTTP Caching เป็นตัวเลือกที่ปลอดภัยที่สุดสำหรับโปรเจกต์ส่วนใหญ่ GraphQL เหมาะกับ Frontend ที่ต้องการข้อมูลหลากหลายจากหลาย Resource ลดปัญหา Over-fetching โดยเฉพาะ Mobile App ที่ต้องประหยัด Bandwidth gRPC เหมาะกับ Microservices Communication ภายในที่ต้องการ Performance สูง รองรับ Streaming และ Type Safety
ในปี 2026 แนวโน้มที่เห็นได้ชัดคือหลายองค์กรใช้ Hybrid Approach โดยใช้ REST สำหรับ Public API, GraphQL สำหรับ BFF (Backend for Frontend) และ gRPC สำหรับ Internal Microservices Communication ไม่จำเป็นต้องเลือกอย่างใดอย่างหนึ่ง แต่เลือกตามความเหมาะสมของแต่ละ Use Case
FAQ — คำถามที่พบบ่อย
Q: REST API กับ RESTful API ต่างกันอย่างไร?
A: REST เป็นสถาปัตยกรรม (Architectural Style) ส่วน RESTful API คือ API ที่ปฏิบัติตาม REST Constraints ทั้ง 6 ข้อ ในความเป็นจริง API ส่วนใหญ่ที่เรียกว่า REST API ไม่ได้ปฏิบัติตามทุกข้อ ซึ่งก็ไม่เป็นไร ขอให้ปฏิบัติตาม Best Practices ที่สำคัญ เช่น Resource-based URL, Proper HTTP Methods และ Status Codes ก็เพียงพอ
Q: ควรใช้ JWT หรือ Session สำหรับ Authentication?
A: ขึ้นอยู่กับสถาปัตยกรรม JWT เหมาะกับ Stateless API, Microservices และ Mobile App เพราะไม่ต้องเก็บ Session บน Server ส่วน Session เหมาะกับ Monolithic Web App ที่ต้องการ Revoke ได้ทันที JWT มีข้อเสียคือเมื่อ Issued แล้วจะ Revoke ยาก ต้องรอหมดอายุ (แก้ได้ด้วย Token Blacklist แต่ก็กลายเป็น Stateful)
Q: GraphQL จะมาแทน REST ไหม?
A: ไม่น่าจะแทนที่กันได้ทั้งหมด เพราะทั้งสองมี Trade-offs ที่แตกต่างกัน REST ง่ายกว่า Cache ได้ดีกว่า และเหมาะกับ CRUD ธรรมดา ส่วน GraphQL ดีกว่าเมื่อมีข้อมูลซับซ้อน หลาย Relationship ในปี 2026 ทั้งสองยังคงใช้กันอย่างแพร่หลาย
Q: Rate Limiting ควรตั้งเท่าไร?
A: ขึ้นอยู่กับ API และ Plan ตัวอย่างเช่น Free Plan: 60 requests/นาที, Pro Plan: 600 requests/นาที, Enterprise: 6000 requests/นาที ดูจาก API ใหญ่ๆ เช่น GitHub: 5000 requests/ชั่วโมง, Twitter: 300 requests/15 นาที เริ่มจากค่าที่สมเหตุสมผลแล้วปรับตามการใช้งานจริง
Q: ต้องเรียน gRPC ไหม?
A: ถ้าคุณทำ Microservices ที่ต้องการ Performance สูง มี Type Safety และ Streaming ควรเรียน gRPC แต่ถ้าทำ Web App ทั่วไป REST API ก็เพียงพอ เริ่มจาก REST ให้เข้าใจดีก่อน แล้วค่อยเรียน GraphQL/gRPC เมื่อต้องการ