AMD Virtualization คืออะไร — AMD-V สำหรับ Virtual
AMD Virtualization AMD-V
AMD Virtualization AMD-V SVM Hardware Virtualization Virtual Machine VirtualBox VMware Hyper-V Docker WSL2 BIOS CPU Hypervisor KVM QEMU
| Hypervisor | Type | ใช้กับ | AMD-V จำเป็น |
|---|---|---|---|
| VirtualBox | Type 2 | Desktop VM | แนะนำ (เร็วขึ้นมาก) |
| VMware Workstation | Type 2 | Desktop VM | จำเป็น |
| Hyper-V | Type 1 | Windows VM | จำเป็น |
| KVM/QEMU | Type 1 | Linux VM | จำเป็น |
| Docker | Container | Containers | จำเป็น (WSL2) |
| Android Emulator | Type 2 | Mobile Dev | จำเป็น |
เปิด AMD-V และ VM Setup
# === AMD-V BIOS & VM Setup ===


# ตรวจสอบ AMD-V บน Windows (PowerShell)

# systeminfo | findstr "Virtualization"

# ผลลัพธ์: Virtualization Enabled In Firmware: Yes


# ตรวจสอบบน Linux

# grep -c svm /proc/cpuinfo

# ผลลัพธ์ > 0 = AMD-V enabled

# หรือ

# lscpu | grep Virtualization

# ผลลัพธ์: Virtualization: AMD-V


# VirtualBox CLI — สร้าง VM

# VBoxManage createvm --name "Ubuntu-Server" \

#   --ostype Ubuntu_64 --register

#

# VBoxManage modifyvm "Ubuntu-Server" \

#   --cpus 4 --memory 4096 --vram 128 \

#   --nic1 nat --audio none \

#   --nested-hw-virt on

#

# VBoxManage createmedium disk \

#   --filename "Ubuntu-Server.vdi" \

#   --size 50000 --format VDI

#

# VBoxManage storagectl "Ubuntu-Server" \

#   --name "SATA" --add sata

#

# VBoxManage storageattach "Ubuntu-Server" \

#   --storagectl "SATA" --port 0 \

#   --type hdd --medium "Ubuntu-Server.vdi"

#

# VBoxManage startvm "Ubuntu-Server" --type headless


# KVM/QEMU บน Linux

# sudo apt install qemu-kvm libvirt-daemon-system

# sudo systemctl enable --now libvirtd

#

# # สร้าง VM

# virt-install \

#   --name ubuntu-server \

#   --ram 4096 --vcpus 4 \

#   --disk size=50 \

#   --os-variant ubuntu22.04 \

#   --cdrom /path/to/ubuntu.iso \

#   --network bridge=virbr0


from dataclasses import dataclass

from typing import List


@dataclass

class VMConfig:

    name: str

    os: str

    cpus: int

    ram_gb: float

    disk_gb: int

    network: str

    purpose: str


vms = [

    VMConfig("web-server", "Ubuntu 22.04", 2, 4, 50, "Bridge", "Web Application"),

    VMConfig("db-server", "Ubuntu 22.04", 4, 8, 200, "Bridge", "PostgreSQL Database"),

    VMConfig("dev-env", "Ubuntu 24.04", 4, 8, 100, "NAT", "Development"),

    VMConfig("windows-test", "Windows 11", 4, 8, 100, "NAT", "Testing"),

    VMConfig("docker-host", "Ubuntu 22.04", 4, 16, 200, "Bridge", "Container Host"),

]


print("=== Virtual Machines ===")

for vm in vms:

    print(f"  [{vm.name}] {vm.os}")

    print(f"    CPU: {vm.cpus} | RAM: {vm.ram_gb}GB | Disk: {vm.disk_gb}GB")

    print(f"    Network: {vm.network} | Purpose: {vm.purpose}")
Troubleshooting
# === Troubleshooting AMD-V ===


issues = {

    "VT-x/AMD-V not available": {

        "cause": "SVM Mode ไม่ได้เปิดใน BIOS",

        "fix": "เข้า BIOS > Advanced > CPU > SVM Mode > Enabled",

    },

    "Hyper-V conflict": {

        "cause": "Hyper-V เปิดอยู่ ชนกับ VirtualBox/VMware",

        "fix": "bcdedit /set hypervisorlaunchtype off แล้ว Restart",

    },

    "VM ช้ามาก": {

        "cause": "ไม่ได้เปิด Hardware Virtualization",

        "fix": "เปิด SVM + Nested Virtualization ใน VM Settings",

    },

    "Nested VM ไม่ทำงาน": {

        "cause": "Nested Virtualization ไม่ได้เปิด",

        "fix": "VBoxManage modifyvm VM --nested-hw-virt on",

    },

    "BSOD เมื่อเปิด VM": {

        "cause": "Driver conflict หรือ Hyper-V conflict",

        "fix": "Update VirtualBox/VMware + ปิด Hyper-V",

    },

}


print("Troubleshooting:")

for issue, info in issues.items():

    print(f"\n  [{issue}]")

    print(f"    Cause: {info['cause']}")

    print(f"    Fix: {info['fix']}")


# AMD CPU Feature Check

features = {

    "AMD-V (SVM)": "Hardware Virtualization พื้นฐาน",

    "AMD-Vi (IOMMU)": "I/O Virtualization สำหรับ GPU Passthrough",

    "SEV": "Secure Encrypted Virtualization เข้ารหัส VM Memory",

    "SEV-ES": "SEV Encrypted State เข้ารหัส CPU Registers",

    "SEV-SNP": "SEV Secure Nested Paging ป้องกัน Hypervisor",

    "NPT": "Nested Page Tables เร็วกว่า Shadow Paging",

}


print(f"\n\nAMD Virtualization Features:")

for feat, desc in features.items():

    print(f"  [{feat}]: {desc}")
เคล็ดลับ
- SVM: เปิด SVM Mode ใน BIOS เสมอ ถ้าใช้ VM
- SSD: ใช้ SSD สำหรับ VM Disk เร็วขึ้นมาก
- VirtIO: ใช้ VirtIO Driver สำหรับ Disk และ Network
- RAM: อย่า Overcommit RAM รวม VM ไม่เกิน RAM Host
- Hyper-V: ปิด Hyper-V ถ้าใช้ VirtualBox หรือ VMware
การนำความรู้ไปประยุกต์ใช้งานจริง

แหล่งเรียนรู้ที่แนะนำ ได้แก่ Official Documentation ที่อัพเดทล่าสุดเสมอ Online Course จาก Coursera Udemy edX ช่อง YouTube คุณภาพทั้งไทยและอังกฤษ และ Community อย่าง Discord Reddit Stack Overflow ที่ช่วยแลกเปลี่ยนประสบการณ์กับนักพัฒนาทั่วโลก
เนื้อหาเกี่ยวข้อง — u c คือทางการแพทย์ — ข้อมูลครบถ้วน 2026
AMD Virtualization คืออะไร
AMD-V SVM Hardware Virtualization CPU จัดการ VM โดยตรง VirtualBox VMware Hyper-V Docker WSL2 เปิดใน BIOS
แนะนำเพิ่มเติม — สัญญาณเทรดรายวัน XM Signal
เนื้อหาเกี่ยวข้อง — ดูเพิ่มเติมเรื่อง GCP Vertex AI Blue Green Canary Deploy
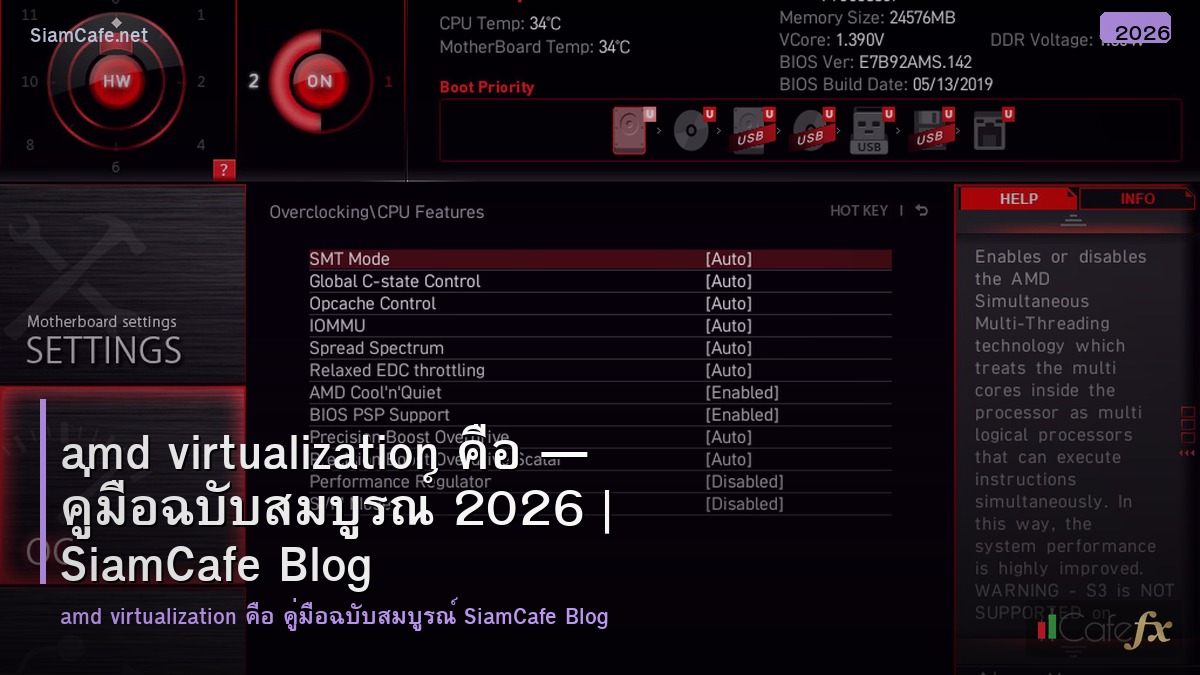
วิธีเปิด AMD-V ใน BIOS ทำอย่างไร
DEL/F2 เข้า BIOS Advanced CPU Configuration SVM Mode Enabled F10 Save Exit ตำแหน่งต่างตามยี่ห้อ Motherboard
AMD-V กับ Intel VT-x ต่างกันอย่างไร
หน้าที่เดียวกัน AMD-V สำหรับ AMD VT-x สำหรับ Intel รองรับ Hypervisor เหมือนกัน Performance ใกล้เคียง
แนะนำเพิ่มเติม — แหล่งความรู้ Forex iCafeForex
เนื้อหาเกี่ยวข้อง — อ่านต่อ: WiFi 6E Design Security Hardening ป้องกันแฮก
ทำไม VM ช้ามาก
AMD-V ไม่เปิด RAM ไม่พอ Disk HDD ช้า CPU Core น้อย Hyper-V Conflict เปิด SVM ใช้ SSD VirtIO Driver
เนื้อหาเกี่ยวข้อง — บทความที่เกี่ยวข้อง: Burp Suite Pro Microservices Architecture
สรุป
AMD Virtualization AMD-V SVM BIOS VirtualBox VMware Hyper-V KVM QEMU Docker WSL2 Performance VirtIO SSD Hugepages Nested Virtualization GPU Passthrough IOMMU SEV