WireGuard VPN — คู่มือติดตั้ง VPN ที่เร็วที่สุดในโลก 2026

WireGuard คืออะไรทำไมเร็วกว่า OpenVPN

ผมใช้ OpenVPN มาตั้งแต่ปี 2005 แต่ตั้งแต่ WireGuard ถูก merge เข้า Linux kernel ในเวอร์ชัน 5.6 (2020) ผม migrate ทุก VPN มาใช้ WireGuard หมดเหตุผลหลักคือ WireGuard มี codebase แค่ 4,000 บรรทัดเทียบกับ OpenVPN ที่มีกว่า 100,000 บรรทัด code น้อย = attack surface น้อย = audit ง่าย = bugs น้อย
Performance ต่างกันชัดเจนผมทดสอบบน server เดียวกัน OpenVPN ได้ throughput ประมาณ 300 Mbps WireGuard ได้ 900+ Mbps บน 1Gbps link Latency ของ WireGuard ต่ำกว่าเห็นได้ชัดเพราะมันทำงานใน kernel space ไม่ต้อง context switch ไป userspace เหมือน OpenVPN
WireGuard ใช้ Cryptography อะไร
WireGuard ใช้ modern cryptographic primitives ที่เลือกมาแล้วว่าดีที่สุดไม่มี cipher negotiation เหมือน OpenVPN/IPSec ที่ต้องเลือก cipher — ChaCha20 สำหรับ symmetric encryption, Poly1305 สำหรับ authentication, Curve25519 สำหรับ key exchange, BLAKE2s สำหรับ hashing, SipHash24 สำหรับ hashtable keys
เนื้อหาเกี่ยวข้อง — บทความที่เกี่ยวข้อง: Zipkin Tracing Edge Computing
ติดตั้งและ Generate Keys
# ติดตั้ง
apt install wireguard

# Generate server keys
wg genkey | tee /etc/wireguard/server_private.key | wg pubkey > /etc/wireguard/server_public.key
chmod 600 /etc/wireguard/server_private.key

# ดู keys
cat /etc/wireguard/server_private.key
cat /etc/wireguard/server_public.key
Server Configuration
# /etc/wireguard/wg0.conf
[Interface]
Address = 10.100.0.1/24
ListenPort = 51820
PrivateKey = SERVER_PRIVATE_KEY_HERE
PostUp = iptables -A FORWARD -i wg0 -j ACCEPT; iptables -t nat -A POSTROUTING -o eth0 -j MASQUERADE
PostDown = iptables -D FORWARD -i wg0 -j ACCEPT; iptables -t nat -D POSTROUTING -o eth0 -j MASQUERADE
SaveConfig = false

# Client 1 — Laptop
[Peer]
PublicKey = CLIENT1_PUBLIC_KEY
AllowedIPs = 10.100.0.2/32

# Client 2 — Phone
[Peer]
PublicKey = CLIENT2_PUBLIC_KEY
AllowedIPs = 10.100.0.3/32

# Client 3 — Remote Office
[Peer]
PublicKey = CLIENT3_PUBLIC_KEY
AllowedIPs = 10.100.0.4/32, 192.168.10.0/24
เปิด IP Forwarding
# เปิด IP forwarding
echo "net.ipv4.ip_forward = 1" >> /etc/sysctl.d/99-wireguard.conf
echo "net.ipv6.conf.all.forwarding = 1" >> /etc/sysctl.d/99-wireguard.conf
sysctl -p /etc/sysctl.d/99-wireguard.conf

# เปิด WireGuard
systemctl enable --now wg-quick@wg0

# ตรวจสอบ
wg show
# interface: wg0
# public key: xxx
# private key: (hidden)
# listening port: 51820
Linux Client
# Generate client keys
wg genkey | tee client_private.key | wg pubkey > client_public.key

# /etc/wireguard/wg0.conf (client)
[Interface]
Address = 10.100.0.2/24
PrivateKey = CLIENT_PRIVATE_KEY
DNS = 1.1.1.1, 8.8.8.8

[Peer]
PublicKey = SERVER_PUBLIC_KEY
Endpoint = vpn.example.com:51820
AllowedIPs = 0.0.0.0/0 # Route all traffic through VPN
PersistentKeepalive = 25

# เชื่อมต่อ
wg-quick up wg0

# ตรวจสอบ
wg show
ping 10.100.0.1

# ตัดการเชื่อมต่อ
wg-quick down wg0
QR Code สำหรับ Mobile
# ติดตั้ง qrencode
apt install qrencode

# สร้าง client config
cat > /tmp/phone.conf << EOF
[Interface]
Address = 10.100.0.3/24
PrivateKey = PHONE_PRIVATE_KEY
DNS = 1.1.1.1

[Peer]
PublicKey = SERVER_PUBLIC_KEY
Endpoint = vpn.example.com:51820
AllowedIPs = 0.0.0.0/0
PersistentKeepalive = 25
EOF

# Generate QR code
qrencode -t ansiutf8 < /tmp/phone.conf
# Scan QR code ด้วย WireGuard app บน iOS/Android

# ลบ config file หลังใช้
rm /tmp/phone.conf
เชื่อม 2 Offices
# Office A (10.10.10.0/24) — Server
# /etc/wireguard/wg0.conf
[Interface]
Address = 10.100.0.1/24
ListenPort = 51820
PrivateKey = OFFICE_A_PRIVATE_KEY
PostUp = iptables -A FORWARD -i wg0 -j ACCEPT; iptables -t nat -A POSTROUTING -o eth0 -j MASQUERADE
PostDown = iptables -D FORWARD -i wg0 -j ACCEPT; iptables -t nat -D POSTROUTING -o eth0 -j MASQUERADE

[Peer]
PublicKey = OFFICE_B_PUBLIC_KEY
Endpoint = office-b.example.com:51820
AllowedIPs = 10.100.0.2/32, 192.168.20.0/24
PersistentKeepalive = 25

# Office B (192.168.20.0/24) — Client
# /etc/wireguard/wg0.conf
[Interface]
Address = 10.100.0.2/24
ListenPort = 51820
PrivateKey = OFFICE_B_PRIVATE_KEY
PostUp = iptables -A FORWARD -i wg0 -j ACCEPT; iptables -t nat -A POSTROUTING -o eth0 -j MASQUERADE
PostDown = iptables -D FORWARD -i wg0 -j ACCEPT; iptables -t nat -D POSTROUTING -o eth0 -j MASQUERADE

[Peer]
PublicKey = OFFICE_A_PUBLIC_KEY
Endpoint = office-a.example.com:51820
AllowedIPs = 10.100.0.1/32, 10.10.10.0/24
PersistentKeepalive = 25

# ตอนนี้ Office A เข้าถึง 192.168.20.0/24 ได้
# Office B เข้าถึง 10.10.10.0/24 ได้
Route เฉพาะ Traffic ที่ต้องการ

# Full tunnel — ทุก traffic ผ่าน VPN
AllowedIPs = 0.0.0.0/0, ::/0

# Split tunnel — เฉพาะ internal networks
AllowedIPs = 10.10.10.0/24, 10.100.0.0/24, 192.168.0.0/16

# Split tunnel — เฉพาะบาง services
AllowedIPs = 10.100.0.0/24, 10.10.10.201/32, 10.10.10.202/32
UFW Rules
# อนุญาต WireGuard port
ufw allow 51820/udp

# อนุญาต forwarding จาก wg0
ufw route allow in on wg0

# ตั้งค่า /etc/ufw/before.rules — เพิ่มก่อน *filter
*nat
:POSTROUTING ACCEPT [0:0]
-A POSTROUTING -s 10.100.0.0/24 -o eth0 -j MASQUERADE
COMMIT
Hardening
# จำกัด SSH เข้าได้เฉพาะผ่าน VPN
iptables -A INPUT -p tcp --dport 22 -s 10.100.0.0/24 -j ACCEPT
iptables -A INPUT -p tcp --dport 22 -j DROP

# Monitor connections
wg show wg0 dump | awk '{print $1, $4, $5}'
# แสดง: public_key, latest_handshake, transfer_rx/tx

# Auto-revoke inactive peers
#!/bin/bash
# revoke peers ที่ไม่มี handshake มากกว่า 30 วัน
THRESHOLD=$((30 * 86400))
NOW=$(date +%s)
wg show wg0 dump | while read -r line; do
 HANDSHAKE=$(echo "$line" | awk '{print $5}')
 if [ "$HANDSHAKE" != "0" ] && [ $((NOW - HANDSHAKE)) -gt $THRESHOLD ]; then
 PUBKEY=$(echo "$line" | awk '{print $1}')
 echo "Removing inactive peer: $PUBKEY"
 wg set wg0 peer "$PUBKEY" remove
 fi
done
การนำไปใช้งานจริงในองค์กร
สำหรับองค์กรขนาดกลางถึงใหญ่ แนะนำให้ใช้หลัก Three-Tier Architecture คือ Core Layer ที่เป็นแกนกลางของระบบ Distribution Layer ที่ทำหน้าที่กระจาย Traffic และ Access Layer ที่เชื่อมต่อกับผู้ใช้โดยตรง การแบ่ง Layer ชัดเจนช่วยให้การ Troubleshoot ง่ายขึ้นและสามารถ Scale ระบบได้ตามความต้องการ
เรื่อง Network Security ก็สำคัญไม่แพ้กัน ควรติดตั้ง Next-Generation Firewall ที่สามารถ Deep Packet Inspection ได้ ใช้ Network Segmentation แยก VLAN สำหรับแต่ละแผนก ติดตั้ง IDS/IPS เพื่อตรวจจับการโจมตี และทำ Regular Security Audit อย่างน้อยปีละ 2 ครั้ง
แนะนำเพิ่มเติม — เรียนเทรดกับ iCafeForex
เปรียบเทียบข้อดีและข้อเสีย
จากตารางเปรียบเทียบจะเห็นว่าข้อดีมีมากกว่าข้อเสียอย่างชัดเจน โดยเฉพาะในแง่ของประสิทธิภาพและความสามารถในการ Scale สำหรับข้อเสียส่วนใหญ่สามารถแก้ไขได้ด้วยการเรียนรู้อย่างเป็นระบบและวางแผนทรัพยากรให้เหมาะสม
เนื้อหาเกี่ยวข้อง — บทความที่เกี่ยวข้อง: Envoy Proxy Microservices Architecture
WireGuard กับ OpenVPN อันไหนดีกว่า?
WireGuard ดีกว่าในเรื่อง performance, simplicity และ security (codebase เล็กกว่า 25 เท่า) OpenVPN ยังมีข้อดีคือทำงานบน TCP port 443 ได้ (bypass firewalls ง่ายกว่า) และรองรับ certificate-based auth ที่ซับซ้อนกว่าสำหรับ use cases ทั่วไปผมแนะนำ WireGuard เลยร่วมกับ Fail2ban สำหรับ SSH protection
WireGuard ไม่มี dynamic IP assignment จัดการยังไง?
WireGuard ออกแบบให้ IP เป็น static สำหรับแต่ละ peer ถ้าต้องการ dynamic management ใช้เครื่องมือเช่น wg-easy (Web UI), netbird หรือ tailscale ที่เป็น WireGuard wrapper พร้อม management layer ผมใช้ script เพิ่ม/ลบ peers ผ่าน Python automation
แนะนำเพิ่มเติม — ดูสัญญาณเทรดที่ XM Signal
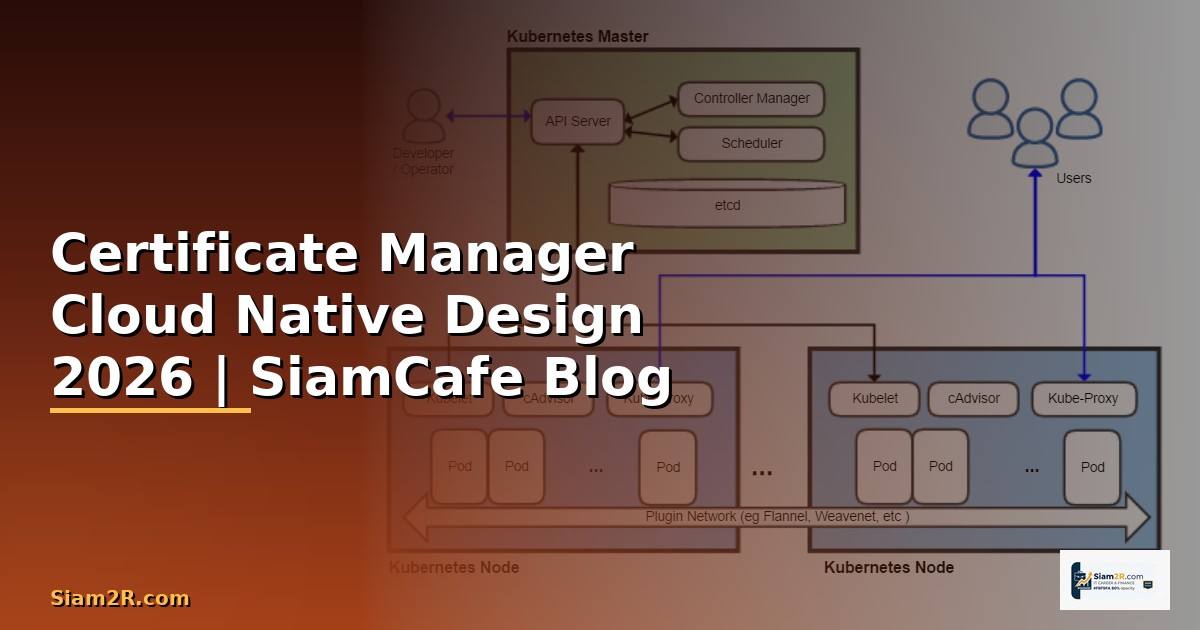
เนื้อหาเกี่ยวข้อง — ทำความเข้าใจ Certificate Manager Cloud Native Design
WireGuard บน Docker ได้ไหม?
ได้ครับใช้ linuxserver/wireguard Docker image ง่ายมากมี Web UI สำหรับจัดการ peers generate QR codes อัตโนมัติเหมาะสำหรับ deploy เร็วๆ
# docker-compose.yml
services:
 wireguard:
 image: lscr.io/linuxserver/wireguard
 cap_add:
 - NET_ADMIN
 - SYS_MODULE
 environment:
 - PUID=1000
 - PGID=1000
 - SERVERURL=vpn.example.com
 - SERVERPORT=51820
 - PEERS=laptop, phone, tablet
 - PEERDNS=1.1.1.1
 - INTERNAL_SUBNET=10.100.0.0
 volumes:
 - ./config:/config
 ports:
 - 51820:51820/udp
 sysctls:
 - net.ipv4.conf.all.src_valid_mark=1
 restart: unless-stopped
สรุป
WireGuard เป็น VPN protocol ที่ดีที่สุดในปี 2026 เร็วกว่า OpenVPN 3 เท่า config ง่ายกว่ามาก codebase เล็ก audit ง่ายปลอดภัยกว่าใช้ได้ทั้ง remote access และ site-to-site VPN รองรับทุก platform
สำหรับ production ผมแนะนำตั้งค่า server ตาม config ด้านบนใช้ QR codes สำหรับ mobile clients ใช้ split tunneling เมื่อไม่ต้องการ route ทุก traffic และ monitor connections สม่ำเสมอครับ
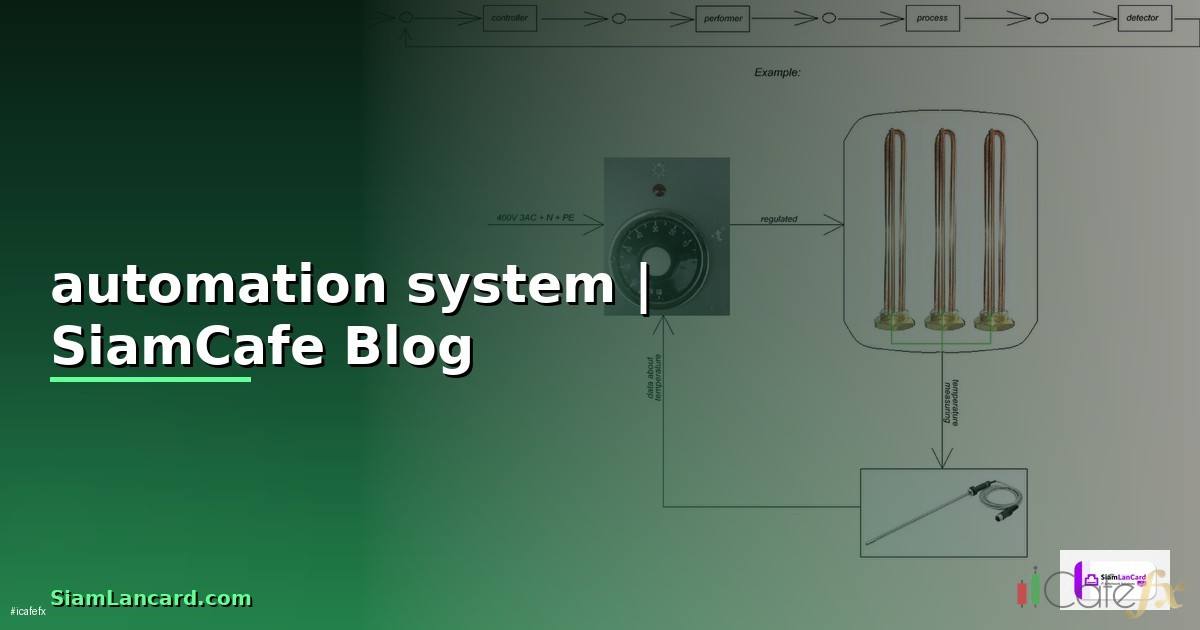
เนื้อหาเกี่ยวข้อง — แนะนำให้อ่าน automation system คืออะไร
อ่านเพิ่มเติม: สอนเทรด Forex | XM Signal | IT Hardware | อาชีพ IT | SiamCafe Book | iCafe Cloud