ในโลกของการพัฒนาซอฟต์แวร์ยุค 2026 การเขียนโค้ดที่ทำงานได้อย่างถูกต้องเพียงอย่างเดียวไม่เพียงพออีกต่อไป Software Testing หรือการทดสอบซอฟต์แวร์คือกระบวนการที่สำคัญอย่างยิ่งในการรับประกันคุณภาพของโปรแกรม ไม่ว่าจะเป็นแอปพลิเคชันขนาดเล็กหรือระบบขนาดใหญ่ระดับ Enterprise ทุกระบบจำเป็นต้องมีการทดสอบที่ครอบคลุมเพื่อให้มั่นใจว่าทุกฟังก์ชันทำงานได้ตามที่คาดหวัง ไม่มีบั๊กแฝง และสามารถรองรับการเปลี่ยนแปลงในอนาคตได้อย่างมั่นคง
บทความนี้จะพาคุณเรียนรู้ Software Testing ตั้งแต่พื้นฐานจนถึงระดับที่สามารถนำไปใช้จริงในโปรเจกต์ได้ ครอบคลุมทั้ง Unit Testing, Integration Testing, End-to-End Testing, TDD, BDD พร้อมตัวอย่างโค้ดจากหลายภาษาและเฟรมเวิร์ก
ทำไม Software Testing ถึงสำคัญ?
หลายคนอาจคิดว่าการเขียนเทสต์คือการเสียเวลา แต่ในความเป็นจริงแล้ว การลงทุนเวลาในการเขียนเทสต์ช่วยประหยัดเวลาและค่าใช้จ่ายมหาศาลในระยะยาว จากการศึกษาของ IBM พบว่าค่าใช้จ่ายในการแก้บั๊กที่พบในขั้นตอน Production สูงกว่าบั๊กที่พบในขั้นตอน Development ถึง 6 เท่า และสูงกว่าบั๊กที่พบในขั้นตอนการออกแบบถึง 15 เท่า
ประโยชน์หลักของ Software Testing มีดังนี้:
- ป้องกันบั๊ก (Bug Prevention) — เทสต์ช่วยตรวจจับปัญหาก่อนที่โค้ดจะถูก Deploy ไปยัง Production ลดความเสียหายที่อาจเกิดขึ้นกับผู้ใช้งานจริง
- เอกสารที่มีชีวิต (Living Documentation) — เทสต์เป็นเอกสารที่บอกว่าโค้ดควรทำงานอย่างไร และอัปเดตไปพร้อมกับโค้ด ไม่เหมือนเอกสารทั่วไปที่มักจะ Outdated
- ความมั่นใจในการ Refactor — เมื่อมีเทสต์ที่ครอบคลุม คุณสามารถปรับปรุงโค้ดได้อย่างมั่นใจว่าจะไม่ทำลายฟังก์ชันเดิมที่ทำงานอยู่
- ลดต้นทุนในระยะยาว — การแก้บั๊กในขั้นตอน Development ถูกกว่าการแก้ใน Production อย่างมาก
- ทำงานเป็นทีมได้ดีขึ้น — เทสต์ช่วยให้สมาชิกในทีมเข้าใจว่าแต่ละส่วนของโค้ดทำงานอย่างไร และสามารถแก้ไขโค้ดของคนอื่นได้อย่างมั่นใจ
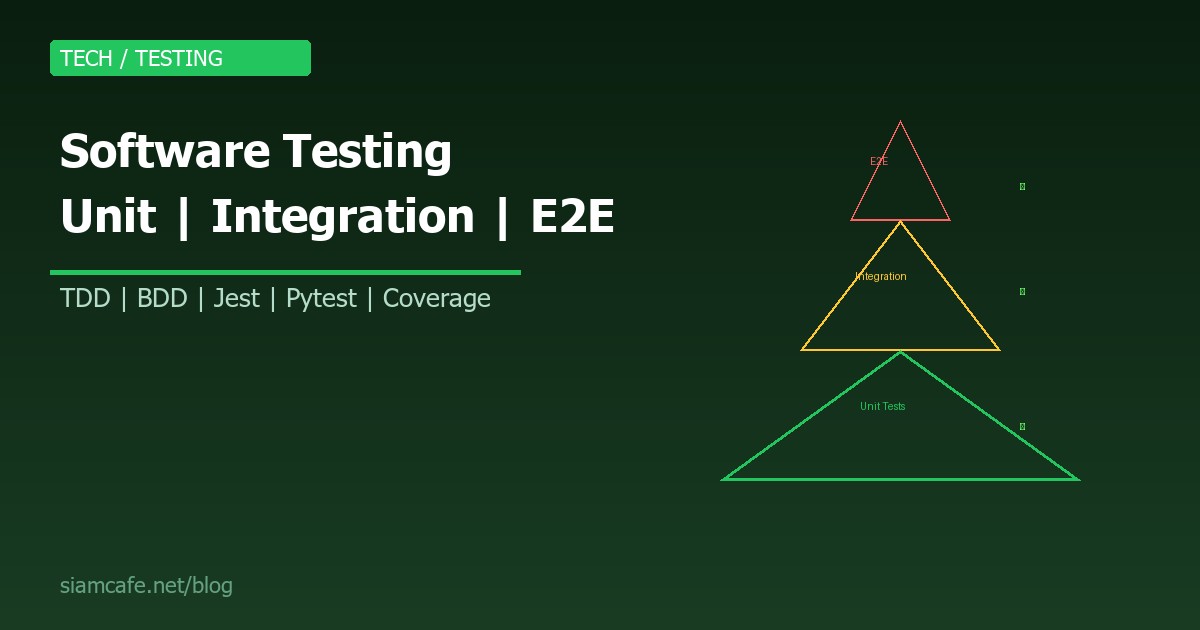
Testing Pyramid — ปิรามิดการทดสอบ
Testing Pyramid เป็นแนวคิดที่ Mike Cohn เสนอในหนังสือ "Succeeding with Agile" ซึ่งอธิบายสัดส่วนที่เหมาะสมของการทดสอบแต่ละประเภท โดยแบ่งเป็น 3 ชั้นหลัก:
| ชั้น | ประเภท | สัดส่วน | ความเร็ว | ค่าใช้จ่าย |
|---|---|---|---|---|
| บน | E2E Tests | 10% | ช้า | สูง |
| กลาง | Integration Tests | 20% | ปานกลาง | ปานกลาง |
| ล่าง | Unit Tests | 70% | เร็วมาก | ต่ำ |
หลักการสำคัญคือ ยิ่งอยู่ชั้นล่างยิ่งควรมีเทสต์มาก เพราะรันเร็ว ค่าใช้จ่ายต่ำ และแก้ไขปัญหาได้ง่าย ในขณะที่เทสต์ชั้นบนควรมีจำนวนน้อยแต่ครอบคลุม Flow สำคัญที่สุด
Unit Testing — การทดสอบหน่วยย่อยที่สุด
Unit Test คือการทดสอบส่วนที่เล็กที่สุดของโค้ด เช่น ฟังก์ชันเดียว หรือเมธอดเดียวของ Class โดยแยกส่วนที่ทดสอบออกจาก Dependencies ภายนอกทั้งหมด เพื่อให้แน่ใจว่าแต่ละหน่วยทำงานถูกต้องด้วยตัวเอง
AAA Pattern (Arrange-Act-Assert)
รูปแบบที่นิยมที่สุดในการเขียน Unit Test คือ AAA Pattern ซึ่งแบ่งเทสต์แต่ละตัวออกเป็น 3 ส่วนชัดเจน ทำให้อ่านง่ายและบำรุงรักษาได้ง่าย:
# Python — Pytest ตัวอย่าง AAA Pattern
def test_calculate_discount():
    # Arrange — เตรียมข้อมูลทดสอบ
    price = 1000
    discount_percent = 20

    # Act — เรียกฟังก์ชันที่ต้องการทดสอบ
    result = calculate_discount(price, discount_percent)

    # Assert — ตรวจสอบผลลัพธ์
    assert result == 800
// JavaScript — Jest ตัวอย่าง AAA Pattern
describe('calculateDiscount', () => {
test('should apply 20% discount correctly', () => {
// Arrange
const price = 1000;
const discountPercent = 20;
// Act
const result = calculateDiscount(price, discountPercent);
// Assert
expect(result).toBe(800);
});
test('should return original price when discount is 0', () => {
expect(calculateDiscount(500, 0)).toBe(500);
});
test('should throw error for negative discount', () => {
expect(() => calculateDiscount(500, -10)).toThrow('Invalid discount');
});
});// Go — testing package
func TestCalculateDiscount(t *testing.T) {
// Arrange
price := 1000.0
discountPercent := 20.0
// Act
result := CalculateDiscount(price, discountPercent)
// Assert
expected := 800.0
if result != expected {
t.Errorf("CalculateDiscount(%f, %f) = %f; want %f",
price, discountPercent, result, expected)
}
}Mocking — จำลอง Dependencies
ในการเขียน Unit Test บ่อยครั้งที่ฟังก์ชันที่เราต้องการทดสอบมีการเรียกใช้ Dependencies ภายนอก เช่น Database, API, File System เราจำเป็นต้อง Mock (จำลอง) Dependencies เหล่านี้ เพื่อให้เทสต์ทำงานเร็วและไม่ขึ้นอยู่กับระบบภายนอก
# Python — unittest.mock
from unittest.mock import Mock, patch, MagicMock

class TestUserService:
    def test_get_user_by_id(self):
        # Arrange — Mock repository
        mock_repo = Mock()
        mock_repo.find_by_id.return_value = {
            "id": 1, "name": "สมชาย", "email": "somchai@example.com"
        }
        service = UserService(repository=mock_repo)

        # Act
        user = service.get_user(1)

        # Assert
        assert user["name"] == "สมชาย"
        mock_repo.find_by_id.assert_called_once_with(1)

    @patch('services.user_service.requests.get')
    def test_fetch_external_profile(self, mock_get):
        # Arrange
        mock_response = Mock()
        mock_response.json.return_value = {"avatar": "https://example.com/pic.jpg"}
        mock_response.status_code = 200
        mock_get.return_value = mock_response

        service = UserService()

        # Act
        profile = service.fetch_external_profile("user123")

        # Assert
        assert profile["avatar"] == "https://example.com/pic.jpg"
        mock_get.assert_called_once()
// JavaScript — Jest Mocking
// ไฟล์: userService.test.js
jest.mock('./database');
const db = require('./database');
describe('UserService', () => {
beforeEach(() => {
jest.clearAllMocks();
});
test('should fetch user from database', async () => {
// Arrange
db.query.mockResolvedValue({ id: 1, name: 'สมหญิง' });
// Act
const user = await UserService.getUser(1);
// Assert
expect(user.name).toBe('สมหญิง');
expect(db.query).toHaveBeenCalledWith('SELECT * FROM users WHERE id = ?', [1]);
});
test('should throw when user not found', async () => {
db.query.mockResolvedValue(null);
await expect(UserService.getUser(999)).rejects.toThrow('User not found');
});
});Integration Testing — ทดสอบการทำงานร่วมกัน
Integration Test คือการทดสอบว่าหลายส่วนของระบบทำงานร่วมกันได้อย่างถูกต้อง ต่างจาก Unit Test ที่ทดสอบแต่ละหน่วยแยกกัน Integration Test จะทดสอบว่าเมื่อนำหน่วยต่างๆ มาต่อกันแล้ว ระบบทำงานได้ตามที่คาดหวัง ตัวอย่างเช่น การทดสอบว่า API Endpoint สามารถรับข้อมูล ประมวลผล และบันทึกลง Database ได้ถูกต้อง
ทดสอบ API ด้วย Supertest (Node.js)
// JavaScript — Supertest + Express
const request = require('supertest');
const app = require('../app');
const db = require('../database');

describe('POST /api/users', () => {
  beforeAll(async () => {
    await db.migrate();
  });

  afterEach(async () => {
    await db.query('DELETE FROM users');
  });

  afterAll(async () => {
    await db.close();
  });

  test('should create a new user and return 201', async () => {
    const newUser = {
      name: 'ทดสอบ',
      email: 'test@example.com',
      password: 'secure123'
    };

    const res = await request(app)
      .post('/api/users')
      .send(newUser)
      .expect(201);

    expect(res.body.name).toBe('ทดสอบ');
    expect(res.body.email).toBe('test@example.com');
    expect(res.body).not.toHaveProperty('password');

    // ตรวจสอบว่าบันทึกลง Database จริง
    const dbUser = await db.query('SELECT * FROM users WHERE email = ?', ['test@example.com']);
    expect(dbUser).toBeDefined();
  });

  test('should return 400 for invalid email', async () => {
    const res = await request(app)
      .post('/api/users')
      .send({ name: 'ทดสอบ', email: 'not-an-email', password: '123' })
      .expect(400);

    expect(res.body.error).toContain('email');
  });

  test('should return 409 for duplicate email', async () => {
    const user = { name: 'ทดสอบ', email: 'dup@example.com', password: 'pass123' };
    await request(app).post('/api/users').send(user);
    const res = await request(app).post('/api/users').send(user).expect(409);
    expect(res.body.error).toContain('already exists');
  });
});
ทดสอบ API ด้วย httpx (Python)
# Python — FastAPI + httpx
import pytest
from httpx import AsyncClient, ASGITransport
from app.main import app
from app.database import get_db, Base, engine

@pytest.fixture(autouse=True)
async def setup_db():
    Base.metadata.create_all(bind=engine)
    yield
    Base.metadata.drop_all(bind=engine)

@pytest.mark.asyncio
async def test_create_and_get_product():
    transport = ASGITransport(app=app)
    async with AsyncClient(transport=transport, base_url="http://test") as client:
        # สร้างสินค้า
        create_res = await client.post("/api/products", json={
            "name": "เมาส์ไร้สาย",
            "price": 599.0,
            "stock": 100
        })
        assert create_res.status_code == 201
        product_id = create_res.json()["id"]

        # ดึงสินค้า
        get_res = await client.get(f"/api/products/{product_id}")
        assert get_res.status_code == 200
        assert get_res.json()["name"] == "เมาส์ไร้สาย"
        assert get_res.json()["price"] == 599.0
Testcontainers — จำลอง Database จริง
Testcontainers เป็นเครื่องมือที่ช่วยให้สามารถสร้าง Container ของ Database จริง (เช่น PostgreSQL, MySQL, Redis) ขึ้นมาใช้ในเทสต์ได้ ทำให้เทสต์ใกล้เคียงกับ Production มากที่สุด
# Python — Testcontainers
from testcontainers.postgres import PostgresContainer
import psycopg2

def test_database_operations():
    with PostgresContainer("postgres:16") as postgres:
        # เชื่อมต่อ Database จริงใน Container
        conn = psycopg2.connect(
            host=postgres.get_container_host_ip(),
            port=postgres.get_exposed_port(5432),
            user=postgres.username,
            password=postgres.password,
            dbname=postgres.dbname
        )
        cursor = conn.cursor()

        # สร้างตาราง
        cursor.execute("""
            CREATE TABLE products (
                id SERIAL PRIMARY KEY,
                name TEXT NOT NULL,
                price DECIMAL(10,2) NOT NULL
            )
        """)
        conn.commit()

        # ทดสอบ Insert
        cursor.execute("INSERT INTO products (name, price) VALUES (%s, %s) RETURNING id",
                       ("คีย์บอร์ด", 1290.00))
        product_id = cursor.fetchone()[0]
        assert product_id is not None

        # ทดสอบ Select
        cursor.execute("SELECT name, price FROM products WHERE id = %s", (product_id,))
        row = cursor.fetchone()
        assert row[0] == "คีย์บอร์ด"
        assert float(row[1]) == 1290.00

        conn.close()
    # Container จะถูกลบอัตโนมัติ
E2E Testing — ทดสอบทั้งระบบจากมุมผู้ใช้
End-to-End (E2E) Test คือการทดสอบระบบทั้งหมดจากมุมมองของผู้ใช้จริง โดยจำลองการใช้งานเบราว์เซอร์ คลิกปุ่ม กรอกฟอร์ม และตรวจสอบว่าผลลัพธ์ที่แสดงบนหน้าจอถูกต้อง เป็นเทสต์ที่ให้ความมั่นใจสูงสุดว่าระบบทำงานได้จริง แต่ก็ช้าและเปราะบางที่สุดเช่นกัน
Playwright — E2E Testing Framework ยอดนิยม 2026
// JavaScript — Playwright
const { test, expect } = require('@playwright/test');

test.describe('ระบบสมัครสมาชิก', () => {
  test('ผู้ใช้สามารถสมัครสมาชิกและเข้าสู่ระบบได้', async ({ page }) => {
    // ไปหน้าสมัครสมาชิก
    await page.goto('http://localhost:3000/register');

    // กรอกฟอร์ม
    await page.fill('#name', 'สมชาย ใจดี');
    await page.fill('#email', 'somchai@test.com');
    await page.fill('#password', 'P@ssw0rd123');
    await page.fill('#confirm-password', 'P@ssw0rd123');

    // คลิกปุ่มสมัคร
    await page.click('button[type="submit"]');

    // ตรวจสอบว่าสมัครสำเร็จ
    await expect(page.locator('.success-message')).toContainText('สมัครสมาชิกสำเร็จ');

    // เข้าสู่ระบบ
    await page.goto('http://localhost:3000/login');
    await page.fill('#email', 'somchai@test.com');
    await page.fill('#password', 'P@ssw0rd123');
    await page.click('button[type="submit"]');

    // ตรวจสอบว่าเข้าสู่ระบบสำเร็จ
    await expect(page.locator('.user-name')).toContainText('สมชาย ใจดี');
    await expect(page).toHaveURL('http://localhost:3000/dashboard');
  });

  test('แสดงข้อผิดพลาดเมื่อ email ซ้ำ', async ({ page }) => {
    await page.goto('http://localhost:3000/register');
    await page.fill('#email', 'existing@test.com');
    await page.fill('#password', 'P@ssw0rd123');
    await page.click('button[type="submit"]');
    await expect(page.locator('.error-message')).toContainText('อีเมลนี้ถูกใช้แล้ว');
  });
});
Cypress — อีกทางเลือกยอดนิยม
// JavaScript — Cypress
describe('ระบบตะกร้าสินค้า', () => {
  beforeEach(() => {
    cy.visit('/shop');
  });

  it('เพิ่มสินค้าลงตะกร้าและชำระเงินได้', () => {
    // เพิ่มสินค้า
    cy.get('[data-testid="product-1"]').click();
    cy.get('[data-testid="add-to-cart"]').click();
    cy.get('.cart-count').should('contain', '1');

    // ไปที่ตะกร้า
    cy.get('[data-testid="cart-icon"]').click();
    cy.url().should('include', '/cart');
    cy.get('.cart-item').should('have.length', 1);

    // ชำระเงิน
    cy.get('[data-testid="checkout-btn"]').click();
    cy.get('#card-number').type('4242424242424242');
    cy.get('#expiry').type('12/28');
    cy.get('#cvv').type('123');
    cy.get('[data-testid="pay-btn"]').click();

    // ตรวจสอบผลลัพธ์
    cy.get('.order-confirmation').should('be.visible');
    cy.get('.order-status').should('contain', 'ชำระเงินสำเร็จ');
  });
});
TDD — Test-Driven Development
TDD (Test-Driven Development) คือวิธีการพัฒนาซอฟต์แวร์ที่เขียนเทสต์ก่อนเขียนโค้ดจริง วงจรของ TDD มี 3 ขั้นตอนที่เรียกว่า Red-Green-Refactor:
- Red — เขียนเทสต์ที่ Fail (เพราะยังไม่มีโค้ดจริง)
- Green — เขียนโค้ดน้อยที่สุดเพื่อให้เทสต์ผ่าน
- Refactor — ปรับปรุงโค้ดให้สะอาด โดยเทสต์ยังคงผ่าน
# Python — ตัวอย่าง TDD สร้าง Password Validator

# ขั้นตอน 1: RED — เขียนเทสต์ก่อน (จะ Fail)
def test_password_must_be_at_least_8_chars():
    assert validate_password("short") == False

def test_password_must_contain_uppercase():
    assert validate_password("alllowercase1!") == False

def test_password_must_contain_number():
    assert validate_password("NoNumberHere!") == False

def test_password_must_contain_special_char():
    assert validate_password("NoSpecial123") == False

def test_valid_password_returns_true():
    assert validate_password("Str0ng!Pass") == True

# ขั้นตอน 2: GREEN — เขียนโค้ดน้อยที่สุดให้ผ่าน
import re

def validate_password(password: str) -> bool:
    if len(password) < 8:
        return False
    if not re.search(r'[A-Z]', password):
        return False
    if not re.search(r'[0-9]', password):
        return False
    if not re.search(r'[!@#$%^&*]', password):
        return False
    return True

# ขั้นตอน 3: REFACTOR — ปรับปรุงให้สะอาด
def validate_password_v2(password: str) -> bool:
    rules = [
        (len(password) >= 8, "ต้องมีอย่างน้อย 8 ตัวอักษร"),
        (bool(re.search(r'[A-Z]', password)), "ต้องมีตัวพิมพ์ใหญ่"),
        (bool(re.search(r'[0-9]', password)), "ต้องมีตัวเลข"),
        (bool(re.search(r'[!@#$%^&*]', password)), "ต้องมีอักขระพิเศษ"),
    ]
    return all(passed for passed, _ in rules)
BDD — Behavior-Driven Development
BDD (Behavior-Driven Development) เป็นแนวทางที่ต่อยอดจาก TDD โดยเน้นการเขียนเทสต์ในรูปแบบภาษาธรรมชาติที่ทุกคนในทีม (รวมถึงคนที่ไม่ใช่โปรแกรมเมอร์) สามารถอ่านเข้าใจได้ ใช้รูปแบบ Given-When-Then:
# Gherkin — ไฟล์ .feature
Feature: ระบบเข้าสู่ระบบ
  ในฐานะผู้ใช้ที่มีบัญชี
  ฉันต้องการเข้าสู่ระบบ
  เพื่อเข้าถึงข้อมูลส่วนตัว

  Scenario: เข้าสู่ระบบด้วยข้อมูลที่ถูกต้อง
    Given ฉันอยู่ที่หน้าเข้าสู่ระบบ
    When ฉันกรอกอีเมล "somchai@example.com"
    And ฉันกรอกรหัสผ่าน "P@ssw0rd123"
    And ฉันกดปุ่มเข้าสู่ระบบ
    Then ฉันควรเห็นหน้า Dashboard
    And ฉันควรเห็นข้อความ "สวัสดี สมชาย"

  Scenario: เข้าสู่ระบบด้วยรหัสผ่านผิด
    Given ฉันอยู่ที่หน้าเข้าสู่ระบบ
    When ฉันกรอกอีเมล "somchai@example.com"
    And ฉันกรอกรหัสผ่าน "wrongpassword"
    And ฉันกดปุ่มเข้าสู่ระบบ
    Then ฉันควรเห็นข้อความผิดพลาด "อีเมลหรือรหัสผ่านไม่ถูกต้อง"
Testing Frameworks — เครื่องมือทดสอบยอดนิยม
| ภาษา/Runtime | Framework | จุดเด่น |
|---|---|---|
| JavaScript/TypeScript | Jest | All-in-one, Snapshot testing, Mocking built-in |
| JavaScript/TypeScript | Vitest | เร็ว, รองรับ ESM, ใกล้ชิด Vite |
| Python | Pytest | ง่าย, Fixture system, Plugin มากมาย |
| Go | testing (built-in) | ไม่ต้องติดตั้งเพิ่ม, Table-driven tests |
| Go | testify | Assertion helpers, Mock generation |
| Java | JUnit 5 | มาตรฐานอุตสาหกรรม, Parameterized tests |
| Rust | #[test] (built-in) | ไม่ต้องติดตั้งเพิ่ม, cargo test |
| E2E | Playwright | Multi-browser, Auto-wait, Codegen |
| E2E | Cypress | DX ดี, Time-travel debugging |
Go Table-Driven Tests
// Go — Table-driven tests (Best practice)
func TestAdd(t *testing.T) {
    tests := []struct {
        name     string
        a, b     int
        expected int
    }{
        {"positive numbers", 2, 3, 5},
        {"negative numbers", -1, -2, -3},
        {"zero", 0, 0, 0},
        {"mixed", -1, 5, 4},
    }

    for _, tt := range tests {
        t.Run(tt.name, func(t *testing.T) {
            result := Add(tt.a, tt.b)
            if result != tt.expected {
                t.Errorf("Add(%d, %d) = %d; want %d",
                    tt.a, tt.b, result, tt.expected)
            }
        })
    }
}
JUnit 5 Parameterized Tests
// Java — JUnit 5
import org.junit.jupiter.params.ParameterizedTest;
import org.junit.jupiter.params.provider.CsvSource;
import static org.junit.jupiter.api.Assertions.*;

class CalculatorTest {
    @ParameterizedTest
    @CsvSource({
        "1, 1, 2",
        "2, 3, 5",
        "100, 200, 300",
        "-1, 1, 0"
    })
    void testAdd(int a, int b, int expected) {
        Calculator calc = new Calculator();
        assertEquals(expected, calc.add(a, b));
    }

    @ParameterizedTest
    @CsvSource({
        "10, 0",
        "-5, 0"
    })
    void testDivideByZero(int a, int b) {
        Calculator calc = new Calculator();
        assertThrows(ArithmeticException.class, () -> calc.divide(a, b));
    }
}
Code Coverage — ความครอบคลุมของเทสต์
Code Coverage คือตัวชี้วัดที่บอกว่าเทสต์ของเราครอบคลุมโค้ดมากแค่ไหน โดยวัดจากจำนวนบรรทัด, Branch, หรือ Function ที่ถูกเรียกใช้ระหว่างรันเทสต์ เป็นเครื่องมือสำคัญในการประเมินคุณภาพของเทสต์
# Python — coverage.py
pip install coverage

# รันเทสต์พร้อมวัด Coverage
coverage run -m pytest
coverage report -m          # แสดงผลในเทอร์มินัล
coverage html               # สร้างรายงาน HTML

# ตัวอย่างผลลัพธ์:
# Name                    Stmts   Miss  Cover   Missing
# -------------------------------------------------------
# app/models.py              45      3    93%    22-24
# app/services.py            78     12    85%    45-56
# app/utils.py               30      0   100%
# -------------------------------------------------------
# TOTAL                     153     15    90%
// JavaScript — Istanbul/nyc + Jest
// package.json
{
"scripts": {
"test": "jest --coverage",
"test:ci": "jest --coverage --coverageReporters='text' --coverageReporters='lcov'"
},
"jest": {
"collectCoverageFrom": [
"src/**/*.{js,ts}",
"!src/**/*.test.{js,ts}"
],
"coverageThreshold": {
"global": {
"branches": 80,
"functions": 80,
"lines": 80,
"statements": 80
}
}
}
}Snapshot Testing
Snapshot Testing เป็นเทคนิคที่บันทึกผลลัพธ์ของโค้ด (เช่น HTML, JSON, Component output) เป็น Snapshot ไฟล์ แล้วในรอบถัดไปจะเปรียบเทียบผลลัพธ์ใหม่กับ Snapshot เดิม ถ้าต่างกันเทสต์จะ Fail เหมาะสำหรับตรวจจับการเปลี่ยนแปลงที่ไม่ตั้งใจ
// Jest — Snapshot Testing
test('renders user profile correctly', () => {
  const component = render(<UserProfile name="สมชาย" role="admin" />);
  expect(component.toJSON()).toMatchSnapshot();
});

// ถ้าต้องการอัปเดต Snapshot เมื่อเปลี่ยนแปลงตั้งใจ:
// npx jest --updateSnapshot
Property-Based Testing
Property-Based Testing เป็นแนวทางที่แตกต่างจากเทสต์ทั่วไป แทนที่จะระบุ Input/Output ที่เจาะจง จะระบุ Properties (คุณสมบัติ) ที่ผลลัพธ์ต้องเป็นจริงเสมอ แล้วเฟรมเวิร์กจะสุ่ม Input ร้อยๆ พันๆ ตัวมาทดสอบ
# Python — Hypothesis
from hypothesis import given
import hypothesis.strategies as st

@given(st.lists(st.integers()))
def test_sort_preserves_length(lst):
    """เรียงลำดับแล้ว จำนวนสมาชิกต้องเท่าเดิม"""
    sorted_lst = sorted(lst)
    assert len(sorted_lst) == len(lst)

@given(st.lists(st.integers(), min_size=1))
def test_sort_first_element_is_minimum(lst):
    """สมาชิกตัวแรกของ List ที่เรียงแล้ว ต้องเป็นค่าน้อยสุด"""
    sorted_lst = sorted(lst)
    assert sorted_lst[0] == min(lst)

@given(st.text(), st.text())
def test_string_concat_length(a, b):
    """ความยาวของ String ที่ต่อกัน ต้องเท่ากับผลรวมความยาว"""
    assert len(a + b) == len(a) + len(b)
Mutation Testing
Mutation Testing เป็นเทคนิคขั้นสูงที่ใช้วัดคุณภาพของเทสต์ โดยเปลี่ยนแปลง (Mutate) โค้ดจริงเล็กน้อย เช่น เปลี่ยน + เป็น -, เปลี่ยน == เป็น != แล้วรันเทสต์ ถ้าเทสต์ยังผ่านแสดงว่าเทสต์ไม่ดีพอ (ไม่สามารถตรวจจับความผิดพลาดได้)
# Python — mutmut
pip install mutmut

# รัน Mutation testing
mutmut run --paths-to-mutate=app/

# ดูผลลัพธ์
mutmut results
# Killed: 45    — เทสต์ตรวจจับ Mutation ได้ (ดี)
# Survived: 5   — เทสต์ไม่ตรวจจับ (ต้องเพิ่มเทสต์)
# Score: 90%
การทดสอบใน CI/CD Pipeline
การเทสต์จะมีประสิทธิภาพสูงสุดเมื่อรันอัตโนมัติทุกครั้งที่มีการ Push โค้ดหรือสร้าง Pull Request ตัวอย่างการตั้งค่า CI/CD pipeline:
# GitHub Actions — .github/workflows/test.yml
name: Tests
on:
  push:
    branches: [main, develop]
  pull_request:
    branches: [main]

jobs:
  unit-tests:
    runs-on: ubuntu-latest
    steps:
      - uses: actions/checkout@v4
      - uses: actions/setup-node@v4
        with:
          node-version: '20'
      - run: npm ci
      - run: npm run test:unit -- --coverage
      - uses: codecov/codecov-action@v4
        with:
          file: ./coverage/lcov.info

  integration-tests:
    runs-on: ubuntu-latest
    services:
      postgres:
        image: postgres:16
        env:
          POSTGRES_PASSWORD: testpass
          POSTGRES_DB: testdb
        ports: ['5432:5432']
    steps:
      - uses: actions/checkout@v4
      - uses: actions/setup-node@v4
        with:
          node-version: '20'
      - run: npm ci
      - run: npm run test:integration
        env:
          DATABASE_URL: postgresql://postgres:testpass@localhost:5432/testdb

  e2e-tests:
    runs-on: ubuntu-latest
    steps:
      - uses: actions/checkout@v4
      - uses: actions/setup-node@v4
        with:
          node-version: '20'
      - run: npm ci
      - run: npx playwright install --with-deps
      - run: npm run test:e2e
Testing Anti-Patterns — สิ่งที่ไม่ควรทำ
การเขียนเทสต์ที่ไม่ดีอาจส่งผลเสียมากกว่าการไม่มีเทสต์เลย เพราะให้ความมั่นใจปลอม (False confidence) และเสียเวลาในการบำรุงรักษา ต่อไปนี้คือ Anti-patterns ที่พบบ่อย:
- Ice Cream Cone — มี E2E เยอะมาก แต่ Unit Test น้อย ทำให้เทสต์ช้าและเปราะบาง ควรกลับปิรามิดให้ Unit Test เยอะที่สุด
- Flaky Tests — เทสต์ที่บางทีผ่านบางทีไม่ผ่าน โดยไม่ได้แก้ไขอะไร มักเกิดจากการพึ่งพาเวลา, Network, หรือ Shared state ต้องแก้ไขทันทีเพราะทำให้ทีมเสียความเชื่อมั่นในเทสต์
- Testing Implementation Details — ทดสอบว่าโค้ดทำงาน "อย่างไร" แทนที่จะทดสอบว่าให้ผลลัพธ์ "อะไร" ทำให้เทสต์พังทุกครั้งที่ Refactor แม้ว่า Behavior ไม่เปลี่ยน
- God Test — เทสต์ตัวเดียวที่ทดสอบหลายสิ่ง เมื่อ Fail ไม่รู้ว่าส่วนไหนผิด ควรแยกเป็นเทสต์ย่อยๆ แต่ละตัวทดสอบสิ่งเดียว
- No Assertion — เทสต์ที่รันโค้ดแต่ไม่มี Assert ใดๆ จะ Pass เสมอแม้โค้ดจะผิด ทุกเทสต์ต้องมีอย่างน้อย 1 Assertion
- Copy-Paste Tests — เทสต์ที่ Copy-Paste มาแล้วแก้นิดหน่อย ทำให้ยากต่อการบำรุงรักษา ควรใช้ Parameterized Tests แทน
- Ignoring Failing Tests — เทสต์ที่ Fail แล้วแค่ Skip หรือ Comment out แทนที่จะแก้ไข ทำให้ Test suite เสื่อมคุณภาพไปเรื่อยๆ
Test Naming Conventions — การตั้งชื่อเทสต์ที่ดี
ชื่อเทสต์ที่ดีต้องบอกได้ทันทีว่าเทสต์อะไร ภายใต้เงื่อนไขอะไร และผลลัพธ์ที่คาดหวังคืออะไร:
# รูปแบบที่ 1: should_[ผลลัพธ์]_when_[เงื่อนไข]
def test_should_return_error_when_email_is_invalid():
    ...

def test_should_create_user_when_all_fields_valid():
    ...

# รูปแบบที่ 2: [method]_[scenario]_[expected]
def test_calculate_discount_with_zero_percent_returns_original_price():
    ...

def test_validate_password_with_short_input_returns_false():
    ...

# รูปแบบที่ 3: Given-When-Then ในชื่อ
def test_given_logged_in_user_when_access_profile_then_returns_200():
    ...
เมื่อไหร่ควรเขียนเทสต์?
คำถามที่หลายคนสงสัยคือ ควรเขียนเทสต์เมื่อไหร่ คำตอบคือ ขึ้นอยู่กับบริบทของโปรเจกต์ แต่มีแนวทางทั่วไปดังนี้:
- ควรเขียนเสมอ: Business logic สำคัญ, ฟังก์ชันที่ซับซ้อน, โค้ดที่เปลี่ยนบ่อย, API endpoints, ฟังก์ชันที่มี Edge cases มาก
- ควรเขียน: Utility functions, Data transformation, Validation logic, Error handling
- อาจไม่จำเป็น: Getter/Setter ง่ายๆ, Configuration ที่ไม่มี Logic, UI ที่เปลี่ยนบ่อยมาก (ใช้ Snapshot test แทน), Prototype/MVP ที่ยังไม่แน่ใจว่าจะใช้งานจริง
Pytest Fixtures — จัดการ Test Setup
# Python — Pytest Fixtures ขั้นสูง
import pytest
from app import create_app
from app.database import db as _db

@pytest.fixture(scope='session')
def app():
    """สร้าง Application สำหรับทั้ง Test session"""
    app = create_app('testing')
    return app

@pytest.fixture(scope='function')
def db(app):
    """สร้าง Database ใหม่ทุกเทสต์"""
    with app.app_context():
        _db.create_all()
        yield _db
        _db.session.rollback()
        _db.drop_all()

@pytest.fixture
def client(app):
    """สร้าง Test client"""
    return app.test_client()

@pytest.fixture
def sample_user(db):
    """สร้าง User ตัวอย่าง"""
    from app.models import User
    user = User(name="ทดสอบ", email="test@example.com")
    user.set_password("TestPass123!")
    db.session.add(user)
    db.session.commit()
    return user

# ใช้งาน Fixtures
def test_get_user_profile(client, sample_user):
    res = client.get(f'/api/users/{sample_user.id}')
    assert res.status_code == 200
    assert res.json['name'] == 'ทดสอบ'

def test_update_user(client, sample_user):
    res = client.put(f'/api/users/{sample_user.id}', json={"name": "ชื่อใหม่"})
    assert res.status_code == 200
    assert res.json['name'] == 'ชื่อใหม่'
สรุป — Best Practices ของ Software Testing
การเขียนเทสต์ที่ดีไม่ใช่แค่เรื่องของเครื่องมือหรือเฟรมเวิร์ก แต่เป็นเรื่องของวินัยและแนวคิดที่ถูกต้อง ต่อไปนี้คือ Best practices ที่ควรยึดถือ:
- ยึดหลัก Testing Pyramid — Unit Test เยอะ, Integration ปานกลาง, E2E น้อยแต่ครอบคลุม
- เทสต์ต้อง Independent — แต่ละเทสต์ต้องรันได้เดี่ยวๆ ไม่พึ่งพาเทสต์อื่น
- เทสต์ต้อง Deterministic — รันกี่ครั้งก็ได้ผลเหมือนกัน
- เทสต์ต้องเร็ว — Unit Test ต้องรันเสร็จในวินาที ไม่ใช่นาที
- ตั้งชื่อเทสต์ให้อ่านรู้เรื่อง — เมื่อ Fail ต้องรู้ทันทีว่าอะไรผิด
- อย่า Test Implementation — ทดสอบ Behavior ไม่ใช่วิธีการทำงาน
- รันเทสต์ใน CI/CD — ทุก Push และ Pull Request ต้องผ่านเทสต์
- ใช้ Coverage เป็นเครื่องมือ ไม่ใช่เป้าหมาย — เน้นคุณภาพ Assertion ไม่ใช่ตัวเลข
- แก้ Flaky Test ทันที — อย่าปล่อยให้ทีมชินกับเทสต์ที่ Fail
- เขียนเทสต์เมื่อแก้บั๊ก — ก่อนแก้บั๊ก เขียนเทสต์ที่ Reproduce บั๊กนั้นก่อน
Software Testing เป็นทักษะที่สำคัญไม่แพ้การเขียนโค้ดจริง นักพัฒนาที่เก่งจริงๆ ไม่ใช่คนที่เขียนโค้ดเร็วที่สุด แต่คือคนที่เขียนโค้ดที่มีคุณภาพ ทดสอบได้ และบำรุงรักษาง่าย เริ่มต้นวันนี้ด้วยการเขียน Unit Test ให้ฟังก์ชันถัดไปที่คุณสร้าง แล้วคุณจะรู้สึกถึงความแตกต่าง