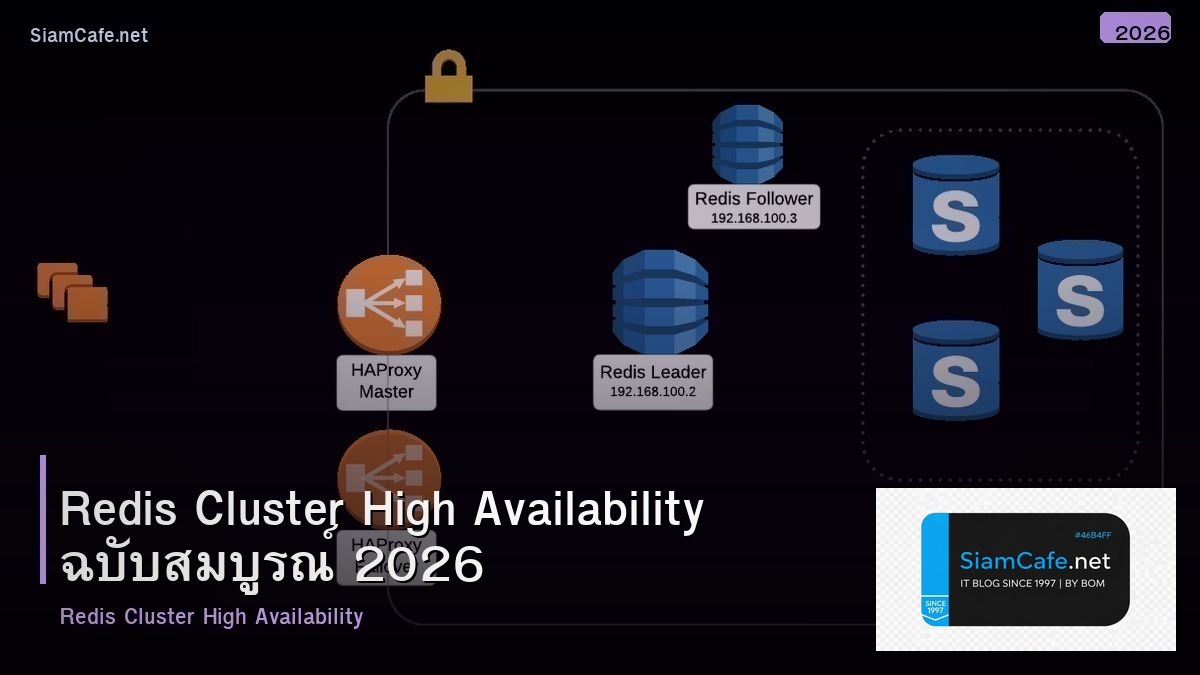
Redis Cluster High Availability ฉบับสมบูรณ์ 2026

Redis เป็น in-memory data store ที่เร็วที่สุดในโลกให้ latency ระดับ sub-millisecond สำหรับทุก operation ตั้งแต่ simple key-value caching ไปจนถึง real-time leaderboard, session store, message queue และ rate limiting แต่เมื่อใช้งานจริงในระดับ production สิ่งที่ขาดไม่ได้คือ high availability เพราะ Redis เป็น single point of failure ถ้าไม่มี replication
วิดีโอประกอบการเรียนรู้ | YouTube @icafefx
บทความนี้จะพาคุณตั้งค่า Redis ให้มี high availability ทั้งแบบ Sentinel สำหรับ automatic failover และ Redis Cluster สำหรับ horizontal scaling พร้อม persistence, security, monitoring และ performance tuning ที่ใช้งานได้จริงในองค์กรครับ
1. ภาพรวม Redis Architecture

Redis มี 3 architecture หลักสำหรับ high availability แบบแรกคือ Master-Replica ที่มี master รับ write และ replica รับ read ง่ายที่สุดแต่ failover ต้องทำด้วยมือแบบที่สองคือ Sentinel ที่เพิ่ม monitor process มาดู master ถ้า master ล่ม Sentinel จะ promote replica เป็น master ใหม่อัตโนมัติและแบบที่สามคือ Cluster ที่แบ่ง data ออกเป็น hash slots กระจายไปหลาย master node ทำให้ scale ได้ทั้ง storage และ throughput
การเลือก architecture ขึ้นอยู่กับ use case ถ้า data fit ใน RAM ของ node เดียวและต้องการ failover อัตโนมัติใช้ Sentinel ก็เพียงพอถ้า data ใหญ่เกิน RAM ของ node เดียวหรือต้องการ write throughput สูงมากใช้ Cluster ที่กระจาย write ไปหลาย master ถ้าเป็น development หรือ staging ที่ไม่ต้องการ HA ใช้ standalone ก็ได้ครับ
2. ติดตั้ง Redis บน Ubuntu
# เพิ่ม Redis official repository
curl -fsSL https://packages.redis.io/gpg | sudo gpg --dearmor -o /usr/share/keyrings/redis-archive-keyring.gpg

echo "deb [signed-by=/usr/share/keyrings/redis-archive-keyring.gpg] https://packages.redis.io/deb $(lsb_release -cs) main" | sudo tee /etc/apt/sources.list.d/redis.list

sudo apt update
sudo apt install -y redis-server

# ตรวจสอบ version
redis-server --version
# Redis server v=7.4.x

# เปิด service
sudo systemctl enable redis-server
sudo systemctl start redis-server

# ทดสอบ
redis-cli ping
# PONG
ตั้งค่าพื้นฐานใน redis.conf สำหรับ production ที่สำคัญคือ bind address, password, maxmemory และ maxmemory-policy
# /etc/redis/redis.conf — Production settings
bind 0.0.0.0
port 6379
protected-mode yes
requirepass "StrongRedisP@ss2026!"

# Memory
maxmemory 4gb
maxmemory-policy allkeys-lru

# Logging
loglevel notice
logfile /var/log/redis/redis-server.log

# Disable dangerous commands
rename-command FLUSHDB ""
rename-command FLUSHALL ""
rename-command DEBUG ""
rename-command CONFIG "CONFIG_e8f2a1"

# TCP keepalive
tcp-keepalive 300
tcp-backlog 511

# Timeout (0 = no timeout)
timeout 300
การตั้ง maxmemory-policy เป็น allkeys-lru เป็น policy ที่เหมาะสมที่สุดสำหรับ caching use case เมื่อ memory เต็ม Redis จะลบ key ที่ใช้งานน้อยที่สุดออกก่อนทำให้ cache ทำงานได้ต่อเนื่องโดยไม่ต้อง manual intervention
3. Master-Replica Replication
Replication เป็นพื้นฐานของ HA ทุกรูปแบบ Master รับ write ทั้งหมดแล้ว replicate ไปยัง replica แบบ asynchronous ทำให้ replica มี copy ของ data เกือบ real-time
เนื้อหาเกี่ยวข้อง — อ่านต่อ: SOPS Encryption Interview Preparation
# บน Replica node — /etc/redis/redis.conf
replicaof 10.0.1.10 6379
masterauth "StrongRedisP@ss2026!"

# ให้ replica รับ read ได้
replica-read-only yes

# Replication backlog size
repl-backlog-size 256mb

# Replica priority (ค่าต่ำ = ถูก promote ก่อน)
replica-priority 100
# ตรวจสอบ replication status
redis-cli -a "StrongRedisP@ss2026!" INFO replication

# Output ที่ควรเห็น:
# role:master
# connected_slaves:2
# slave0:ip=10.0.1.11, port=6379, state=online, offset=12345, lag=0
# slave1:ip=10.0.1.12, port=6379, state=online, offset=12345, lag=0
ค่า lag=0 หมายความว่า replica sync กับ master ได้ทันถ้า lag สูงแสดงว่า network ช้าหรือ replica มี load สูงจากการ serve read queries มากเกินไปควร monitor ค่านี้อย่างสม่ำเสมอเพื่อให้มั่นใจว่า data consistency อยู่ในระดับที่ยอมรับได้ครับ
4. Redis Sentinel (Auto Failover)
Sentinel คือ distributed system ที่ monitor Redis instance และทำ automatic failover ต้องมีอย่างน้อย 3 Sentinel process เพื่อให้ quorum vote ได้ถูกต้อง
# /etc/redis/sentinel.conf
port 26379
daemonize yes
logfile /var/log/redis/sentinel.log
pidfile /var/run/redis/sentinel.pid

# Monitor master — ชื่อ mymaster, IP, port, quorum 2
sentinel monitor mymaster 10.0.1.10 6379 2

# Authentication
sentinel auth-pass mymaster "StrongRedisP@ss2026!"

# Failover timeout
sentinel down-after-milliseconds mymaster 5000
sentinel failover-timeout mymaster 60000
sentinel parallel-syncs mymaster 1

# Notification script (optional)
# sentinel notification-script mymaster /opt/redis/notify.sh
# เปิด Sentinel บนทุก 3 node
sudo redis-sentinel /etc/redis/sentinel.conf

# ตรวจสอบ Sentinel status
redis-cli -p 26379 SENTINEL master mymaster
redis-cli -p 26379 SENTINEL replicas mymaster
redis-cli -p 26379 SENTINEL sentinels mymaster

# ดู master ปัจจุบัน
redis-cli -p 26379 SENTINEL get-master-addr-by-name mymaster
# 1) "10.0.1.10"
# 2) "6379"
เมื่อ master ล่ม Sentinel จะใช้เวลาประมาณ 5-10 วินาที (ขึ้นกับ down-after-milliseconds) ในการตรวจจับและ promote replica เป็น master ใหม่ Application ที่ใช้ Sentinel-aware client จะถูก redirect ไปยัง master ใหม่อัตโนมัติแนะนำใช้ client library ที่รองรับ Sentinel เช่น redis-py, Jedis, ioredis
แนะนำเพิ่มเติม — อีบุ๊กการลงทุน SiamCafeBook
5. Redis Cluster (Sharding)
Redis Cluster เป็น solution สำหรับ horizontal scaling โดยแบ่ง keyspace ออกเป็น 16384 hash slots กระจายไปยัง master node ต่างๆแต่ละ key จะถูก assign ไป slot ด้วยสูตร CRC16(key) mod 16384
# สร้าง 6 Redis instance (3 master + 3 replica)
# Port 7000-7005 บน machine เดียว (สำหรับ test)

for port in 7000 7001 7002 7003 7004 7005; do
 mkdir -p /etc/redis/cluster/
 cat > /etc/redis/cluster//redis.conf << EOF
port
cluster-enabled yes
cluster-config-file nodes-.conf
cluster-node-timeout 5000
appendonly yes
appendfilename "appendonly-.aof"
dbfilename dump-.rdb
dir /var/lib/redis/cluster/
bind 0.0.0.0
requirepass "ClusterP@ss2026!"
masterauth "ClusterP@ss2026!"
logfile /var/log/redis/redis-.log
EOF

 mkdir -p /var/lib/redis/cluster/
 redis-server /etc/redis/cluster//redis.conf --daemonize yes
done
# สร้าง cluster
redis-cli -a "ClusterP@ss2026!" --cluster create \
 127.0.0.1:7000 127.0.0.1:7001 127.0.0.1:7002 \
 127.0.0.1:7003 127.0.0.1:7004 127.0.0.1:7005 \
 --cluster-replicas 1

# ตรวจสอบ cluster info
redis-cli -a "ClusterP@ss2026!" -p 7000 CLUSTER INFO
redis-cli -a "ClusterP@ss2026!" -p 7000 CLUSTER NODES

# ทดสอบ write/read
redis-cli -a "ClusterP@ss2026!" -c -p 7000 SET mykey "hello"
redis-cli -a "ClusterP@ss2026!" -c -p 7000 GET mykey
สังเกตว่า flag -c เปิด cluster mode ใน redis-cli ทำให้ client follow redirect ไปยัง node ที่ถูกต้องอัตโนมัติเมื่อ SET key ที่ hash slot อยู่บน node อื่น Redis จะตอบ MOVED redirect และ client จะส่ง request ไปยัง node ที่ถูกต้อง
6. Persistence: RDB + AOF
Redis มี 2 วิธีหลักสำหรับ persistence คือ RDB snapshot ที่สร้าง binary dump ของ data ทั้งหมดเป็นระยะและ AOF (Append-Only File) ที่ log ทุก write operation สำหรับ production แนะนำเปิดทั้งสองแบบเพื่อความปลอดภัยสูงสุด
# /etc/redis/redis.conf — Persistence settings

# RDB snapshots
save 900 1 # save ถ้ามี 1 key เปลี่ยนใน 15 นาที
save 300 10 # save ถ้ามี 10 keys เปลี่ยนใน 5 นาที
save 60 10000 # save ถ้ามี 10000 keys เปลี่ยนใน 1 นาที

rdbcompression yes
rdbchecksum yes
dbfilename dump.rdb

# AOF
appendonly yes
appendfilename "appendonly.aof"
appendfsync everysec # sync ทุกวินาที (balance ระหว่าง performance กับ durability)
auto-aof-rewrite-percentage 100
auto-aof-rewrite-min-size 64mb

# ใช้ AOF ใหม่แบบ multi-part (Redis 7+)
aof-use-rdb-preamble yes
การตั้ง appendfsync เป็น everysec เป็น sweet spot ที่ดีที่สุดถ้า server crash จะสูญเสีย data อย่างมากแค่ 1 วินาทีในขณะที่ performance แทบไม่ต่างจาก no appendfsync ถ้าต้องการ durability สูงสุดใช้ always แต่ performance จะลดลง 50-80 เปอร์เซ็นต์เพราะ fsync ทุก write
เนื้อหาเกี่ยวข้อง — บทความที่เกี่ยวข้อง: doo prime รีวิว — ข้อมูลครบถ้วน 2026
7. Security และ Authentication
# Redis 6+ — ACL (Access Control Lists)
# สร้าง user สำหรับ application
ACL SETUSER appuser on >AppP@ss123 ~app:* +@read +@write -@admin -@dangerous

# สร้าง user สำหรับ monitoring
ACL SETUSER monuser on >MonP@ss123 ~* +info +ping +dbsize +monitor -@write

# สร้าง admin user
ACL SETUSER admin on >AdminP@ss123 ~* +@all

# ดู user list
ACL LIST

# บันทึก ACL ลงไฟล์
ACL SAVE
# /etc/redis/redis.conf — Security settings

# TLS/SSL
tls-port 6380
tls-cert-file /etc/redis/tls/redis.crt
tls-key-file /etc/redis/tls/redis.key
tls-ca-cert-file /etc/redis/tls/ca.crt
tls-auth-clients optional

# Disable non-TLS port (optional)
# port 0

# ACL file
aclfile /etc/redis/users.acl
ACL เป็น feature ที่สำคัญมากสำหรับ production ช่วยให้ควบคุม permission ของแต่ละ user ได้ละเอียด application user ใช้ได้เฉพาะ read/write command กับ key pattern ที่กำหนด monitoring user ดูได้แค่ info ไม่มีสิทธิ์ write ป้องกัน accidental data corruption ได้ดีครับ
8. Performance Tuning
# System tuning สำหรับ Redis
# /etc/sysctl.d/redis.conf
vm.overcommit_memory = 1
net.core.somaxconn = 65535
net.core.netdev_max_backlog = 65535
net.ipv4.tcp_max_syn_backlog = 65535

# Disable THP (Transparent Huge Pages)
echo never > /sys/kernel/mm/transparent_hugepage/enabled
echo never > /sys/kernel/mm/transparent_hugepage/defrag

# เพิ่มใน /etc/rc.local หรือ systemd unit
# Redis benchmark
redis-benchmark -a "StrongRedisP@ss2026!" -h 127.0.0.1 -p 6379 \
 -t set, get, incr, lpush, rpush, sadd -n 1000000 -q --threads 4

# ผลลัพธ์ทั่วไปบน modern server:
# SET: 180,000 requests per second
# GET: 200,000 requests per second
# INCR: 190,000 requests per second
Pipeline เพิ่ม Throughput
การส่ง command ทีละอัน RTT จะเป็น bottleneck ใช้ pipeline ส่งหลาย command ในครั้งเดียว throughput เพิ่มได้ 5-10 เท่า application framework ส่วนใหญ่รองรับ pipeline อยู่แล้วเช่น redis-py มี pipeline() method, Jedis มี Pipeline class ให้ใช้งานง่ายมากครับ
Lua Scripting ลด Round-trips
สำหรับ operation ที่ต้องใช้หลาย command ติดต่อกันเช่น check-and-set, rate limiting ใช้ Lua script ที่ run บน Redis server ได้ทั้งหมดใน 1 round-trip ได้ atomicity และ performance ที่ดีกว่าการส่ง command ทีละอัน
9. Monitoring และ Alerting
# Redis INFO command — ข้อมูลที่ต้อง monitor
redis-cli -a "StrongRedisP@ss2026!" INFO memory
# used_memory_human: 2.5G
# used_memory_rss_human: 3.1G
# mem_fragmentation_ratio: 1.24

redis-cli -a "StrongRedisP@ss2026!" INFO stats
# total_connections_received: 1234567
# total_commands_processed: 98765432
# instantaneous_ops_per_sec: 12500
# keyspace_hits: 87654321
# keyspace_misses: 1234567

# Cache hit rate
# hit_rate = keyspace_hits / (keyspace_hits + keyspace_misses) * 100
# ควร > 95%
ค่าที่ต้อง monitor ที่สำคัญที่สุดคือ memory usage ต้องไม่เกิน maxmemory, cache hit rate ควรอยู่เหนือ 95 เปอร์เซ็นต์, replication lag ควรเป็น 0 หรือใกล้เคียง, connected clients ไม่ควรสูงกว่า maxclients และ mem_fragmentation_ratio ควรอยู่ระหว่าง 1.0-1.5 ถ้าสูงกว่า 1.5 แสดงว่ามี memory fragmentation ต้อง restart Redis
Session Store

Redis เป็น session store ที่ดีที่สุดสำหรับ web application ที่มีหลาย server เพราะทุก server เข้าถึง session เดียวกันได้ตั้ง TTL ให้ session key หมดอายุอัตโนมัติไม่ต้อง cleanup ด้วยมือ performance ดีกว่าเก็บ session ใน database หลายเท่าตัว
แนะนำเพิ่มเติม — ระบบเทรดของ iCafeForex
Cache Layer
ใส่ Redis เป็น cache ระหว่าง application กับ database ลด query load บน MySQL หรือ PostgreSQL ได้ 80-95 เปอร์เซ็นต์ใช้ cache-aside pattern อ่านจาก cache ก่อนถ้าไม่มีค่อย query database แล้วเก็บผลลัพธ์ใน cache สำหรับครั้งถัดไป
Real-time Leaderboard
Sorted Set ของ Redis เหมาะสำหรับ leaderboard มากเพิ่ม score ด้วย ZADD, ดู ranking ด้วย ZRANK, ดู top 10 ด้วย ZRANGE ทั้งหมด O(log N) เร็วมากแม้จะมีสมาชิกหลายล้านคน
เนื้อหาเกี่ยวข้อง — อ่านต่อ: buy stop adalah — คู่มือฉบับสมบูรณ์ 2026
Message Queue
Redis Streams (XADD/XREAD) เป็น lightweight message queue ที่เหมาะสำหรับ microservice communication ให้ consumer groups, acknowledgment และ pending message management คล้ายกับ Kafka แต่ setup ง่ายกว่ามากครับ
Memory เต็ม OOM
ถ้า Redis ใช้ memory เกิน maxmemory และ maxmemory-policy เป็น noeviction จะตอบ OOM error ทุก write command แก้โดยเพิ่ม maxmemory, เปลี่ยน policy เป็น allkeys-lru หรือตรวจสอบว่ามี key ที่ไม่มี TTL จำนวนมากหรือไม่ใช้ redis-cli --bigkeys หา key ที่กิน memory มากที่สุดครับ
Latency Spike
Redis ควรมี latency ต่ำกว่า 1ms ถ้าสูงกว่านั้นอาจเกิดจาก BGSAVE fork ที่ใช้เวลานาน, slow Lua script, KEYS command ที่ scan ทุก key หรือ swap memory ใช้ redis-cli --latency และ SLOWLOG GET 10 เพื่อ diagnose
Cluster ไม่ converge
ถ้า CLUSTER INFO แสดง cluster_state:fail ตรวจสอบว่า node สื่อสารกันได้ผ่าน cluster bus port (port+10000) firewall ต้องเปิดทั้ง data port และ bus port ใช้ CLUSTER NODES ดูสถานะแต่ละ node และ CLUSTER FIX เพื่อ repair slot allocation
Redis Cluster กับ Redis Sentinel ต่างกันอย่างไร?
Redis Sentinel ให้ high availability ด้วย automatic failover แต่ data อยู่บน master ตัวเดียวส่วน Redis Cluster แบ่ง data ออกเป็น 16384 hash slots กระจายไปหลาย node ทำให้ scale ได้ทั้ง read และ write ใช้ Cluster เมื่อ data ใหญ่เกิน RAM ของ node เดียวหรือต้องการ write throughput สูงมากครับ
Redis ต้องใช้ RAM เท่าไหร่?
ขึ้นอยู่กับ data set size โดยทั่วไป Redis ใช้ RAM ประมาณ 1.5-2 เท่าของ data ที่เก็บเพราะ overhead สำหรับ data structure, replication buffer และ COW fork เวลา BGSAVE แนะนำเผื่อ RAM อย่างน้อย 25 เปอร์เซ็นต์เหนือ data set
Redis persistence ใช้ RDB หรือ AOF ดี?
แนะนำใช้ทั้งสองแบบ RDB ให้ compact snapshot ที่ restore เร็วส่วน AOF ให้ durability ที่ดีกว่าเพราะ log ทุก write operation สำหรับ production ใช้ AOF appendfsync everysec ร่วมกับ RDB save ทุก 15 นาทีจะได้ทั้ง performance และ durability
เนื้อหาเกี่ยวข้อง — บทความที่เกี่ยวข้อง: PagerDuty Incident Shift Left Security
Redis Cluster ต้องมีกี่ node?
ขั้นต่ำ 6 node คือ 3 master + 3 replica เพื่อให้ cluster ทำงานได้แม้ node ล่ม 1 ตัวสำหรับ production แนะนำ 6-9 node เพื่อ fault tolerance ที่ดีขึ้นถ้า master ล่ม 1 ตัว replica จะ promote เป็น master ใหม่อัตโนมัติครับ
Redis กับ Memcached ตัวไหนดีกว่า?
Redis มี feature มากกว่า Memcached มากรองรับ data structure หลากหลาย (Strings, Lists, Sets, Sorted Sets, Hashes, Streams) มี persistence, replication, Lua scripting และ pub/sub ส่วน Memcached เร็วกว่าเล็กน้อยสำหรับ simple key-value แต่ไม่มี HA ในตัวสำหรับโปรเจ็คใหม่แนะนำ Redis เสมอครับ
สรุป
Redis เป็น in-memory data store ที่ไม่มีใครเทียบเรื่องความเร็วและความยืดหยุ่นด้วย Sentinel สำหรับ automatic failover และ Cluster สำหรับ horizontal scaling คุณสามารถสร้าง caching layer ที่ทนทานและรองรับ traffic สูงมากได้การตั้ง persistence ที่ถูกต้อง security ที่แข็งแกร่งและ monitoring ที่ครอบคลุมจะทำให้ Redis ของคุณพร้อมสำหรับ production workload ทุกระดับครับ
เริ่มต้นจาก standalone Redis แล้วค่อยขยายเป็น Sentinel เมื่อต้องการ HA และ Cluster เมื่อ data ใหญ่ขึ้นลงทุนเวลาเรียนรู้ Redis จะคืนทุนหลายเท่าเมื่อ application ของคุณเร็วขึ้นและเชื่อถือได้มากขึ้นครับ
อ่านเพิ่มเติม: สอนเทรด Forex | XM Signal | IT Hardware | อาชีพ IT