Kubernetes Networking เป็นหนึ่งในหัวข้อที่ซับซ้อนที่สุดของ Kubernetes แต่ก็เป็นหัวข้อที่สำคัญที่สุดเช่นกัน เพราะ Application ทุกตัวจำเป็นต้องสื่อสารกัน ไม่ว่าจะเป็น Pod สื่อสารกับ Pod, Service ส่ง Traffic ไป Backend หรือ Client จากภายนอกเข้าถึง Application ผ่าน Ingress
บทความนี้จะพาคุณเข้าใจ Kubernetes Networking ตั้งแต่พื้นฐาน Networking Model ไปจนถึง Service Discovery, Ingress Controllers, NetworkPolicies และ CNI Plugins เพื่อให้คุณสามารถออกแบบและแก้ไขปัญหา Networking ใน K8s ได้อย่างมั่นใจ
Kubernetes Networking Model — หลักการพื้นฐาน
Kubernetes กำหนดกฎ Networking พื้นฐาน 4 ข้อที่ทุก Implementation ต้องปฏิบัติตาม:
- ทุก Pod ได้รับ IP Address เป็นของตัวเอง — ไม่ต้องแชร์ IP กับ Pod อื่น
- Pod ทุกตัวสามารถสื่อสารกับ Pod อื่นได้โดยตรง — ไม่ต้องผ่าน NAT (Flat Network)
- Agent บน Node (เช่น kubelet) สามารถสื่อสารกับทุก Pod บน Node นั้นได้
- Pod ที่ใช้ Host Network สามารถสื่อสารกับทุก Pod ได้โดยตรง
กฎเหล่านี้ทำให้ Networking ใน Kubernetes เป็น Flat Network ที่เรียบง่าย Pod ทุกตัวอยู่ใน Network เดียวกันเสมือน ไม่ว่าจะอยู่บน Node เดียวกันหรือคนละ Node
# ดู IP ของ Pod
kubectl get pods -o wide

# ผลลัพธ์:
# NAME          READY   STATUS    IP            NODE
# web-abc123    1/1     Running   10.244.1.5    node-1
# api-def456    1/1     Running   10.244.2.8    node-2
# db-ghi789     1/1     Running   10.244.1.12   node-1

# Pod สามารถ Ping กันได้โดยตรง (แม้ต่าง Node)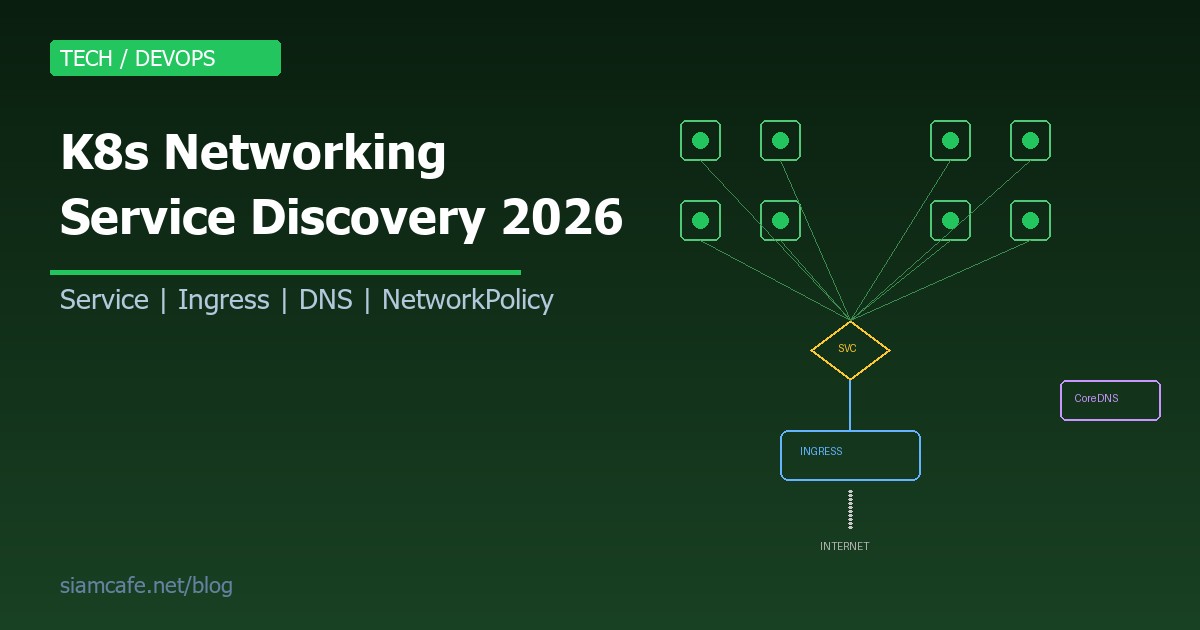
kubectl exec web-abc123 -- ping 10.244.2.8Services — หัวใจของ Service Discovery
แม้ว่า Pod จะมี IP แต่ IP ของ Pod เปลี่ยนทุกครั้งที่ Pod ถูกสร้างใหม่ ดังนั้นจึงไม่ควรใช้ Pod IP โดยตรง Kubernetes จึงมี Service เป็น Abstraction Layer ที่ให้ Stable IP และ DNS Name สำหรับกลุ่มของ Pods
ClusterIP — Service ภายใน Cluster
ClusterIP เป็นประเภท Service ที่ใช้บ่อยที่สุด ให้ Virtual IP ที่เข้าถึงได้เฉพาะภายใน Cluster:
# clusterip-service.yaml
apiVersion: v1
kind: Service
metadata:
  name: api-service
  namespace: production
spec:
  type: ClusterIP        # default type
  selector:
    app: api              # เลือก Pods ที่มี label app=api
    version: v2
  ports:
    - name: http
      protocol: TCP
      port: 80            # Port ของ Service
      targetPort: 3000    # Port ของ Container
    - name: grpc
      protocol: TCP
      port: 9090
      targetPort: 9090

---
# Pod ที่ match selector
apiVersion: apps/v1
kind: Deployment
metadata:
  name: api
spec:
  replicas: 3
  selector:
    matchLabels:
      app: api
      version: v2
  template:
    metadata:
      labels:
        app: api
        version: v2
    spec:
      containers:
        - name: api
          image: myapp/api:2.0
          ports:
            - containerPort: 3000
            - containerPort: 9090
# ดู Service
kubectl get svc api-service -n production
# NAME TYPE CLUSTER-IP PORT(S) AGE
# api-service ClusterIP 10.96.45.123 80/TCP,9090/TCP 5m
# เข้าถึงจาก Pod อื่นใน Cluster
curl http://api-service.production.svc.cluster.local:80
curl http://api-service.production:80 # ข้าม .svc.cluster.local ได้
curl http://api-service:80 # ถ้าอยู่ Namespace เดียวกันNodePort — เปิดให้เข้าถึงจากภายนอก
# nodeport-service.yaml
apiVersion: v1
kind: Service
metadata:
  name: web-nodeport
spec:
  type: NodePort
  selector:
    app: web
  ports:
    - port: 80
      targetPort: 8080
      nodePort: 30080    # Port 30000-32767 บนทุก Node

# เข้าถึงผ่าน NodeIP:NodePort
# http://192.168.1.10:30080
# http://192.168.1.11:30080  (ทุก Node)
LoadBalancer — สำหรับ Cloud
# loadbalancer-service.yaml
apiVersion: v1
kind: Service
metadata:
  name: web-lb
  annotations:
    # AWS-specific annotations
    service.beta.kubernetes.io/aws-load-balancer-type: "nlb"
    service.beta.kubernetes.io/aws-load-balancer-scheme: "internet-facing"
spec:
  type: LoadBalancer
  selector:
    app: web
  ports:
    - port: 80
      targetPort: 8080
    - port: 443
      targetPort: 8443

# Cloud provider จะสร้าง External Load Balancer ให้
kubectl get svc web-lb
# EXTERNAL-IP: a1b2c3d4.elb.amazonaws.com
ExternalName — DNS Alias
# externalname-service.yaml
apiVersion: v1
kind: Service
metadata:
  name: external-db
spec:
  type: ExternalName
  externalName: mydb.example.com    # DNS CNAME

# Pod สามารถเข้าถึง external-db แล้วจะ resolve เป็น mydb.example.com
# ใช้สำหรับชี้ไปยัง External Service (เช่น RDS, Cloud SQL)
Headless Service — ไม่มี ClusterIP
# headless-service.yaml
apiVersion: v1
kind: Service
metadata:
  name: db-headless
spec:
  clusterIP: None        # Headless!
  selector:
    app: database
  ports:
    - port: 5432

# DNS จะ return IP ของทุก Pod โดยตรง (ไม่ผ่าน Virtual IP)
# ใช้กับ StatefulSet ที่ต้องการเข้าถึง Pod แต่ละตัวโดยตรง
# เช่น db-headless-0.db-headless.default.svc.cluster.local| Service Type | ใช้เมื่อ | เข้าถึงจาก |
|---|---|---|
| ClusterIP | Service ภายใน Cluster | ภายใน Cluster เท่านั้น |
| NodePort | Dev/Test หรือ On-premise | NodeIP:Port |
| LoadBalancer | Production บน Cloud | External IP/DNS |
| ExternalName | ชี้ไปยัง External Service | DNS CNAME |
| Headless | StatefulSet, Direct Pod access | DNS returns Pod IPs |
Endpoints และ EndpointSlices
เมื่อสร้าง Service Kubernetes จะสร้าง Endpoints Object อัตโนมัติที่เก็บรายการ IP ของ Pods ที่ match selector:
# ดู Endpoints
kubectl get endpoints api-service -n production
# NAME          ENDPOINTS
# api-service   10.244.1.5:3000,10.244.2.8:3000,10.244.1.12:3000

# EndpointSlices — API ใหม่ที่ Scale ได้ดีกว่า
kubectl get endpointslices -l kubernetes.io/service-name=api-service

# EndpointSlice แบ่ง Endpoints เป็น Slice (max 100 endpoints ต่อ slice)
# ทำให้ kube-proxy ไม่ต้อง Watch Endpoints ขนาดใหญ่ทั้งก้อนkube-proxy — ผู้จัดการ Network Rules
kube-proxy รันบนทุก Node ทำหน้าที่สร้าง Network Rules เพื่อส่ง Traffic จาก Service IP ไปยัง Pod IP:
iptables Mode (Default)
# ดู iptables rules ที่ kube-proxy สร้าง
sudo iptables -t nat -L KUBE-SERVICES -n

# kube-proxy สร้าง iptables rules ที่:
# 1. จับ Traffic ที่ส่งไป Service IP
# 2. DNAT ไปยัง Pod IP แบบ Random (round-robin)
# 3. ทำ Connection Tracking

# ข้อดี: เสถียร, ใช้งานมานาน
# ข้อเสีย: ช้าเมื่อ Rules มากกว่า 5,000+ (O(n) lookup)
IPVS Mode (แนะนำสำหรับ Cluster ใหญ่)
# เปิดใช้ IPVS mode
# ใน kube-proxy config:
apiVersion: kubeproxy.config.k8s.io/v1alpha1
kind: KubeProxyConfiguration
mode: "ipvs"
ipvs:
  scheduler: "rr"    # round-robin, lc (least connection), sh (source hash)

# ข้อดี IPVS:
# - O(1) lookup — เร็วกว่า iptables มากเมื่อมี Service มาก
# - รองรับ Load Balancing Algorithms หลากหลาย
# - Connection tracking ดีกว่า

# ดู IPVS rules
sudo ipvsadm -Ln
CoreDNS — Service Discovery ผ่าน DNS
CoreDNS เป็น DNS Server ภายใน Kubernetes Cluster ที่ทำให้ Pod สามารถค้นหา Service ด้วยชื่อแทน IP:
# DNS Format สำหรับ Service:
# <service-name>.<namespace>.svc.cluster.local

# ตัวอย่าง:
# api-service.production.svc.cluster.local    -> 10.96.45.123
# redis.cache.svc.cluster.local              -> 10.96.78.91
# web.default.svc.cluster.local              -> 10.96.12.34

# ถ้าอยู่ Namespace เดียวกัน ใช้แค่ชื่อ Service:
curl http://api-service:80

# ถ้าต่าง Namespace ต้องระบุ:
curl http://api-service.production:80
# ทดสอบ DNS ภายใน Cluster
kubectl run dns-test --image=busybox --rm -it -- nslookup api-service.production
# ดู CoreDNS config
kubectl get configmap coredns -n kube-system -o yaml
# CoreDNS Corefile:
.:53 {
errors
health {
lameduck 5s
}
ready
kubernetes cluster.local in-addr.arpa ip6.arpa {
pods insecure
fallthrough in-addr.arpa ip6.arpa
ttl 30
}
prometheus :9153
forward . /etc/resolv.conf {
max_concurrent 1000
}
cache 30
loop
reload
loadbalance
}DNS Records ที่ CoreDNS สร้าง
| ประเภท | DNS Record | ตัวอย่าง |
|---|---|---|
| Service (ClusterIP) | A record | api-svc.ns.svc.cluster.local -> ClusterIP |
| Service (Headless) | A record (multiple) | db-svc.ns.svc.cluster.local -> Pod IPs |
| Pod ใน StatefulSet | A record | pod-0.db-svc.ns.svc.cluster.local -> Pod IP |
| Service (ExternalName) | CNAME | ext-db.ns.svc.cluster.local -> mydb.example.com |
| SRV Record | SRV | _http._tcp.api-svc.ns.svc.cluster.local |
Ingress — รับ Traffic จากภายนอก
Ingress เป็น API Object ที่กำหนดกฎการ Route HTTP/HTTPS Traffic จากภายนอก Cluster เข้าสู่ Services ภายใน:
Ingress Controller
Ingress Resource ไม่ทำงานเองโดยตรง ต้องมี Ingress Controller ที่คอยอ่าน Ingress Rules แล้วสร้าง Configuration จริง:
# ติดตั้ง Nginx Ingress Controller
kubectl apply -f https://raw.githubusercontent.com/kubernetes/ingress-nginx/controller-v1.10.0/deploy/static/provider/cloud/deploy.yaml

# หรือใช้ Helm
helm repo add ingress-nginx https://kubernetes.github.io/ingress-nginx
helm install ingress-nginx ingress-nginx/ingress-nginx

# ตรวจสอบ
kubectl get pods -n ingress-nginx
kubectl get svc -n ingress-nginx| Ingress Controller | จุดเด่น | เหมาะกับ |
|---|---|---|
| Nginx Ingress | เสถียร, Community ใหญ่ | ทั่วไป |
| Traefik | Auto TLS, Dashboard ในตัว | ง่ายต่อการใช้งาน |
| HAProxy | Performance สูง | High-traffic |
| AWS ALB Controller | ใช้ AWS ALB โดยตรง | AWS EKS |
| Istio Gateway | Service Mesh integration | Microservices |
Path-based Routing
# path-based-ingress.yaml
apiVersion: networking.k8s.io/v1
kind: Ingress
metadata:
  name: app-ingress
  annotations:
    nginx.ingress.kubernetes.io/rewrite-target: /$1
spec:
  ingressClassName: nginx
  rules:
    - host: myapp.example.com
      http:
        paths:
          - path: /api/(.*)
            pathType: ImplementationSpecific
            backend:
              service:
                name: api-service
                port:
                  number: 80
          - path: /admin/(.*)
            pathType: ImplementationSpecific
            backend:
              service:
                name: admin-service
                port:
                  number: 80
          - path: /(.*)
            pathType: ImplementationSpecific
            backend:
              service:
                name: web-service
                port:
                  number: 80
Host-based Routing
# host-based-ingress.yaml
apiVersion: networking.k8s.io/v1
kind: Ingress
metadata:
  name: multi-host-ingress
spec:
  ingressClassName: nginx
  rules:
    - host: app.example.com
      http:
        paths:
          - path: /
            pathType: Prefix
            backend:
              service:
                name: app-service
                port:
                  number: 80
    - host: api.example.com
      http:
        paths:
          - path: /
            pathType: Prefix
            backend:
              service:
                name: api-service
                port:
                  number: 80
    - host: admin.example.com
      http:
        paths:
          - path: /
            pathType: Prefix
            backend:
              service:
                name: admin-service
                port:
                  number: 80
TLS Termination
# สร้าง TLS Secret
kubectl create secret tls app-tls \
  --cert=tls.crt \
  --key=tls.key

# Ingress with TLS
apiVersion: networking.k8s.io/v1
kind: Ingress
metadata:
  name: tls-ingress
  annotations:
    nginx.ingress.kubernetes.io/ssl-redirect: "true"
    nginx.ingress.kubernetes.io/force-ssl-redirect: "true"
spec:
  ingressClassName: nginx
  tls:
    - hosts:
        - app.example.com
        - api.example.com
      secretName: app-tls
  rules:
    - host: app.example.com
      http:
        paths:
          - path: /
            pathType: Prefix
            backend:
              service:
                name: app-service
                port:
                  number: 80

# ใช้ cert-manager สำหรับ Auto TLS (Let's Encrypt)
# ติดตั้ง cert-manager
kubectl apply -f https://github.com/cert-manager/cert-manager/releases/download/v1.14.0/cert-manager.yaml

# ClusterIssuer สำหรับ Let's Encrypt
apiVersion: cert-manager.io/v1
kind: ClusterIssuer
metadata:
  name: letsencrypt-prod
spec:
  acme:
    server: https://acme-v02.api.letsencrypt.org/directory
    email: admin@example.com
    privateKeySecretRef:
      name: letsencrypt-prod
    solvers:
      - http01:
          ingress:
            class: nginx

# Ingress ที่ใช้ cert-manager
apiVersion: networking.k8s.io/v1
kind: Ingress
metadata:
  name: auto-tls-ingress
  annotations:
    cert-manager.io/cluster-issuer: "letsencrypt-prod"
spec:
  ingressClassName: nginx
  tls:
    - hosts:
        - app.example.com
      secretName: app-tls-auto    # cert-manager จะสร้างให้
  rules:
    - host: app.example.com
      http:
        paths:
          - path: /
            pathType: Prefix
            backend:
              service:
                name: app-service
                port:
                  number: 80
Gateway API — Next-gen Ingress
Gateway API เป็น API ใหม่ที่ออกแบบมาแทนที่ Ingress ในอนาคต มีความยืดหยุ่นและ Expressive มากกว่า:
# ติดตั้ง Gateway API CRDs
kubectl apply -f https://github.com/kubernetes-sigs/gateway-api/releases/download/v1.1.0/standard-install.yaml

# GatewayClass — กำหนด Implementation
apiVersion: gateway.networking.k8s.io/v1
kind: GatewayClass
metadata:
  name: nginx
spec:
  controllerName: k8s.io/nginx-gateway

---
# Gateway — สร้าง Listener
apiVersion: gateway.networking.k8s.io/v1
kind: Gateway
metadata:
  name: main-gateway
spec:
  gatewayClassName: nginx
  listeners:
    - name: http
      protocol: HTTP
      port: 80
    - name: https
      protocol: HTTPS
      port: 443
      tls:
        mode: Terminate
        certificateRefs:
          - name: app-tls

---
# HTTPRoute — กำหนด Routing Rules
apiVersion: gateway.networking.k8s.io/v1
kind: HTTPRoute
metadata:
  name: app-route
spec:
  parentRefs:
    - name: main-gateway
  hostnames:
    - "app.example.com"
  rules:
    - matches:
        - path:
            type: PathPrefix
            value: /api
      backendRefs:
        - name: api-service
          port: 80
          weight: 90
        - name: api-service-canary
          port: 80
          weight: 10    # Canary deployment!
    - matches:
        - path:
            type: PathPrefix
            value: /
      backendRefs:
        - name: web-service
port: 80NetworkPolicies — Firewall ระดับ Pod
NetworkPolicy ช่วยควบคุมว่า Pod ไหนสามารถสื่อสารกับ Pod ไหนได้บ้าง เป็นเหมือน Firewall ระดับ Pod:
Default Deny All
# deny-all.yaml — ปิด Traffic ทั้งหมดก่อน แล้วค่อยเปิดทีละอัน
apiVersion: networking.k8s.io/v1
kind: NetworkPolicy
metadata:
  name: deny-all
  namespace: production
spec:
  podSelector: {}     # เลือกทุก Pod
  policyTypes:
    - Ingress
    - Egress
  # ไม่มี ingress/egress rules = ปิดหมด
Allow Specific Traffic
# allow-web-to-api.yaml
apiVersion: networking.k8s.io/v1
kind: NetworkPolicy
metadata:
  name: allow-web-to-api
  namespace: production
spec:
  podSelector:
    matchLabels:
      app: api              # Policy นี้ apply กับ Pods ที่มี label app=api
  policyTypes:
    - Ingress
  ingress:
    - from:
        - podSelector:
            matchLabels:
              app: web       # อนุญาต traffic จาก Pods ที่มี label app=web
        - namespaceSelector:
            matchLabels:
              env: production  # ที่อยู่ใน namespace ที่มี label env=production
      ports:
        - protocol: TCP
          port: 3000
Namespace Isolation
# namespace-isolation.yaml
# อนุญาตเฉพาะ traffic ภายใน namespace เดียวกัน
apiVersion: networking.k8s.io/v1
kind: NetworkPolicy
metadata:
  name: namespace-isolation
  namespace: production
spec:
  podSelector: {}
  policyTypes:
    - Ingress
  ingress:
    - from:
        - namespaceSelector:
            matchLabels:
              kubernetes.io/metadata.name: production

---
# อนุญาต DNS traffic (CoreDNS อยู่ใน kube-system)
apiVersion: networking.k8s.io/v1
kind: NetworkPolicy
metadata:
  name: allow-dns
  namespace: production
spec:
  podSelector: {}
  policyTypes:
    - Egress
  egress:
    - to:
        - namespaceSelector:
            matchLabels:
              kubernetes.io/metadata.name: kube-system
      ports:
        - protocol: UDP
          port: 53
        - protocol: TCP
          port: 53
Egress Rules
# allow-external-api.yaml
apiVersion: networking.k8s.io/v1
kind: NetworkPolicy
metadata:
  name: allow-external-api
  namespace: production
spec:
  podSelector:
    matchLabels:
      app: payment
  policyTypes:
    - Egress
  egress:
    # อนุญาตให้ payment pods เข้าถึง External Payment API
    - to:
        - ipBlock:
            cidr: 203.0.113.0/24    # Payment provider IP range
      ports:
        - protocol: TCP
          port: 443
    # อนุญาต DNS
    - to:
        - namespaceSelector: {}
      ports:
        - protocol: UDP
          port: 53
CNI Plugins — เลือก Network Implementation
Container Network Interface (CNI) เป็น Standard ที่กำหนดว่า Plugin ต้อง Implement Networking อย่างไร เลือก CNI Plugin ที่เหมาะกับความต้องการ:
เปรียบเทียบ CNI Plugins
| CNI Plugin | Network Mode | NetworkPolicy | จุดเด่น |
|---|---|---|---|
| Calico | BGP / VXLAN / IPIP | รองรับครบ | เป็นที่นิยมที่สุด, Enterprise features |
| Cilium | eBPF | รองรับ + ขยาย | eBPF-based, High performance, L7 policy |
| Flannel | VXLAN | ไม่รองรับ | ง่ายที่สุด, เหมาะสำหรับเริ่มต้น |
| Weave Net | VXLAN / sleeve | รองรับ | ติดตั้งง่าย, Encryption ในตัว |
| AWS VPC CNI | AWS VPC | Security Groups | Native AWS networking |
| Azure CNI | Azure VNet | รองรับ | Native Azure networking |
Cilium — eBPF-based Networking
Cilium เป็น CNI Plugin ยุคใหม่ที่ใช้ eBPF (extended Berkeley Packet Filter) แทน iptables ทำให้ Performance สูงกว่ามาก:
# ติดตั้ง Cilium ด้วย Helm
helm repo add cilium https://helm.cilium.io/
helm install cilium cilium/cilium --version 1.16.0 \
  --namespace kube-system \
  --set hubble.enabled=true \
  --set hubble.relay.enabled=true \
  --set hubble.ui.enabled=true

# ข้อดีของ Cilium:
# 1. eBPF แทน iptables — เร็วกว่า ไม่ต้อง traverse iptables chains
# 2. L7 Network Policy — บล็อกได้ถึงระดับ HTTP path, gRPC method
# 3. Hubble — Observability ในตัว ดู Network Flow แบบ Real-time
# 4. Service Mesh ในตัว — ไม่ต้อง Sidecar (Cilium Mesh)
# 5. Encryption — WireGuard encryption ระหว่าง Nodes

# ตรวจสอบ Cilium status
cilium status
cilium connectivity test

# ดู Network Flow ด้วย Hubble
hubble observe --namespace production
hubble observe --to-pod api-service
# Cilium L7 Network Policy (ขยายจาก K8s NetworkPolicy)
apiVersion: cilium.io/v2
kind: CiliumNetworkPolicy
metadata:
name: l7-api-policy
namespace: production
spec:
endpointSelector:
matchLabels:
app: api
ingress:
- fromEndpoints:
- matchLabels:
app: web
toPorts:
- ports:
- port: "80"
protocol: TCP
rules:
http:
- method: "GET"
path: "/api/v1/.*"
- method: "POST"
path: "/api/v1/users"
# ปิดกั้น DELETE, PUT ฯลฯMulti-cluster Networking
เมื่อ Application ขยายเป็นหลาย Cluster ต้องมีวิธีเชื่อมต่อ Network ข้าม Cluster:
# เครื่องมือสำหรับ Multi-cluster Networking:

# 1. Cilium Cluster Mesh — เชื่อม Pod network ข้าม Cluster
cilium clustermesh enable
cilium clustermesh connect --destination-context cluster2

# 2. Submariner — เชื่อม Overlay network ข้าม Cluster
# สร้าง encrypted tunnel ระหว่าง Clusters
subctl deploy-broker
subctl join broker-info.subm --clusterid cluster1
subctl join broker-info.subm --clusterid cluster2

# 3. Istio Multi-cluster — Service Mesh ข้าม Cluster
# ใช้ Istio สร้าง Unified service mesh

# หลักการ:
# - Service ใน Cluster A สามารถเรียก Service ใน Cluster B ได้
# - DNS resolution ข้าม Cluster
# - Load balancing ข้าม Cluster
# - Failover ระหว่าง Cluster
Debugging Kubernetes Networking
เมื่อ Network มีปัญหาใน K8s ใช้เครื่องมือเหล่านี้ในการ Debug:
kubectl port-forward
# Forward port จาก Pod ไปยัง localhost
kubectl port-forward pod/api-abc123 8080:3000
# เข้าถึง: http://localhost:8080

# Forward จาก Service
kubectl port-forward svc/api-service 8080:80

# Forward จาก Deployment
kubectl port-forward deployment/api 8080:3000
kubectl exec — เข้าไปใน Pod
# เข้า Shell ใน Pod
kubectl exec -it api-abc123 -- /bin/sh

# ทดสอบ Connectivity
kubectl exec api-abc123 -- curl -s http://db-service:5432
kubectl exec api-abc123 -- nslookup api-service
kubectl exec api-abc123 -- wget -qO- http://web-service:80

# ใช้ Debug container (สำหรับ Distroless images)
kubectl debug -it api-abc123 --image=nicolaka/netshoot -- /bin/bash
# ใน netshoot มี: curl, dig, nslookup, tcpdump, iperf, mtr ฯลฯ
Network Debugging Tools
# ดู DNS resolution
kubectl exec dns-debug -- nslookup api-service.production.svc.cluster.local
kubectl exec dns-debug -- dig +short api-service.production.svc.cluster.local

# ดู Network traffic ด้วย tcpdump
kubectl exec -it api-abc123 -- tcpdump -i eth0 port 3000 -nn

# ทดสอบ Port connectivity
kubectl exec -it test-pod -- nc -zv api-service 80

# ดู Service endpoints
kubectl get endpoints api-service -o yaml

# ดู Network events
kubectl get events --field-selector reason=NetworkNotReady

# ดู kube-proxy logs
kubectl logs -n kube-system -l k8s-app=kube-proxy

# ดู CoreDNS logs
kubectl logs -n kube-system -l k8s-app=kube-dns

# ดู CNI plugin logs (ตัวอย่าง Calico)
kubectl logs -n calico-system -l k8s-app=calico-node
Common Networking Issues
# 1. Pod ไม่สามารถ Resolve DNS
#    - ตรวจสอบ CoreDNS pods running
kubectl get pods -n kube-system -l k8s-app=kube-dns
#    - ตรวจสอบ resolv.conf ใน Pod
kubectl exec pod-name -- cat /etc/resolv.conf

# 2. Service ไม่สามารถเข้าถึง Pods
#    - ตรวจสอบ Endpoints มี IP ไหม
kubectl get endpoints svc-name
#    - ตรวจสอบ Pod labels match กับ Service selector
kubectl get pods --show-labels

# 3. Ingress ไม่ทำงาน
#    - ตรวจสอบ Ingress Controller running
kubectl get pods -n ingress-nginx
#    - ดู Ingress events
kubectl describe ingress ingress-name
#    - ตรวจสอบ Service มี Endpoints

# 4. NetworkPolicy บล็อก Traffic
#    - ดู NetworkPolicies ที่ apply กับ Pod
kubectl get networkpolicies -n namespace
#    - ลอง Label selector ว่า match กับ Pod จริงไหม
Service Mesh Integration Points
Service Mesh เช่น Istio, Linkerd หรือ Cilium Mesh ทำงานร่วมกับ K8s Networking โดยเพิ่ม Features:
# Service Mesh เพิ่มสิ่งเหล่านี้ให้ K8s Networking:

# 1. mTLS — Mutual TLS ระหว่าง Pods (Encryption + Authentication)
# 2. Traffic Management — Canary, A/B testing, Circuit breaker
# 3. Observability — Request tracing, Metrics, Access logs
# 4. Retries & Timeouts — Automatic retry with backoff

# Istio + K8s Networking:
# - Istio Sidecar (Envoy) จับ Traffic ทั้งหมดของ Pod
# - ทำ mTLS อัตโนมัติ
# - Route traffic ตาม VirtualService rules
# - ส่ง Telemetry ไป Prometheus/Jaeger

# Cilium Service Mesh (No Sidecar):
# - ใช้ eBPF แทน Sidecar
# - ลด Resource overhead
# - Performance ดีกว่า Sidecar-based mesh
# - L7 observability ผ่าน Hubble
Best Practices สำหรับ K8s Networking
- ใช้ NetworkPolicy เสมอ — เริ่มจาก Deny All แล้วเปิดทีละอัน (Zero Trust)
- ใช้ Namespaces แยก Environment — production, staging, development แยกกัน
- เลือก CNI Plugin ที่เหมาะสม — Cilium สำหรับ Performance, Calico สำหรับ Enterprise
- ใช้ Gateway API แทน Ingress — สำหรับโปรเจกต์ใหม่ในปี 2026
- ตั้ง Resource Limits สำหรับ CoreDNS — ป้องกัน DNS ล่มเมื่อ Load สูง
- ใช้ cert-manager สำหรับ TLS — Auto-renew certificates
- Monitor Network Traffic — ใช้ Hubble, Prometheus หรือ Datadog
- ใช้ IPVS mode — สำหรับ Cluster ที่มี Services มากกว่า 1,000
- ทดสอบ NetworkPolicy — ใช้
kubectl execทดสอบ Connectivity หลังสร้าง Policy - Document Network Architecture — วาด Diagram แสดง Traffic Flow ของ Application
สรุป
Kubernetes Networking เป็นเรื่องที่กว้างและลึก แต่เมื่อเข้าใจหลักการพื้นฐาน ทุกอย่างจะเชื่อมโยงกัน เริ่มจาก Flat Network Model ที่ทุก Pod สื่อสารกันได้ ผ่าน Services ที่ให้ Stable Endpoint, CoreDNS ที่ทำ Service Discovery, Ingress และ Gateway API ที่รับ Traffic จากภายนอก จนถึง NetworkPolicies ที่เป็น Firewall ระดับ Pod
ในปี 2026 แนวโน้มสำคัญคือ Cilium eBPF ที่กำลังแทนที่ iptables, Gateway API ที่จะแทนที่ Ingress และ Sidecar-less Service Mesh ที่ลด Overhead เริ่มต้นด้วยการเข้าใจ Services และ DNS ก่อน แล้วค่อยขยายไปเรื่อง NetworkPolicy, Ingress และ CNI Plugins จะทำให้คุณเป็น K8s Networking Expert ได้อย่างมั่นใจ