ในโลกของ Infrastructure as Code (IaC) Terraform ครองตลาดมานานหลายปี แต่ในปี 2026 มีผู้ท้าชิงตัวใหม่ที่น่าสนใจ — Crossplane เครื่องมือที่ทำให้คุณสร้าง Cloud Infrastructure ผ่าน Kubernetes API ด้วยคำสั่ง kubectl apply เหมือนกับที่สร้าง Pod หรือ Deployment
Crossplane เปลี่ยนแนวคิดจาก "Infrastructure ที่ถูก Provision จากภายนอก" เป็น "Infrastructure ที่เป็น Kubernetes resources" ทำให้ทุกอย่างอยู่ใน K8s ecosystem เดียวกัน
Crossplane vs Terraform — เปรียบเทียบ
| Feature | Crossplane | Terraform |
|---|---|---|
| Paradigm | Kubernetes-native (Declarative, Reconciliation loop) | CLI-based (Plan → Apply → State) |
| State Management | etcd (K8s built-in) ไม่ต้องจัดการ State file | State file (S3, Terraform Cloud) ต้องจัดการเอง |
| Drift Detection | ตลอดเวลา (Reconciliation loop) | เมื่อรัน terraform plan เท่านั้น |
| Self-healing | ใช่ — ถ้าใครลบ Resource ข้างนอก Crossplane จะสร้างใหม่อัตโนมัติ | ไม่ — ต้องรัน terraform apply เอง |
| GitOps | Native กับ ArgoCD/Flux (เป็น K8s YAML) | ต้องใช้ Wrapper (Atlantis, Terraform Cloud) |
| Language | YAML (K8s manifests) | HCL (HashiCorp Configuration Language) |
| Learning curve | ง่ายถ้ารู้ K8s อยู่แล้ว | ต้องเรียน HCL ใหม่ |
| Community | กำลังเติบโต (CNCF Incubating) | ใหญ่มาก (Mature) |
| Best for | K8s-native teams, Platform engineering | ทุกทีม, Multi-tool environments |
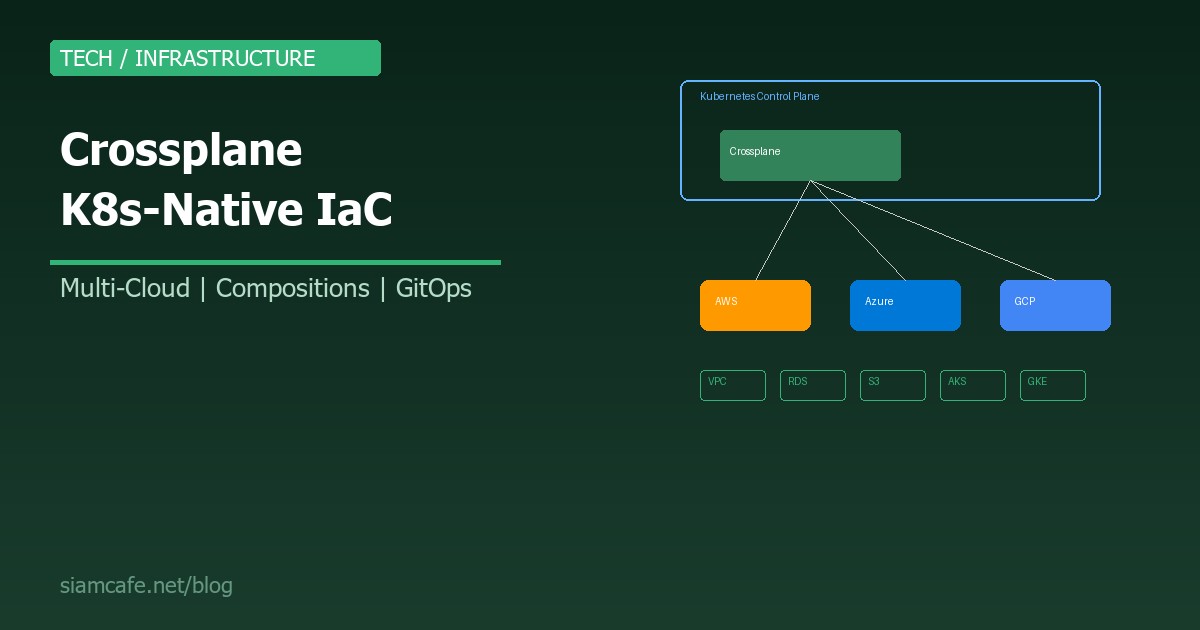
Crossplane Architecture
Crossplane ประกอบด้วย 4 Components หลัก:
| Component | คืออะไร | เปรียบเทียบกับ Terraform |
|---|---|---|
| Providers | Plugin ที่เชื่อมกับ Cloud (AWS, Azure, GCP, etc.) | เหมือน Terraform providers |
| Managed Resources | K8s resources ที่แทน Cloud resources จริง | เหมือน Terraform resources |
| Compositions | Template ที่รวมหลาย Managed Resources เข้าด้วยกัน | เหมือน Terraform modules |
| Claims (XRC) | Interface สำหรับ User ขอ Resources | เหมือน module block ใน Terraform |
# Architecture flow:
#
# Developer สร้าง Claim (XRC)
#        ↓
# Crossplane ดู CompositeResourceDefinition (XRD)
#        ↓
# Crossplane สร้าง Composite Resource (XR)
#        ↓
# Composition กำหนดว่าต้องสร้าง Managed Resources อะไรบ้าง
#        ↓
# Provider สร้าง Resources จริงบน Cloud
#        ↓
# Reconciliation loop ตรวจสอบตลอดเวลา
ติดตั้ง Crossplane บน Kubernetes
# 1. ติดตั้ง Crossplane ด้วย Helm
helm repo add crossplane-stable https://charts.crossplane.io/stable
helm repo update

helm install crossplane crossplane-stable/crossplane   --namespace crossplane-system   --create-namespace   --set args='--enable-composition-functions'

# 2. ตรวจสอบ
kubectl get pods -n crossplane-system
# NAME                                       READY   STATUS
# crossplane-xxxxx                           1/1     Running
# crossplane-rbac-manager-xxxxx              1/1     Running

# 3. ติดตั้ง Crossplane CLI (optional)
curl -sL https://raw.githubusercontent.com/crossplane/crossplane/master/install.sh | sh
sudo mv crossplane /usr/local/bin/
AWS Provider — สร้าง Cloud Resources จาก K8s
# 1. ติดตั้ง AWS Provider
apiVersion: pkg.crossplane.io/v1
kind: Provider
metadata:
  name: provider-aws
spec:
  package: xpkg.upbound.io/upbound/provider-aws-ec2:v1.2.0
  # แยก Provider ตาม Service: provider-aws-ec2, provider-aws-rds, provider-aws-s3, etc.

---
# 2. Configure AWS Credentials
# สร้าง Secret ที่มี AWS credentials
kubectl create secret generic aws-creds   -n crossplane-system   --from-file=creds=./aws-credentials.txt

# aws-credentials.txt format:
# [default]
# aws_access_key_id = AKIAIOSFODNN7EXAMPLE
# aws_secret_access_key = wJalrXUtnFEMI/K7MDENG/bPxRfiCYEXAMPLEKEY

---
# 3. ProviderConfig — บอก Provider ว่าใช้ Credentials ไหน
apiVersion: aws.upbound.io/v1beta1
kind: ProviderConfig
metadata:
  name: default
spec:
  credentials:
    source: Secret
    secretRef:
      namespace: crossplane-system
      name: aws-creds
      key: creds
สร้าง VPC ด้วย kubectl
# สร้าง VPC — เหมือนสร้าง Pod!
apiVersion: ec2.aws.upbound.io/v1beta1
kind: VPC
metadata:
  name: my-production-vpc
spec:
  forProvider:
    region: ap-southeast-1
    cidrBlock: "10.0.0.0/16"
    enableDnsSupport: true
    enableDnsHostnames: true
    tags:
      Name: production-vpc
      Environment: production
      ManagedBy: crossplane

# kubectl apply -f vpc.yaml
# kubectl get vpc
# NAME                 READY   SYNCED   EXTERNAL-NAME          AGE
# my-production-vpc    True    True     vpc-0abc123def456      5m

# Crossplane จะ:
# 1. สร้าง VPC จริงบน AWS
# 2. เก็บ State ใน etcd (ไม่ต้องมี state file)
# 3. ตรวจสอบทุก 1-10 นาที ว่า VPC ยังอยู่ถูกต้อง
# 4. ถ้าใครลบ VPC บน AWS Console → Crossplane จะสร้างใหม่!
สร้าง S3 Bucket + RDS
# S3 Bucket
apiVersion: s3.aws.upbound.io/v1beta1
kind: Bucket
metadata:
  name: my-app-storage
spec:
  forProvider:
    region: ap-southeast-1
    tags:
      Environment: production

---
# RDS Instance
apiVersion: rds.aws.upbound.io/v1beta1
kind: Instance
metadata:
  name: my-app-database
spec:
  forProvider:
    region: ap-southeast-1
    instanceClass: db.t3.medium
    engine: postgres
    engineVersion: "15"
    allocatedStorage: 50
    dbName: myapp
    masterUsername: admin
    masterPasswordSecretRef:
      name: db-password
      namespace: default
      key: password
    skipFinalSnapshot: true
    publiclyAccessible: false
    vpcSecurityGroupIdRefs:
      - name: my-db-sg
    dbSubnetGroupNameRef:
      name: my-db-subnet-group
Compositions — สร้าง Platform API
Composition คือ "แม่พิมพ์" ที่กำหนดว่า เมื่อ Developer ขอ Resource แบบนี้ Crossplane จะสร้างอะไรบ้างบน Cloud เหมือน Terraform Module แต่อยู่ใน K8s:
# 1. CompositeResourceDefinition (XRD) — กำหนด Schema
apiVersion: apiextensions.crossplane.io/v1
kind: CompositeResourceDefinition
metadata:
  name: xdatabases.platform.company.com
spec:
  group: platform.company.com
  names:
    kind: XDatabase
    plural: xdatabases
  claimNames:
    kind: Database
    plural: databases
  versions:
    - name: v1alpha1
      served: true
      referenceable: true
      schema:
        openAPIV3Schema:
          type: object
          properties:
            spec:
              type: object
              properties:
                parameters:
                  type: object
                  properties:
                    size:
                      type: string
                      enum: ["small", "medium", "large"]
                      description: "Database size"
                    engine:
                      type: string
                      enum: ["postgres", "mysql"]
                      default: "postgres"
                    region:
                      type: string
                      default: "ap-southeast-1"
                  required:
                    - size

---
# 2. Composition — กำหนดว่า "small" "medium" "large" สร้างอะไร
apiVersion: apiextensions.crossplane.io/v1
kind: Composition
metadata:
  name: database-aws
  labels:
    provider: aws
spec:
  compositeTypeRef:
    apiVersion: platform.company.com/v1alpha1
    kind: XDatabase
  resources:
    - name: rds-instance
      base:
        apiVersion: rds.aws.upbound.io/v1beta1
        kind: Instance
        spec:
          forProvider:
            region: ap-southeast-1
            engine: postgres
            engineVersion: "15"
            skipFinalSnapshot: true
            publiclyAccessible: false
      patches:
        # Map "size" parameter to RDS instance class
        - type: FromCompositeFieldPath
          fromFieldPath: "spec.parameters.size"
          toFieldPath: "spec.forProvider.instanceClass"
          transforms:
            - type: map
              map:
                small: db.t3.micro
                medium: db.t3.medium
                large: db.r6g.xlarge
        - type: FromCompositeFieldPath
          fromFieldPath: "spec.parameters.size"
          toFieldPath: "spec.forProvider.allocatedStorage"
          transforms:
            - type: map
              map:
                small: 20
                medium: 100
                large: 500
        - type: FromCompositeFieldPath
          fromFieldPath: "spec.parameters.engine"
          toFieldPath: "spec.forProvider.engine"
        - type: FromCompositeFieldPath
          fromFieldPath: "spec.parameters.region"
          toFieldPath: "spec.forProvider.region"

    - name: security-group
      base:
        apiVersion: ec2.aws.upbound.io/v1beta1
        kind: SecurityGroup
        spec:
          forProvider:
            region: ap-southeast-1
            description: "Database security group"
      patches:
        - type: FromCompositeFieldPath
          fromFieldPath: "spec.parameters.region"
          toFieldPath: "spec.forProvider.region"
Developer ใช้ Claim — ขอ Database ง่ายๆ
# 3. Claim (XRC) — Developer แค่บอกว่าต้องการอะไร
apiVersion: platform.company.com/v1alpha1
kind: Database
metadata:
  name: my-app-db
  namespace: team-alpha
spec:
  parameters:
    size: medium
    engine: postgres
    region: ap-southeast-1

# kubectl apply -f database-claim.yaml
# แค่นี้! Developer ไม่ต้องรู้ว่า RDS Instance class คืออะไร
# ไม่ต้องรู้ว่า Security group ต้อง Configure อย่างไร
# แค่บอก "ขอ Database size medium engine postgres" จบ!Crossplane + ArgoCD — GitOps for Infrastructure
เพราะ Crossplane resources คือ K8s YAML จึงเชื่อมกับ ArgoCD ได้ทันที ไม่ต้องมี Wrapper:
# ArgoCD Application สำหรับ Infrastructure
apiVersion: argoproj.io/v1alpha1
kind: Application
metadata:
  name: infrastructure
  namespace: argocd
spec:
  project: default
  source:
    repoURL: https://github.com/myorg/infrastructure.git
    targetRevision: main
    path: crossplane/production
  destination:
    server: https://kubernetes.default.svc
    namespace: crossplane-system
  syncPolicy:
    automated:
      prune: true
      selfHeal: true
    syncOptions:
      - CreateNamespace=true

# Flow:
# 1. Developer push YAML to Git
# 2. ArgoCD detects change
# 3. ArgoCD syncs to K8s
# 4. Crossplane creates/updates Cloud resources
# 5. Crossplane reconciles continuously
#
# Full GitOps: Git → ArgoCD → Crossplane → Cloud
# ไม่มี terraform apply ไม่มี state file ไม่มี CI pipeline สำหรับ Terraform
Azure & GCP Providers
# Azure Provider
apiVersion: pkg.crossplane.io/v1
kind: Provider
metadata:
  name: provider-azure
spec:
  package: xpkg.upbound.io/upbound/provider-azure-network:v1.0.0

---
# สร้าง Azure Resource Group
apiVersion: azure.upbound.io/v1beta1
kind: ResourceGroup
metadata:
  name: my-rg
spec:
  forProvider:
    location: Southeast Asia

---
# GCP Provider
apiVersion: pkg.crossplane.io/v1
kind: Provider
metadata:
  name: provider-gcp
spec:
  package: xpkg.upbound.io/upbound/provider-gcp-compute:v1.0.0

---
# สร้าง GCP Network
apiVersion: compute.gcp.upbound.io/v1beta1
kind: Network
metadata:
  name: my-gcp-network
spec:
  forProvider:
    autoCreateSubnetworks: false
    project: my-gcp-project
Environment Configs — Multi-environment
# EnvironmentConfig — กำหนดค่าตาม Environment
apiVersion: apiextensions.crossplane.io/v1alpha1
kind: EnvironmentConfig
metadata:
  name: production
  labels:
    environment: production
data:
  region: ap-southeast-1
  vpcCidr: "10.0.0.0/16"
  instanceSize: large
  multiAz: true

---
apiVersion: apiextensions.crossplane.io/v1alpha1
kind: EnvironmentConfig
metadata:
  name: staging
  labels:
    environment: staging
data:
  region: ap-southeast-1
  vpcCidr: "10.1.0.0/16"
  instanceSize: small
  multiAz: false

# Composition สามารถ Patch จาก EnvironmentConfig ได้
# ทำให้ Composition เดียวใช้ได้ทุก Environment
เมื่อไหร่ควรใช้ Crossplane แทน Terraform?
| สถานการณ์ | ใช้ Crossplane | ใช้ Terraform |
|---|---|---|
| ทีมใช้ K8s เป็นหลัก | ใช่ — ทุกอย่างเป็น K8s YAML | |
| ต้องการ Self-healing Infrastructure | ใช่ — Reconciliation loop | |
| Platform engineering (Self-service portal) | ใช่ — Claims + Compositions | |
| GitOps-first (ArgoCD/Flux) | ใช่ — Native K8s resources | |
| ทีมไม่ใช้ K8s | ใช่ — ไม่ต้องมี K8s cluster | |
| Legacy infrastructure | ใช่ — Provider support กว้างกว่า | |
| Simple infrastructure | ใช่ — ง่ายกว่า ไม่ต้อง Setup K8s | |
| Multi-tool environment | ใช่ — ใช้ได้ Standalone |
Limitations ของ Crossplane
- ต้องมี K8s cluster: Crossplane ทำงานบน K8s ถ้าไม่มี K8s ใช้ไม่ได้ (Terraform ทำงาน Standalone)
- Provider support น้อยกว่า: Terraform มี Provider มากกว่า 3,000 ตัว Crossplane ยังตามหลัง (แม้จะเพิ่มขึ้นเร็ว)
- Learning curve สำหรับ Non-K8s teams: ถ้าทีมไม่คุ้นเคย K8s จะยากกว่า Terraform มาก
- Debugging ยากกว่า: Error messages อาจไม่ชัดเจน ต้อง
kubectl describeดูหลาย Layer - YAML verbosity: Compositions + XRDs อาจยาวมากสำหรับ Complex infrastructure
Migration จาก Terraform ไป Crossplane
# ขั้นตอน Migration:
# 1. ติดตั้ง Crossplane + Providers บน K8s cluster
# 2. Import resources ที่มีอยู่ (ทีละตัว)
#    - Crossplane มี "Observe Only" mode
#    - สร้าง Managed Resource ที่ชี้ไป External resource ที่มีอยู่

# ตัวอย่าง: Import VPC ที่มีอยู่
apiVersion: ec2.aws.upbound.io/v1beta1
kind: VPC
metadata:
  name: existing-vpc
  annotations:
    crossplane.io/external-name: vpc-0abc123def456  # VPC ID ที่มีอยู่
spec:
  forProvider:
    region: ap-southeast-1
    cidrBlock: "10.0.0.0/16"
  # managementPolicies: ["Observe"]  # Observe only, don't modify

# 3. ทดสอบว่า Crossplane Sync ถูกต้อง
# 4. เปลี่ยน managementPolicies เป็น full management
# 5. ลบ Terraform state สำหรับ Resources ที่ Migrate แล้ว
# 6. ทำทีละ Resource group อย่ารีบ
สรุป
Crossplane เป็น Game changer สำหรับทีมที่ใช้ Kubernetes เป็นศูนย์กลาง แทนที่จะต้องสลับไปมาระหว่าง kubectl กับ terraform CLI ทุกอย่างอยู่ใน K8s เดียวกัน สร้าง Pod ก็ kubectl apply สร้าง RDS ก็ kubectl apply เหมือนกัน
แต่ Crossplane ไม่ได้เหมาะกับทุกทีม ถ้าไม่ใช้ K8s Terraform ยังเป็นตัวเลือกที่ดีกว่า สิ่งสำคัญคือเลือกเครื่องมือที่เหมาะกับ Context ของทีม ไม่ใช่เลือกเพราะ "ใหม่" หรือ "เท่"
ถ้าสนใจ เริ่มจากติดตั้ง Crossplane บน Lab cluster สร้าง S3 Bucket สักตัว แล้วลองลบ Bucket ผ่าน AWS Console แล้วดูว่า Crossplane สร้างกลับมาให้อัตโนมัติ — นั่นคือพลังของ Reconciliation loop ที่ Terraform ไม่มี