ClickHouse Analytics กับ SSL/TLS Certificate —
ClickHouse คืออะไร
ClickHouse เป็น Open-source Columnar Database Management System ที่พัฒนาโดย Yandex ออกแบบมาสำหรับ Online Analytical Processing (OLAP) โดยเฉพาะ จุดเด่นคือ Query ข้อมูลหลายพันล้านแถวได้ภายในวินาที รองรับ SQL เต็มรูปแบบ มี Compression ที่ดีเยี่ยม และ Scale ได้ทั้ง Vertical และ Horizontal
เมื่อ ClickHouse ถูกใช้ในระบบ Production ที่มีข้อมูลสำคัญ การเข้ารหัสการสื่อสารด้วย SSL/TLS เป็นสิ่งจำเป็น เพื่อป้องกันการดักจับข้อมูลระหว่าง Client และ Server โดยเฉพาะเมื่อ ClickHouse อยู่บน Cloud หรือเข้าถึงผ่าน Internet
การสร้าง SSL Certificate
# วิธีที่ 1: สร้าง Self-signed Certificate สำหรับ Development

# สร้าง CA Certificate

openssl req -x509 -newkey rsa:4096 -days 3650 \

  -keyout ca-key.pem -out ca-cert.pem \

  -subj "/C=TH/ST=Bangkok/O=MyCompany/CN=ClickHouse-CA" \

  -nodes


# สร้าง Server Certificate

openssl req -newkey rsa:4096 \

  -keyout server-key.pem -out server-req.pem \

  -subj "/C=TH/ST=Bangkok/O=MyCompany/CN=clickhouse.company.com" \

  -nodes


# Sign Server Certificate ด้วย CA

cat > server-ext.cnf << EOF

subjectAltName = DNS:clickhouse.company.com,DNS:localhost,IP:127.0.0.1,IP:10.0.1.10

EOF


openssl x509 -req -in server-req.pem \

  -CA ca-cert.pem -CAkey ca-key.pem -CAcreateserial \

  -out server-cert.pem -days 365 \

  -extfile server-ext.cnf


# สร้าง Client Certificate (สำหรับ Mutual TLS)

openssl req -newkey rsa:4096 \

  -keyout client-key.pem -out client-req.pem \

  -subj "/C=TH/ST=Bangkok/O=MyCompany/CN=clickhouse-client" \

  -nodes


openssl x509 -req -in client-req.pem \

  -CA ca-cert.pem -CAkey ca-key.pem -CAcreateserial \

  -out client-cert.pem -days 365


# ตรวจสอบ Certificate

openssl x509 -in server-cert.pem -noout -text | head -30

openssl verify -CAfile ca-cert.pem server-cert.pem

openssl verify -CAfile ca-cert.pem client-cert.pem


# ตั้ง Permissions

chmod 600 *-key.pem

chmod 644 *-cert.pem

chown clickhouse:clickhouse server-*.pem ca-cert.pem


# วิธีที่ 2: ใช้ Let's Encrypt สำหรับ Production

sudo apt install certbot

sudo certbot certonly --standalone -d clickhouse.company.com


# Copy Certificate ไปที่ ClickHouse

sudo cp /etc/letsencrypt/live/clickhouse.company.com/fullchain.pem \

  /etc/clickhouse-server/ssl/server-cert.pem

sudo cp /etc/letsencrypt/live/clickhouse.company.com/privkey.pem \

  /etc/clickhouse-server/ssl/server-key.pem

sudo chown clickhouse:clickhouse /etc/clickhouse-server/ssl/*
การตั้งค่า ClickHouse Server กับ SSL/TLS
<!-- /etc/clickhouse-server/config.d/ssl.xml -->

<clickhouse>

    <!-- HTTPS Interface (แทน HTTP) -->

    <https_port>8443</https_port>


    <!-- Native Protocol กับ TLS -->

    <tcp_port_secure>9440</tcp_port_secure>


    <!-- ปิด Unencrypted Ports (Production) -->

    <!-- <http_port>8123</http_port> -->

    <!-- <tcp_port>9000</tcp_port> -->


    <!-- Interserver HTTPS (สำหรับ Cluster Replication) -->

    <interserver_https_port>9010</interserver_https_port>


    <openSSL>

        <server>

            <certificateFile>/etc/clickhouse-server/ssl/server-cert.pem</certificateFile>

            <privateKeyFile>/etc/clickhouse-server/ssl/server-key.pem</privateKeyFile>

            <caConfig>/etc/clickhouse-server/ssl/ca-cert.pem</caConfig>

            <verificationMode>relaxed</verificationMode>

            <loadDefaultCAFile>true</loadDefaultCAFile>

            <cacheSessions>true</cacheSessions>

            <disableProtocols>sslv2, sslv3, tlsv1, tlsv1_1</disableProtocols>

            <preferServerCiphers>true</preferServerCiphers>

            <cipherList>ECDHE-ECDSA-AES256-GCM-SHA384:ECDHE-RSA-AES256-GCM-SHA384:ECDHE-ECDSA-AES128-GCM-SHA256</cipherList>

        </server>

        <client>

            <loadDefaultCAFile>true</loadDefaultCAFile>

            <caConfig>/etc/clickhouse-server/ssl/ca-cert.pem</caConfig>

            <cacheSessions>true</cacheSessions>

            <disableProtocols>sslv2, sslv3, tlsv1, tlsv1_1</disableProtocols>

        </client>

    </openSSL>


    <!-- gRPC กับ TLS -->

    <grpc>

        <enable_ssl>true</enable_ssl>

        <ssl_cert_file>/etc/clickhouse-server/ssl/server-cert.pem</ssl_cert_file>

        <ssl_key_file>/etc/clickhouse-server/ssl/server-key.pem</ssl_key_file>

        <ssl_require_client_auth>false</ssl_require_client_auth>

    </grpc>

</clickhouse>


---

# Restart ClickHouse

sudo systemctl restart clickhouse-server


# ตรวจสอบว่า SSL ทำงาน

curl -k https://localhost:8443/ --user default:password

# Ok.


# ตรวจสอบ TLS Version

openssl s_client -connect localhost:8443 -tls1_3 < /dev/null 2>&1 | grep -E "Protocol|Cipher"

# Protocol  : TLSv1.3

# Cipher    : TLS_AES_256_GCM_SHA384


# ตรวจสอบ Certificate Details

echo | openssl s_client -connect localhost:8443 2>/dev/null | openssl x509 -noout -dates

# notBefore=Mar  1 00:00:00 2026 GMT

# notAfter=Mar  1 00:00:00 2027 GMT
การเชื่อมต่อ Client กับ SSL
# 1. clickhouse-client CLI
clickhouse-client \
--host clickhouse.company.com \
--port 9440 \
--secure \
--user default \
--password 'your_password'
# 2. Python clickhouse-driver
from clickhouse_driver import Client
client = Client(
host="clickhouse.company.com",
port=9440,
user="default",
password="your_password",
secure=True,
verify=True,
ssl_options={
"ca_certs": "/path/to/ca-cert.pem",
# สำหรับ Mutual TLS:
# "certfile": "/path/to/client-cert.pem",
# "keyfile": "/path/to/client-key.pem",
},
)
result = client.execute("SELECT version(), uptime()")
print(f"Version: {result[0][0]}, Uptime: {result[0][1]}s")
# Query Analytics
result = client.execute("""
SELECT
toDate(timestamp) AS day,
count() AS events,
uniq(user_id) AS unique_users,
avg(duration_ms) AS avg_duration
FROM events
WHERE timestamp >= today() - 30
GROUP BY day
ORDER BY day
""")
for row in result:
print(f"{row[0]}: {row[1]:,} events, {row[2]:,} users, {row[3]:.0f}ms avg")
# 3. Python clickhouse-connect (HTTP/HTTPS)
import clickhouse_connect
client = clickhouse_connect.get_client(
host="clickhouse.company.com",
port=8443,
username="default",
password="your_password",
secure=True,
verify=True,
ca_cert="/path/to/ca-cert.pem",
)
df = client.query_df("""
SELECT * FROM system.metrics
WHERE metric LIKE '%Connection%'
""")
print(df)
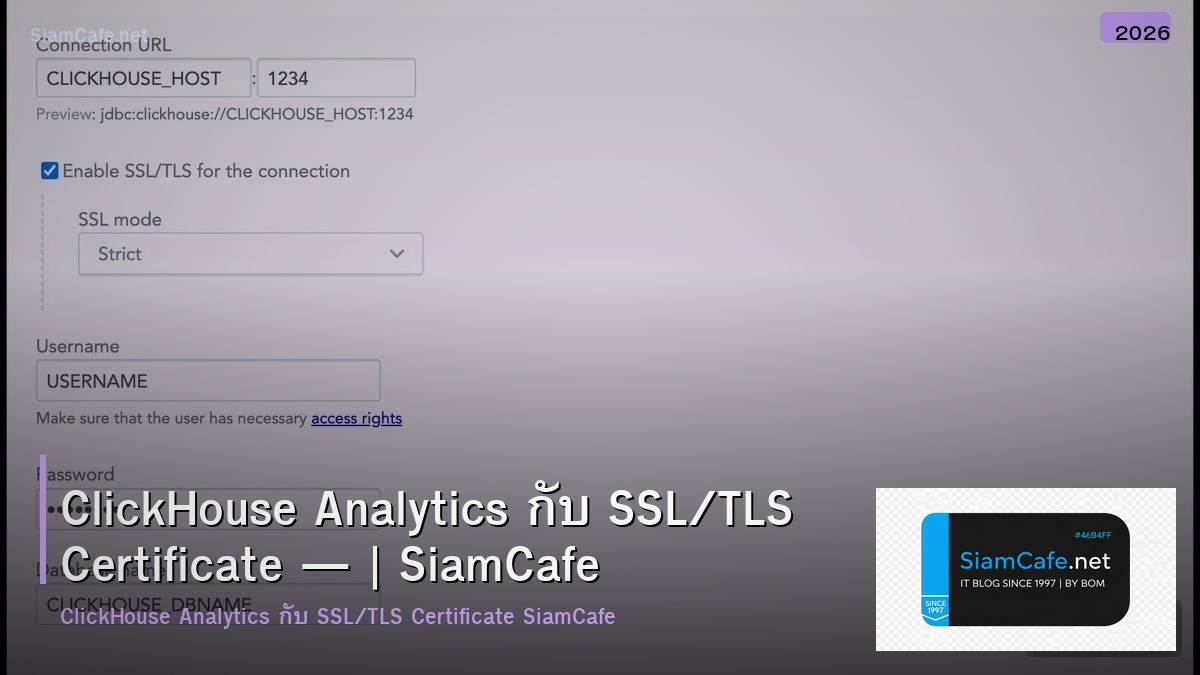
# 4. DBeaver / DataGrip Connection
# JDBC URL: jdbc:clickhouse://clickhouse.company.com:8443/default?ssl=true&sslmode=strictCertificate Rotation อัตโนมัติ
#!/bin/bash

# rotate-clickhouse-cert.sh — Renew และ Rotate Certificate อัตโนมัติ


set -euo pipefail


CERT_DIR="/etc/clickhouse-server/ssl"

DOMAIN="clickhouse.company.com"

LOG_FILE="/var/log/clickhouse-cert-rotate.log"


log() {

    echo "[$(date '+%Y-%m-%d %H:%M:%S')] $1" | tee -a "$LOG_FILE"

}


# 1. Renew Let's Encrypt Certificate

log "Renewing certificate for $DOMAIN..."

certbot renew --quiet --deploy-hook "echo 'Certificate renewed'" 2>&1 | tee -a "$LOG_FILE"


# 2. Copy Certificate ใหม่

LETSENCRYPT_DIR="/etc/letsencrypt/live/$DOMAIN"

if [ -f "$LETSENCRYPT_DIR/fullchain.pem" ]; then

    # Backup Certificate เก่า

    cp "$CERT_DIR/server-cert.pem" "$CERT_DIR/server-cert.pem.bak"

    cp "$CERT_DIR/server-key.pem" "$CERT_DIR/server-key.pem.bak"


    # Copy Certificate ใหม่

    cp "$LETSENCRYPT_DIR/fullchain.pem" "$CERT_DIR/server-cert.pem"

    cp "$LETSENCRYPT_DIR/privkey.pem" "$CERT_DIR/server-key.pem"

    chown clickhouse:clickhouse "$CERT_DIR"/*

    chmod 600 "$CERT_DIR/server-key.pem"


    log "Certificate files updated"

fi


# 3. Verify Certificate ใหม่

if openssl verify -CAfile "$CERT_DIR/ca-cert.pem" "$CERT_DIR/server-cert.pem" 2>/dev/null; then

    log "Certificate verification: OK"

else

    log "ERROR: Certificate verification failed! Rolling back..."

    cp "$CERT_DIR/server-cert.pem.bak" "$CERT_DIR/server-cert.pem"

    cp "$CERT_DIR/server-key.pem.bak" "$CERT_DIR/server-key.pem"

    exit 1

fi


# 4. ตรวจสอบ Expiry Date

EXPIRY=$(openssl x509 -in "$CERT_DIR/server-cert.pem" -noout -enddate | cut -d= -f2)

log "New certificate expires: $EXPIRY"


# 5. Reload ClickHouse Config (ไม่ต้อง Restart)

clickhouse-client --query "SYSTEM RELOAD CONFIG" 2>&1 | tee -a "$LOG_FILE"

log "ClickHouse config reloaded"


# 6. ตรวจสอบว่า SSL ทำงาน

if curl -sk https://localhost:8443/ --max-time 5 | grep -q "Ok"; then

    log "SSL connection test: PASSED"

else

    log "ERROR: SSL connection test FAILED!"

    exit 1

fi


log "Certificate rotation completed successfully"


---

# ตั้ง Cron ให้รันทุกวัน

# 0 3 * * * /opt/scripts/rotate-clickhouse-cert.sh
Security Best Practices สำหรับ ClickHouse

- ปิด Unencrypted Ports: Comment out http_port (8123) และ tcp_port (9000) ใช้เฉพาะ https_port (8443) และ tcp_port_secure (9440)
- ใช้ TLS 1.3: ปิด Protocol เก่าทั้งหมด (SSLv2, SSLv3, TLS 1.0, TLS 1.1) ใช้เฉพาะ TLS 1.2+ หรือ 1.3
- Mutual TLS: สำหรับ Service-to-Service Communication ใช้ Client Certificate เพื่อ Authenticate ทั้งสองฝั่ง
- Certificate Rotation: ตั้ง Auto-renewal ด้วย Certbot และ Reload Config อัตโนมัติ
- Network Isolation: ใช้ Firewall จำกัด IP ที่เข้าถึง ClickHouse ได้ อยู่ใน Private Network เท่านั้น
- RBAC: สร้าง User แยกตาม Role กำหนด Permission เฉพาะ Database/Table ที่จำเป็น
- Audit Log: เปิด Query Log และ Session Log เพื่อ Track ว่าใครเข้าถึงอะไร
- Monitor Certificate Expiry: ตั้ง Alert แจ้งเตือน 30 วันก่อน Certificate หมดอายุ
แนวทางป้องกันภัยไซเบอร์สำหรับองค์กรไทย
ภัยคุกคามทางไซเบอร์ในปี 2026 มีความซับซ้อนมากขึ้น Ransomware ยังคงเป็นภัยอันดับหนึ่ง โดยผู้โจมตีใช้ AI ช่วยสร้าง Phishing Email ที่แนบเนียนขึ้น องค์กรควรมี Multi-Layered Security ตั้งแต่ Perimeter Defense ด้วย Next-Gen Firewall Endpoint Protection ด้วย EDR Solution และ Network Detection and Response
เนื้อหาเกี่ยวข้อง — ทำความเข้าใจ Go Fiber Message Queue Design
การฝึกอบรมพนักงานเป็นสิ่งสำคัญที่สุด เพราะ Human Error เป็นสาเหตุหลักของการรั่วไหลข้อมูล ควรจัด Security Awareness Training อย่างน้อยไตรมาสละครั้ง ทำ Phishing Simulation ทดสอบพนักงาน และมี Incident Response Plan ที่ชัดเจน ฝึกซ้อมเป็นประจำ
แนะนำเพิ่มเติม — เรียนเทรดกับ iCafeForex
สำหรับกฎหมาย PDPA ของไทย องค์กรต้องมี Data Protection Officer แจ้งวัตถุประสงค์การเก็บข้อมูลอย่างชัดเจน ขอ Consent ก่อนใช้ข้อมูลส่วนบุคคล มีมาตรการรักษาความปลอดภัยที่เหมาะสม และแจ้งเหตุ Data Breach ภายใน 72 ชั่วโมง
เนื้อหาเกี่ยวข้อง — อ่านต่อ: Wireguard VPN Identity Access Management
ClickHouse คืออะไรและใช้ทำอะไร
ClickHouse เป็น Open-source Columnar Database สำหรับ Real-time Analytics Query ข้อมูลหลายพันล้านแถวได้ภายในวินาที เหมาะกับ Log Analytics, Business Intelligence, Time-series Data ใช้โดยบริษัทระดับโลกเช่น Cloudflare, Uber, eBay
ทำไมต้องตั้งค่า SSL/TLS สำหรับ ClickHouse
เพื่อเข้ารหัสข้อมูลระหว่าง Client กับ Server ป้องกัน Man-in-the-Middle Attack ป้องกันการดักจับ Query และ Data ผ่าน Network และเป็นข้อกำหนดของ Compliance Standards เช่น PCI-DSS, HIPAA, SOC2 ที่กำหนดให้ Data in Transit ต้องเข้ารหัส
แนะนำเพิ่มเติม — SiamCafeBook
เนื้อหาเกี่ยวข้อง — บทความที่เกี่ยวข้อง: Elasticsearch Aggregation Metric Collection
ใช้ Certificate แบบไหนสำหรับ ClickHouse
Production ใช้ Certificate จาก CA เช่น Let's Encrypt (ฟรี) หรือ Internal CA ขององค์กร Development ใช้ Self-signed Certificate ได้ ClickHouse รองรับ PEM Format ต้องมี Certificate File, Private Key File และ CA Certificate File
วิธี Rotate Certificate โดยไม่ต้อง Restart ClickHouse ทำอย่างไร
ClickHouse ตั้งแต่ version 22.8 รองรับ Dynamic Certificate Reload ใช้ SYSTEM RELOAD CONFIG command หรือตั้ง certificateReloadInterval ใน config.xml เขียน Script ที่ Renew Certificate, Copy ไฟล์ใหม่, Verify แล้ว Reload Config อัตโนมัติผ่าน Cron
เนื้อหาเกี่ยวข้อง — ดูเพิ่มเติมเรื่อง Java Spring Security Stream Processing
สรุปและแนวทางปฏิบัติ
การตั้งค่า SSL/TLS สำหรับ ClickHouse เป็นสิ่งจำเป็นสำหรับระบบ Production เพื่อเข้ารหัส Data in Transit และผ่าน Compliance Standards เริ่มจากสร้าง Certificate ด้วย Let's Encrypt หรือ Internal CA, Config ClickHouse ให้ใช้ HTTPS (8443) และ Secure Native Protocol (9440), ปิด Unencrypted Ports, ใช้ TLS 1.2+ เท่านั้น และตั้ง Certificate Rotation อัตโนมัติด้วย Script + Cron รวมกับ RBAC, Network Isolation และ Audit Log เพื่อ Security ที่ครอบคลุม